❌

Reading view

How to trim and wire larix bonsai

As you may have noticed, I like Larch, and I like working on them in the middle of winter. It is one of the species which I regularly buy and style, to eventually sell off again. I often come across larches which, with a little wire and pruning, can be made even more impact full. A good reason to explain a little how I go about styling larches

About growing Larch as bonsai

First and foremost: For Japanese and European Larch it is important to realize that there is no back budding. The living buds that are there, is what you have to work with. Very seldom do buds pop up on older branches so whenever working with Larch, ensure you do not accidentally break off buds, or trim branches beyond the last bud (If you want to keep a branch there). The buds in Larch are somewhat special: In spring the buds can grow a single rosette of needles, or can become an extending branch. Old larches often have many non-extending buds. By trimming old branches back one can trigger these into extending.

Larch branch before cleanup & wiring

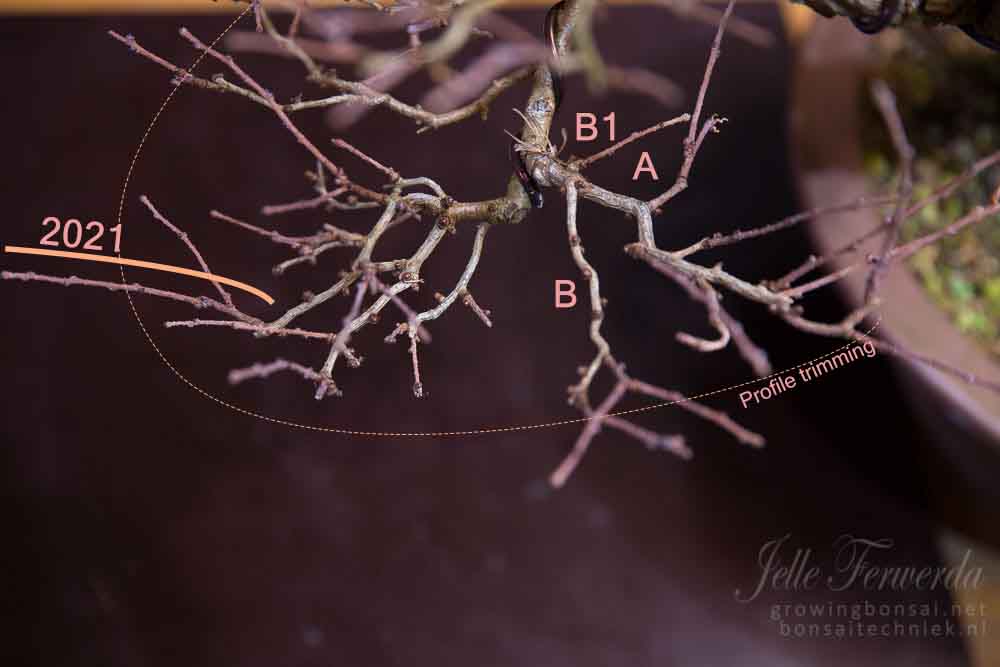
Let’s take a look at this lower branch. It was last wired 2 years ago. There is still a supporting wire around the main branch, ensuring it sets properly in shape. That wire was replaced in winter 2020/2021 as the original wire was being enveloped by the thickening branch. Over summer, the extending your growth has been pruned to encourage sire-branches. The thin brown branches are all growth from this year (See annotated 2021 growth). The more greyish branches are older. Pruning back the new branches to the branch profile, leaving roughly 2 new buds on each branch results in a perfectly fine pad.

A side-view

  • Larch bonsai side branch growing inwards
    Larch bonsai side branch growing inwards
  • Larch bonsai branch development
    Larch bonsai branch development
  • Larch bonsai branch development
    Larch bonsai branch development

Looking from the optimal viewing angle at the tree, one branch seems to grow towards the trunk. This is branch β€œA” in the annotated image. If we were to remove this, we can wire branch β€œB” down and create a pleasant continuation of the flow of the main branch. Branch β€œB” has a small side-branch β€œB1”, grown in 2021, which I will keep around so that in future work we can trim back to this. For now, it helps to fill the profile.

Some fine pruning of larch bonsai

Larch bonsai remove triplets

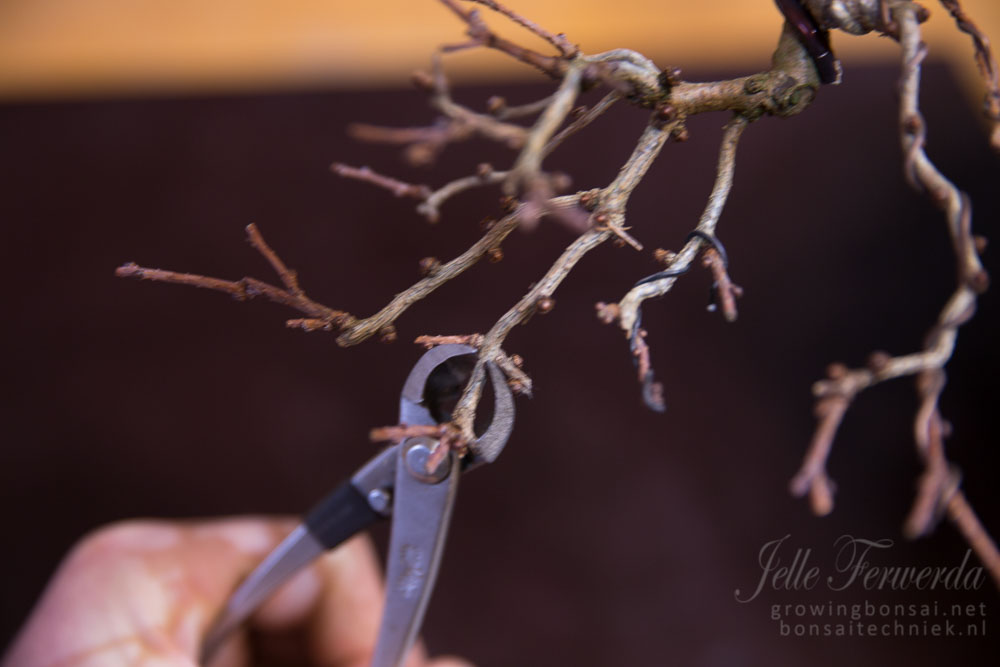
Next, I look through the branch I am working on, and search for all spots where more than 2 branches emerge at junctions, and reduce each junction to two. Here I focus on taper (Removing the thicker over the thinner branches) and internode distance (Tighter internodes are better). Later on, if only trimming this years’ growth is no longer sufficient to reduce the width of the tree, cut-backs will occur into older wood, where a side-branch becomes a main branch.

Wiring a larch bonsai

  • Larch bonsai branch laid out
    Larch bonsai branch laid out
  • Larch bonsai branch laid out
    Larch bonsai branch laid out

After the pruning and selecting of branches, it is time to wire. When building the basic canopy, I wire all young branches every 1-2 years. The reason is that the new growth is usually quite straight. All branches grow in their own space yet do not form a consistent pattern. After wiring, I try to horizontally place each branchlet in its own space, with limited direct overlap on branches short below. This to reduce shading out of the buds one level below. At the same time, in the vertical plane, I like to position young branches by first wiring them up a little, off the main branch plane, and then parallel to the main branch line, creating, seen from the optimal front, a puffed-up branch pad.

This article is part of the series of manuals with techniques for bonsai development

The post How to trim and wire larix bonsai appeared first on Growing Bonsai.

  •  

Grafting Juniper Bonsai

In some cases, one would like to adjust the foliage on a juniper. The original foliage of the species might be very loose, or prone to diseases. In that case, grafting better suited foliage might be an option. Naturally, it is also a route to get branches at places where there are none.

Grafting in a process in which you take a part of one plant, and combine it with another. This works only when combining plants of very closely related species. In general, most junipers can be grafted on other junipers for instance. But not on pines.

The process works by allowing the cambium layers of the donor and recipient plant connect to each other, and over time create shared wood and bark.

Tools

For grafting, you need a few basic tools:

  • Grafting tape
  • A sharp knife
  • A pair of scissors
  • Some wires
  • A donor plant
  • A recipient plant.

Grafting steps

  • First of all, you need to pre-stretch the grafting tape. Doing this will ensure that the tape can attach itself to itself
  • Then you clip a branch from the donor plant. Ideally, this is a branch that has turned woody. Reduce the foliage to the size of a cutting
  • Wrap the donor scion with grafting tape, making sure the woody part of the scion is left free. Each wrap of grafting tape needs to overlap with the previous.
  • Select the location where you would like to graft. With older trees, make sure you find a location with a strong sapflow
  • With the knife, cut a sliver of bark & wood of about 1cm long on 1 side of the donor scion. On the other side, cut a tapered end of about 1/3 cm
  • In the receiving plant, make a deep, slanting cut into the receiving branch of at least a cm long
  • Slide the donor in the slit, with the donor on the side of the cut so that the cambium layers are as near to eachother as possible. The long slit comes against the recipient branch
  • Wrap the connection with grafting taper, securing the scion in the cut

Aftercare

In order to give the graft the best change of success, you need to keep the grafts out of hot sun, wind and frost. For the first months there is barely any sap exchange between scion and recipient plant. As such, there is a real risk of drying out. And the callus formed during the healing, is for the first year or so weak, and easily breaks after which the graft with die.

Watch the whole process in the video!

The post Grafting Juniper Bonsai appeared first on Growing Bonsai.

  •  

Creating a Juniper bonsai rock planting

My friend Wolfgang Egbert, a talented bonsai artist from Germany, created this little rock planting and kindly allowed me to republish his work as a mini-tutorial. (On facebook he regularly posts his work, if interested)

Materials needed to create a small bonsai juniper rock planting

  • A young juniper (Here: a 3 year old itoigawa cutting)
  • An interesting rock (Ideally with some crevices and taper)
  • Keto (A special substrate, consisting of a mix of peat and loam)
  • Wire in different thicknesses
  • Moss
  • Akadama

Preparing the rock

  • To get started, prepare β€œbonsai muck”, a mixture of up to 40% Akadama (Or other coarse substrate) and keto. The muck should be soft enough to easily mold, yet not so wet that water drips from it.
  • In the area where you would like to plant the juniper, stick the muck to the rock. Extend as far as you would later like to cover the rock with moss.

Preparing the juniper

  • First, the juniper is trimmed back, and inner foliage is removed to create a small open structure, where each secondary branch is well-defined.
  • In order to be able to position branches and trunk fitting to the rock, the juniper is completely wired with appropriate strength bonsai wire (Here: Aluminium in 1 and 2mm).
  • In order to place the juniper on the rock, the roots are combed out, removing most of the original substrate. Overly long and strong roots are removed, leaving mostly fine roots and a compact root ball.

Putting together a bonsai juniper rock planting

  • Take a piece of 2mm aluminium wire, long enough to wrap around the rock at the level where you would like to position the juniper
  • Gently spread the juniper roots and press them onto the muck
  • Just below the trunk, trap the roots with the wire, loop the wire to the back of the rock, and tighten enough to hold the juniper in place, but not so tight that the roots are crushed.
  • Bend the juniper branches in place, creating a pleasing canopy outline
  • Add muck over the roots, ensuring all roots are properly covered with a thin layer
  • Arrange moss on the muck to create a closed carpet. Muck is sticky and the moss should stay on by itself
  • Water gently

Done!

Aftercare of a young bonsai rock planting

Keep the rock planting in dappled shade. The rock can dry out very quickly so it is important to shade the composition from direct sun during the hottest part of the day. Placing the rock on a Suiban can help to keep the rock moist and the planting watered at all times.

This post is part of a series of tutorial posts on bonsai techniques

The post Creating a Juniper bonsai rock planting appeared first on Growing Bonsai.

  •