Reading view

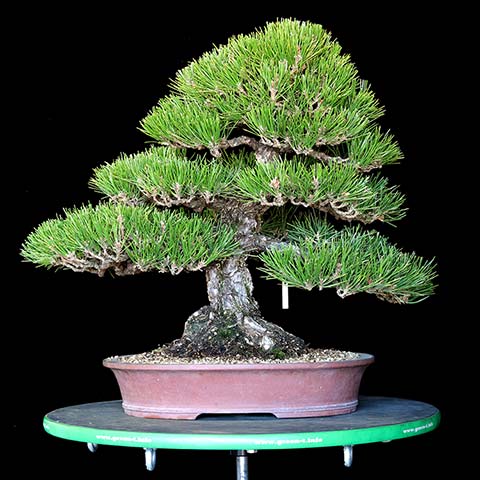
Chinese Cork Bark Elm Progression, Part 1

The story of how I came to own this tree is rather funny, for me at least. Earlier this year at one of my workshops a customer brought several trees to work on, this being one of them. I was attracted to it and began to make some subtle hints to the owner that I would like to purchase it. Initially he was not keen but the following day I made him an offer he could not refuse and I became its caretaker.

The initial attraction

As is the case with most if not perhaps all of the locally available cork bark elms; they would originally have come from Stone Lantern, grown by Stephen Le Roux in the field. However most of the stock I've seen barring some exceptions, are single trunked specimens. I wanted something with which I could create a more natural deciduous form. I felt this tree had the potential I was looking for. It possessed many other qualities such as deeply fissured bark, scars of manageable size, nice trunk taper and movement and others.

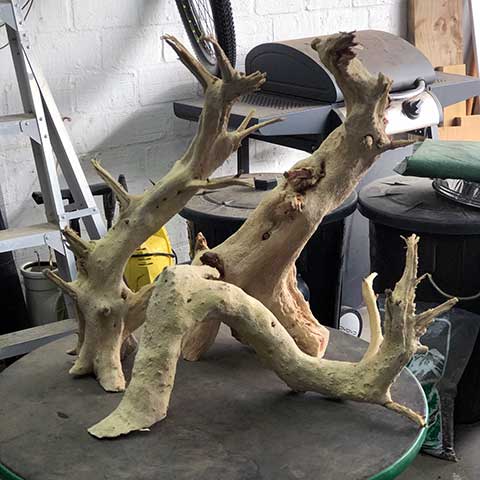
The tree as purchased before any work began. Photo taken 15/08/2019

Repotting

The timing of this purchase was great as the tree was just beginning to bud and as I wanted to get it out of the sandy, composted mix and into a better draining growing medium I could still perform the repot this season.

Upon inspection of the roots I found them to be healthy although still a very immature root mass with mainly coarse roots and few fine roots, rather typical of mixes comprised of mainly fine particles that had compacted creating an environment not conducive to root development being largely devoid of oxygen.

The previous soil mix was very sandy with composted bark mixed into it. Such mixes are prone to compacting and not conducive to a healthy root system.

Elms can be propagated from root cuttings {Read more about the process here} which often have added character to them. Rather than simply cut the roots I did not want and discard these pieces I decided to pot them too. When cutting elm roots I find them to be very fibrous and unless your tools are very sharp it is easy to end up ripping fibres instead of cutting them cleanly, which may retard the healing process. I don't as routine seal cuts on roots, it hasn't seemed to be necessary in my experience.

Root cuttings can be a fun way to propagate elms with lots of character. Unfortunately none of these struck, although I have no idea why.

I'd chosen a Reiho container {Read more about Reiho here} with a simple bamboo relief detail, glazed in a baby blue. The colour would contrast well with the deep bottle green leaves of the elm and the shape would be a balance between the masculinity of the tree but the absence of hard geometric corners would complement the roundness of the future canopy.

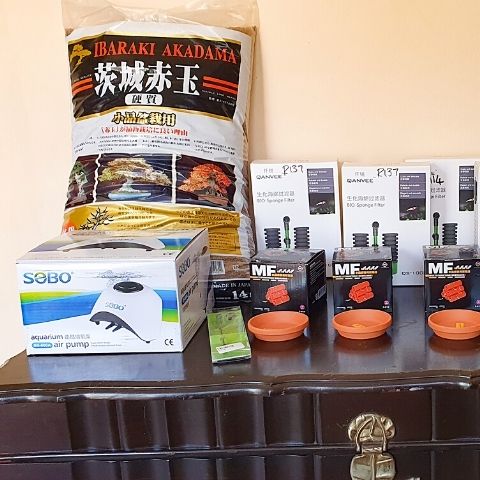
The mix of akadama, pumice and leca which I used to repot the tree into.

My standard mix for developing deciduous trees is 2 parts small akadama and 1 part of pumice. The additional akadama would retain more moisture and store more nutrients, both of which will see this tree develop strongly. I also added a small amount of Leca although this was not entirely necessary.

After repotting, a thin layer of dried, grated sphagnum moss mixed with collected moss, treated in the same manner was applied. This surface finish acts as a mulch and keeps the surface soil particles from moving thus encouraging surface rooting. It also creates an ideal rooting medium for the collected moss to grow, which it does in a matter of weeks. This method of encouraging moss growth is preferable over placing pieces of moss around your trees, as this method usually results in the moss curling up in the heat of summer. Plus by mixing various collected moss species one can create a very natural looking surface around the base of the tree.

After repotting, a mix of sphagnum moss and collected green mosses is applied in a thin layer.

Design and Initial Work

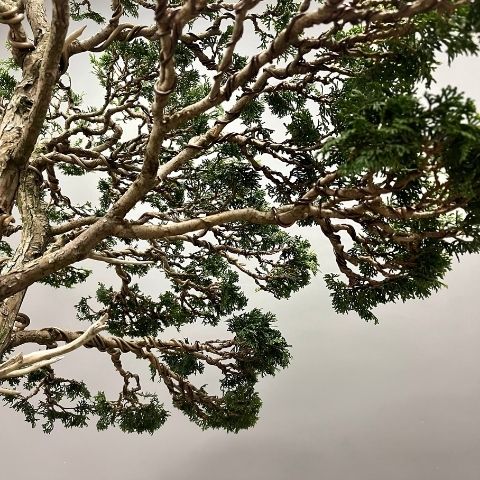
As mentioned already, my goal with this tree is to create a more naturalistic shape. However much of the existing framework which existed was either horizontal or just above. This would need to be changed, altering the angle to be more vertical.

Very horizontal branches would need to be changed.

Fortunately there were no major scars facing the viewer when the tree is viewed from the front. However there were a number of smaller and less obvious scars, remnants from when it was being field grown. These would need to be carved a bit more and then sealed to promote callusing. As these were all fairly large cuts I used a putty type sealer, but for smaller cuts I used a liquid sealer. {Read more about treatment of scars here}

The tree with rebar in place and the branch angles changed.

Aluminium wire alone would not suffice to bend the fairly developed branches so I would need to cut a wedge and using some rebar as an anchor, bend the branches upward. It was necessary to secure the rebar into position and I used the trunk as the anchor, also inserting the rebar somewhat into the container. Rubber from an old tyre tube was used to protect the trunk from damage. However I also needed to secure the bottom of the rebar to a screw which I had fastened to the base of the trunk, as the rebar immediately began to pull away from the trunk when I created tension at the opposite end.

3 Months Later

After a few months of allowing the tree to grow freely, growth being encouraged by fertilizing and good watering, it is time to thin the tree of unwanted branches to focus the trees' energy into those which remain and which I want to develop further.

Development of the tree over the past few months. Photo taken 05/11/2019

Wire Bite

Wire bite like this is not too much of a problem on this species at this point in the tree's development.

The wire applied in early spring, in the initial styling, is now clearly biting in. Wire bite is to be avoided at all costs on very thin barked trees such as Japanese maples, Azaleas and even Olives. The evidence of wire bite on such species can take a very long time to disappear, however when building a tree they are to some extent non-consequential as the branches would still undergo much thickening - however traces of the wire bite may still remain.

Pruning

One needs to envisage the overall final design of the tree to a great extent and through pruning and wiring work towards that end goal.

Pruning unwanted branches using a branch cutter.

Some of the thoughts going through my head (having already determined the basic look of the tree) when I was pruning this tree were:

  • What will this branch look like once its has developed some girth?
  • How much do I need to exaggerate the curves wired into the branches that they will still be visible once they have thickened?
  • What will the negative space look like between the branches?
  • Where is the negative space too big and with which branches can I fill it adding to the positive space?
  • How do I deal with ramification; ensuring good taper from trunk through to branch tips?
  • Will I have sufficient "ports" through which sap can flow to feed the fine twigs at the future outline of the tree to avoid dieback?
  • What internodal distances do I retain at primary branch level, as this will become progressively less the closer I get to the outline of the tree?
  • With future pruning, will I be able to hide or heal over the scars?

When working with deciduous trees one needs to have long term commitment to the process. Initially progress is at a snail's pace as you grow out only to cut back. However each time this is done the ramification of the tree exponentially increases. Suddenly, after a few years of patiently working on the tree you will be able to stand back and appreciate the effort you have gone to and your patience will be rewarded.

Wiring

After pruning away the branches determined unnecessary, according to the thinking process above, I again applied aluminium wire, trying to wire either opposite to the direction used earlier in the season, or to avoid laying wire into the grooves created by the wire bite.

Wire is now used to better position the growth which developed since spring, with a generally vertical orientation. Care was taken to give the first section of the branch some movement.

Bear in mind that clip and grow method of styling will also be employed in creating this tree so the focus now is ONLY on the first few cm's of each branch. Once they have developed the required girth the branch will be cut back and the process of growing out and cutting back will be repeated. 

Unwanted Moss

Killing unwanted moss with undiluted vinegar.

One of the worst tasks you can neglect to do with any cork bark variety of plant or even pines for that matter, is to allow moss to develop up the trunk. This constant moisture on the bark causes it to rot leaving behind a smooth trunk. In some cases the only recourse is to layer the tree above this section. So it is best avoided. In this case I sprayed undiluted vinegar, using the nifty pressure sprayer attachment attached to a used water bottle, on the moss which almost instantly kills it. After it has had time to thoroughly dry I will brush it off with a nylon or pigs hair brush.

Final Notes

After pruning, all cuts were once again treated with the appropriate sealer. If there were any areas damaged when wire was removed, these were also sealed.

Sealing smaller cuts with Top Jin Paste

The tree was placed back on the bench, to be allowed to grow freely till the end of the growing season when it will be assessed again.

After completion of the work described above.

  •  

Twisty little Shimpaku

Article and photos by Martín Díaz

Assessing the material

At first glance, the movement of the trunk on the upper section of this tree is quite simple and uninteresting, so I aimed to accentuate the already existing curves, reduce the total height of the tree, compact the foliage, and focus attention on the areas of dead wood.

Step One

Splitting the deadwood

The red line indicates the section to bend

The part that I wanted to bend had a section of dead wood, so the first step was to separate the dead wood from the live vein, in order to facilitate the process of bending.

The tool used for this work was a root cutter.

Instead of using the tool to make a clean cut I tried to break the fibers using the tool as a wedge. This gave a more natural appearance to the separated area.

Step Two

Bending the trunk

Only the portion of the trunk that needed bending was separated.
To avoid unnecessary stress, the trunk was bent in the direction of least resistance, in this case forward, closing the curve. With a copper wire and rubber protections the trunk was secured in position.

With a copper wire and rubber protections the trunk was secured in position.

Step Three

Choosing the new front

At this point I evaluated the best front for the tree, trying to show the dead wood as well as possible. There were many possible fronts.

Step Four

Pruning unnecessary branches

Already chosen the new front, I continued to eliminate branches that pointed directly down and branches too long to use.

The cut branches were carved into small jin.

Step Five

Wiring the remaining branches

After, it is just a matter of wiring the fine branches with copper wire, eliminating the downward foliage, and trying to leave spaces between the branches to give them enough room to grow and densify the canopy.
Because the bend didn’t cause the trunk to split it’s safe to apply wire on the small branches. If the trunk would had split, it’s best to let alone until it shows signs of good health.

Bonus

Lime sulfur

To finalize, the section of live wood that was connected to dead wood painted with lime sulfur. Because it is already dry and does not transport sap there is no risk of damaging the tree. The branches that were carved into jin should wait until they are dry to be painted.

The end result.

Aftercare

Because this work was done at the beginning of winter, precautions during the coldest days will have to be taken. Next year in the spring the tree will be repotted into a definitive pot and begin its process of refinement.

About the author: Martín Díaz is a third year apprentice at Aichi-en, located in Nagoya, Japan. Originally from Chile, he has been practicing bonsai for over ten years. You can find him on Facebook  and Instagram posting sporadically interesting things that may or may not be related to bonsai

  •  

Portulacaria afra bonsai

Article written by Moshe Emergui 

Want to purchase a Spekboom bonsai? Find out how.

Introduction

Portulacaria afra, is an evergreen succulent shrub or small tree originally from South Africa, where it reaches up to four meters in height. It is also known as the Elephant Bush, Jade Tree or Money Tree.

The stems are reddish-brown which contrast well against the green of the foliage. Leaves are small, luscious and vibrant green in colour. They are rounded in shape and form the dense appearance appreciated in more refined trees.

This succulent makes an excellent bonsai for beginner and professional alike due to its low maintenance requirements and hardiness, especially dry conditions.

portulacaria afra bonsai display

Image caption. A display by the author, including one of his Portulacaria afra.

Location

The ideal location for Portulacaria afra, regardless of size will be outdoors in full sun. However it can also be grown indoors near a well lit window. Trees will weaken in low light conditions making them susceptible to pests such as mealy bugs which suck the plentiful plant sap and secrete honeydew which in turn attracts ants and thus sooty mould.

Important to note is that the Portulacaria afra is sensitive to cold. In Israel it grows everywhere except the high mountains and the valleys where the temp drops below zero.

portulacaria afra in flower

Image caption. Portulacaria in flower.

Watering

Portulacaria afra can hold large amounts of water in the trunk and leaves. In summer, during the growing season, water well but allow the plant to dry completely between irrigation. During winter, watering is reduced to as little as once every three weeks, and that only if it hasn't rained.

Training

Pruning

Portulacaria afra leaves are arranged in opposites, which alternate or rotate on branches. Cutting at pair of leaves will usually produce two branches at the base of the leaves. This pruning method is an effective way of achieving the desired shape with dense foliage pads in a relatively short period of time, should all the conditions be favourable.

portulacaria afra bonsai

Image caption. A beautiful example of a Portulacaria afra partially defoliated and lightly wired. From the author's collection.

Wiring

Training with aluminium wire is possible though caution is needed when bending young branches as they snap easily.

Defoliation of a different kind

Succulent by nature, these plants hold large amounts of water in their trunk, branches and leaves. Long, immature branches tend to droop down due to their own weight. If this is not desired one of the most effective techniques to counteract this is partial defoliation, and in particular removing the top leaves.

Repotting

Actually repotting these trees is only necessary when the roots have completely filled the entire pot. The reason you would repot is to supply your tree with "fresh" soil which permits oxygen and water to flow freely, encouraging a more compact root system. When to repot requires some scrutiny as you do not wish to needlessly stop growth, neither do you wish to break a pot trying to get a thoroughly pot bound tree out of the container. As a general rule, most trees require repotting every two to three years.  However since different trees grow at different rates, this schedule will not always be accurate.

portulacaria afra bonsai

Image caption. Another of the author's trees

The best time for repotting Portulacaria afra is in the summer when the temperature rises and is consistently above 25 ° C. A well-draining soil mixture is best, such as 1 part Akadama mixed with 3 parts Pumice. In Israel we often use graded and rinsed lava stone, usually 2-4mm or 4-8mm in size, depending on the size of the tree, mixed with 20% peat moss.

Allow the soil to dry out somewhat before attempting repotting. The tree, along with all its soil, should then be removed from the pot. The outer and bottom most third of the tree's root mass should be removed. This is done by raking the soil away, then pruning back the roots. In most cases, it is not good to prune back more than one third of the tree's root mass. A thin layer of coarse particles is placed at the bottom of the pot. New soil should be carefully worked in around and under the root mass in such a manner as to avoid leaving any air pockets.

After repotting, you should initially water thoroughly. Moss or other ground covers can be used to cover the surface of the pot. Shelter the tree in a shaded warm area and water only sparingly until new growth establishes itself. 

moshe emergui portulacaria afra

Image caption. The author, Moshe Emergui with one of his Portulacaria afra.

Moshe Emergui is a passionate bonsai artist and international demonstrator who loves to share his expertise and passion with enthusiasts around the world. Moshe has his own studio in Israel; Bonsai Art, shop and visitors center where the public can view his work. You can contact him via email ([email protected]) or visit his Facebook page.

Sign up for my newsletter now and don't miss another blog post.

  •  

Portulacaria afra “the underdog“

The following article is written by Andre Swart.

Want to purchase a Spekboom bonsai? Find out how.

Background

Portulacaria afra (Porkbush) or “Spekboom“ as we all know it , is one of my favourite specimens to work with. My collection and my knowledge of these incredible tolerant species has grown over the last 15 years. This popular succulent plant is found on rocky slopes in the Karoo scrub and semi-arid landscapes in the eastern parts of South Africa. The word “afra” is in reference to the fact that the plant occurs in Africa.

Portulacaria afra is also known as: Elephant's Food (English); Olifantskos (Afrikaans) and for some also known as “small leaf jade” and “dwarf jade." It has shorter internodes and much smaller leaves than Crassula varieties. However, both species are often referred to by the common name of jade. But there is this confusion regarding identification. Some will refer to Portulacaria afra as a “Dwarf Jade Tree“ well Portulacaria afra is not a jade plant. It is a common name what most Americans and Europeans will call it BUT Jade is Crassula ovata, a completely different Family, Genus and Species.

Image caption: Crassula ovata” jade plant.” The leaves are more elongated (ovata = "egg-shaped") and larger than Portulacaria afra. Also, they are missing the indentation at the tip that makes Portulacaria afra leaves heart-shaped. The growth of Crassula is "stockier" and the branches are smooth (not flaky as P.a).

Portulacaria afra is much easier to develop as a good bonsai than the larger leaf jade plant, Crassula. Young branches and trunk are reddish brown, when they mature they become grayish in color. The leaves are close together, opposite and just under 1cm long -- when grown in the sun.

There are other species of Portulacaria (8 species known) which will not be suitable for bonsai, for example:

Image caption: Portulacaria armiana is one of three Portulacaria species in South Africa and native to Namibia, easily distinguished by its large cotyledon-like grey-green leaves and tall perennial whipstick-like inflorescence.

Portulacaria pygmaea is a dwarf succulent type of shrub with small, thickly fleshy, grey green leaves and occurs on rocky hillsides in Namaqualand, South Africa and is also not suited to bonsai cultivation.

But is it a succulent?

There are people that will say “Spekboom “ is a succulent, not a tree and not real bonsai material. Then those haven’t been to the Karoo on a field trip, in certain places they are 4-5 meter proper trees with nebari (like a ficus) and trunks thicker than an average human body.

Image caption: The size of these trunks is what we all dream about. Some will argue, no “shari” or “jin” as this will invite disease, but nature will prove us wrong again!

It is bonsai material

If you can get a proper and believable tree image out of it, why not use it? But do not grow it like a shrub, be creative and develop the branch structure with empty spaces. I believe it is underutilised in our country, so I think we need to make more use of our indigenous species.

Image caption: Andre Swart with one of his Portulacaria Afra grown over 9 years. The loose wire on the back lower branch is to support extended growth to the left in future as per design.

Basic Bonsai Pruning…and a little more.

Do not train your tree like a shrub, you have to see the branch structure by creating empty spaces. Trim your spekboom bonsai into a tree shape by removing branches and leaves that clutter the style you desire.

Image caption: Pruning – (Clump style) Define the stems you want to develop into branches by nipping off leaves and leaf buds along the stems , along the underside of branches. Remove large leaves to open the plant and allow light to reach inner stems where you want new, smaller leaves to grow.

Make cuts clean and allow cuts to air dry and callus over naturally, do not use sealer as it is not necessary and will only invite disease underneath the sealer. Portulacaria has very thin cambium so the wound will not be overgrown like other species.

Image caption: Cut back twigs to only 2-3 nodes and use the “clip and grow“ method to improve the ramification as this works the best on these specimens. If you are building structure, wait until the “reddish“  stem hardens off to a “greyish“ colour before your cut back hard to the direction of the new branch.

They store more water in their branches than most trees, so they take much longer to lignify (harden, turn from green to gray), so for these reasons it is difficult to successfully train these with wire, but not impossible. Wiring is to keep the thicker branches in place and wire “loosely." Watch out for “wire bite“ but fortunately once the wire is removed, the branch will bulge back without disfigurement because of the water content in the branches. These “wire bites“ can sometimes contribute to the character of the tree. The same as when you want taper, to then scar the main stem or branch with a very sharp clean blade and let nature takes its course with creating a naturalistic looking scar. Obviously “shari“ is not ideal, as it just invites disease but it can work in the right setting with proper after care, but not many will agree with me!

Training a spekboom in a literati style, that’s a challenge because of its heavy foliage but with proper care the leaves can be reduced by pinching to only 4-5mm big.

Prune heavily in the spring and summer, but then also anytime when there is active growth pending where you are and your micro climate. I use the “hedge cut“ method for the first 2 growing seasons to develop the canopy, then cut back hard and then to go into the structure with scissors to identify the branches you want to keep and to remove all the unnecessary growth that will interfere with the desired result. Use sharp scissors and remember to leave a bit of “stalk“ which you later can rub off. Do NOT use knob cutters!

Growing Medium and Watering Regime

Spekboom bonsai should be watered more often in summer and less in the winter. Let the soil dry between waterings, but then here it depends on your growing medium. Your bonsai mix depends on where you live, your climate, your watering routine etc. There is no one “best” mix. You have to figure out some of those requirements for your microclimate and then decide which is the best mix. Do not use any fine particles or soil, the mix must be loose. If you have a well drained mix, then it is unlikely you will end up with root rot because it is usually not over watering but poor, compacted soil that will deprive your tree of oxygen and lead to the demise of your tree. I use about 70% grit/crushed stone and 30% composted pine bark, and I water my spekboom collection almost everyday. In the winter give enough water to keep the leaves from shriveling.

If an overwatered tree is the problem, remove the tree from the pot and change the soil, as this invites fungal rot disease When you remove the saturated soil from the roots of your tree, be gentle as those roots are very delicate! Cut away roots that look weak and suspicious. Refill the pot with fresh, an almost loose , gritty mix and important to position your spekboom to its original growing position not to further stress the tree. If your tree is drooping branches that touch the side of the container or the soil, you'll likely have to cut it back to save the rest of the plant. So use sharp scissors to cut the section where it meets the main part of the stem.

Cuttings

Spekboom is easily propagated from cuttings or truncheons. Cuttings can be allowed to dry out for at least a week in a cool place and then planted in washed river sand. It will root easily and can even then be planted directly into the ground, but do not water them straight away.

Image caption: Sometimes cuttings will develop roots, even lying on the surface if they are misted regularly.

Image caption: Water sparingly so that the potting mixture is only damp, but I prefer to give them a twice daily misting on the leaves only, until the cutting takes root. Keep them in a warm shady position until those shrivelled leaves start pushing out new and luscious green leaves after about 1 -2 weeks.

Environmental factors such as temperature and humidity affect the speed at which the roots and new plant develop. Even very large Yamadori can be treated like this. Portulacaria afra needs less frequent watering during its dormancy period, but because the leaves on Portulacaria afra are so thin, it can handle more frequent waterings than other succulents.

Image caption: Make a clean cut at the roots and wait at least 2 weeks for the wound to callus over before you plant the tree in a container. Do not worry about those shrivelled leaves. Tie down the tree or support it with a rock as the foliage is so heavy it will tumble the tree over and break all the new delicate fleshy roots.

Portulacaria use their fleshy leaves and branches as reservoirs. They can survive in relatively small amounts of soil and like to be almost dry out between waterings.

Image caption: Portulacaria can grow in very little growing medium and with regular pruning and care, the leaves can get  smaller and the tree can even evolve in a literati style.

General Care

Spekboom do well when fertilized with organic fertilizers, or those organic pellets in abundance on the surface (or even inorganic, a few 2:3:2 granules in used tea bags just below the surface at the rim of the pot) will let them grow like crazy, so you have to keep up with pruning right through the active growing season, which here in George, Southern Cape, is almost throughout the year. With fertilizer they can push growth and if left in the sun, they need very little care. With frequent pruning, the small leaves readily form desirable pads. They can survive for a while indoors but when they drop leaves it is time to move them out again, however I will not recommend indoors except when you exhibit.

Image caption: Thick cuttings can lend themselves to develop Shohin or Mame Bonsai in proper ceramic containers, or in creative designed cement containers. Their root system does not mind the leaching over time.

The only way to thicken the trunk is to put them in bigger pots and to grow them outside as much as possible, try against a northern faced wall and aim for root zone warmth. Add rocks or stone to the mix - try simulate the conditions in the Karoo!

Image caption: For example, fix the cuttings in an open plastic cooldrink bottle with riversand and fill up the top with 13 – 17mm stone. Tie down the larger truncheons with wire or anchor pillars or tie against a rock for support for a few years!

Spekboom Bonsai prefer ‘tight feet’ and can go years without root pruning. Light root trimming is effective, however when necessary, drastic root pruning is not harmful. Allow the soil to become dry before repotting and DO NOT WATER the plant immediately after potting. The existing leaves may even shrivel before new leaves appear. This is not a problem. If some of the old leaves drop, they will quickly be replaced.

Image caption: Root-over-rock ”group planting” is an excellent style for Portulacaria. The roots readily establish in small pockets of soil and the exposed roots thicken and age surprising well. The plant must be tightly secured on the rock to get it started.

Image caption: A Portulacaria “Raft style“ developed from a truncheon that fell on the ground years ago.

Flowers

Even in their native habitat, the plants need to be very mature before they form flowers. Getting the plant to bloom will require you to keep it in a dry location, withhold water, and expose it to cooler nighttime temperatures. Given the right setting and environment, a spekboom plant not flowering, may simply be that it is not old enough to reproduce yet. Only recently one of mine flowered for the first time in 13 years!

Interesting Facts

Did you know that the leaves of the Spekboom can be eaten and have a sour flavour (like a Granny Smith apple) It is heavily browsed by game and domestic stock and highly favoured by tortoises. Traditional uses also include the increasing of breast milk by lactating mothers. The leaves are used to quench thirst, so try sucking a leaf next time you work on your Bonsai. The juice is also used as an antiseptic and as a treatment for sunburn. Farmers will tell you that a small sprig of Porkbush steamed with a tomato bredie (stew) imparts a delicious flavour. Try it!

Yamadori

I have been doing Bonsai for more than 25 years and Portulacaria is one of my favourite trees to work with, yes, for me it, is a tree. My wife and I will go on frequent visits to farms of patients of mine in the Karoo and with consent, we have the opportunity to collect some really old specimens.

To acquire the best Yamadori on these rocky slopes, you need medical insurance (It's dangerous!), abseiling skills and the proper equipment and technique. Do not take out if you do not have a plan for developing it into a proper bonsai. Decide there and then beforehand what you are going to do with that tree, draw it, ponder over the idea and share the idea with the farmer in respect to the tree in its arid environment. Take the usual care as for cuttings like described before, try to save those delicate roots and make clean cuts. Photograph your Yamadori and send a photo later of the near finish product to the farmer, he will appreciate his contribution to your collection!

My signature Portulacaria afra tree comes from this slope 9 years ago….but there are always easier ways to collect Yamadori.

Conclusion

So, I hope that more people will see the potential of Portulacaria Afra and that the “Spekboom “ as an indigenous species will gain respect as a proper tree represented in different styles in our Bonsai Collection.

Andre Swart is Paediatrician in Private Practice in George. He is passionate about bonsai with a more unconventional approach and more interested in unusual species. The artistic and horticultural approach he shares with his wife, Isabel, who is a keen gardener. You can contact him via email [email protected]

  •  

Rooting Haworthia

The following article was written by Harry Lewis of Living Desert Plants

In my last article, I took a few steps back from advanced Haworthia techniques, and discussed how I care for my plants in general (Read Harry's other articles here). One thing I didn’t go into detail on, that could both fit into general care or advanced techniques, is rooting Haworthia.

The best procedure to follow once you identify a plant that has had root loss is to first identify the cause of the root loss. The second stop would be to remove the cause of the root loss, and the last step would be to decide on the most suitable method and time for rooting. This article will cover these steps.

What causes a loss of roots in Haworthia?

There are several reasons why Haworthia plants would lose their roots. The main culprit is usually overwatering, as Haworthia do not like having wet feet. Their roots need to be able to breathe, which they cannot do in a constantly wet mixture.

The second reason for root loss that ties into that is an incorrect soil mixture. The more cheaply available “succulent mixes” at most nurseries are not suitable for many Haworthia. As I discussed in my general care article, Haworthia need a gritty, aerated soil mixture for their best health. In my experience, mixtures containing a high proportion of fine sand or loamy soil are not conducive to healthy Haworthia and will cause root loss over time.

Figure 1: A cored Haworthia rerooted in fine grade Ibaraki akadama

A lesser known reason for root loss is clustering, when Haworthia grow into a large clump of plants over time. The roots growing from the offsets tend to strangle the mother plant’s roots in small pots, which also prevents new roots from growing. Plants in the middle of a cluster will generally have less roots than those growing on the outer edges, as they have been in the cluster the longest and will have the hardest time getting new roots to reach soil. Haworthia also tend to drop their oldest roots after a period of time, and if these are not trimmed every few years, it can lead to the rotting of healthy roots, though again, this is only really a problem in large clusters of plants.

Disease can also cause root loss. This generally happens when a plant has damage on the roots and is then watered before it can repair the damage, as water is a perfect medium for bacteria to move through. This can be relatively easily avoided by not watering immediately after repotting a plant, as even the smallest of scrapes in a root can allow bacteria to take hold. Insects such as root mealybug feed on plant roots, but these can easily be treated with over-the-counter insecticides.

Sending a plant through a courier can also cause it to drop some, or all, of its roots, especially when packaged incorrectly. Haworthia that have been recently rooted are especially vulnerable to this, as the root has not yet been hardened. These new roots, which are white, tend to shrivel up quickly when dehydrated.

Lastly, there is intentional root removal, where the grower removes the plant’s roots. This is usually done if one is taking root or leaf propagations, or if the plant is root bound and needs some cleaning up. When coring a Haworthia, the top part of the plant will also not have any roots.

Figure 2: A Haworthia that suffered from root rot, rerooted in my general succulent mix

What are the best conditions to regrow roots on Haworthia?

Haworthia roots, in my experience, tend to detect and grow towards water, so mixtures that retain moisture without staying wet are ideal. If you want to reduce stress on the plant, use the soil mix you normally use to re-root so that you do not need to repot it later. This is, however, not strictly necessary. I prefer a mix of the fine grade Ibaraki akadama and pumice in a 50:50 ratio. The small grade is also good, but I find that fine retains moisture for slightly longer, which is useful for rooting. Both a pumice mixture and my normal succulent mixture, which consists of 1:3 LECA and 2:3 made up of equal parts of peat, pine bark and silica sand, do well for this purpose. I water my rooting Haworthia somewhat more often than normal, to make sure that there is enough moisture in the pot. Generally, this would be once per week, but do keep in mind this will fluctuate depending on another important factor in rooting, the weather.

When should I try to regrow roots on Haworthia?

Weather plays an important role in the rooting of Haworthia. Warmer weather, generally 21-29⁰C, is necessary for root development to occur at a decent pace. Anything colder than 20⁰C will not encourage root growth, and the soil mix will retain moisture for too long and could lead to rot or fungus growth. I have also noticed that in exceptionally warm weather, watering a plant in an attempt to encourage new root growth or cool it down is actually detrimental. In my experience, as I mostly use 10cm black plastic square pots, watering Haworthia at temperatures of 35⁰C or higher will cause the water to be so warm that it will “boil” the roots in the pot. This may not, however, occur in all kinds of pots or in well shaded greenhouses. To be safe, I generally do not water at temperatures higher than 30⁰C. 

How to regrow roots on Haworthia

Finally, we get to the crux of the issue at hand. How do you go about growing roots on a plant that has completely lost them?

Haworthia roots grow from the “stem”. This is the brown core at the base of the plant. The core contains the meristematic cells of the plant, which is responsible for new growth. Remove all the dead root and leaf material at the base of the Haworthia, to allow more space for new roots. I tend to remove the lowest three leaves, as this exposes more surface area on the core for roots to grow from. Let plant dry for around two weeks before replanting. As you exposed some of the white core material in the stem while removing leaves, I suggest waiting one additional week after replanting before watering. This is to make sure that the scars properly callous, which prevents stem rot. When watering, let the potting mix dry out as you would with a plant that has formed roots, and do not keep it wet. I usually find using this method in South Africa, I can get new roots within 1.5-2 weeks depending on the plant. Some are, however, a bit stubborn!

Figure 3: The newly exposed core of a Haworthia with all the roots removed

Harry Lewis is a qualified nature conservationist, with a National Diploma in Nature Conservation from Cape Peninsula University of Technology, and an Advanced Diploma in the same field from the University of South Africa. Between 2015 and 2018, Harry worked with large carnivores, such as lions and leopards, but has now moved back to his hometown of Stellenbosch. He has always had a passion for everything nature, including succulents, and now runs Living Desert Plants, a small succulent nursery, from his home. He specializes in growing Haworthia, but also stocks a wide variety of mostly indigenous succulents.

Contact: Harry Lewis
0741951144
[email protected]
www.livingdesertplants.co.za
www.facebook.com/LivingDesertPlants/

  •  

The fantastic Juniperus procumbens nana

The following article was written by Brett Simon

Introduction

This shrub is native to the southern parts of Japan. Commonly known as the garden juniper, it is a fantastic species for bonsai. They are mostly used as trees for beginners. Most of the new talent comps around the country use these as stock trees to work on. I know I have worked on a few and was in fact one of the first tree I ever bought and owned as a bonsai.

In Japan they are not very common as bonsai as they are thought to be too easy. I personally have never understood this. It grows well in all parts of South Africa, takes easily from cuttings, is easy to train and transplants well. What more could a bonsai grower wish for!!

Juniperus procumbens is a mounding juniper. This means that it needs to mound up foliage first before it will elongate. If we need to lengthen a branch we need to let the foliage build and mound before it will send out a runner.

Insert: Note how the foliage at the base of the elongated shoot has mounded up. This strength allows the shoot to elongate.

Juniper's strength comes from there foliage. This means that extra energy is stored in the foliage. For this reason we should never remove more than 70% of the foliage in one go. Please note that this is for a healthy tree. Removing 50% of foliage from a sick or weak tree may cause it to die. I have seen growers do this and the tree was fine however we are taking a chance by doing this. We always need to treat the tree the best we can. So to be cautious stick to 50% at most unless you feel confident that you know the tree will bounce back well.

Cuttings/Air layering

Cuttings can be taken at most times of the year but I have had best success in late spring. I have taken cuttings as thick as my thumb and they have grown well although best is that about the thickness of a pencil. The only time I would not try cuttings is in the middle of winter.

I use akadama and pumice for my cuttings in a 70/30 mix. I have at least a 90% success rate. I don’t use any rooting hormone although I am sure it will not hurt to try.

Air layering is best taken in summer. Always leave some green below the section where you plan to take the layer. This will allow sap flow to continue. Roots normally form within a month or so. Once the bag or pot you used is full of roots it may be separated. I usually wait till the following spring to do this. Make sure you use a black bag to cover your layer this will help prevent algae from growing.

What to do and when?

I have been asked many times what to do when on a juniper. Below is a timeline of when is best to do the following. Please note that I will never give a date as we live in a country that is vastly different. You need to watch your tree and it will tell you when. I have given about times by season.

Styling /Repotting

The first thing to note is that the best time to style a juniper and to repot a juniper is the same. However you cannot perform both in one season. If you need to do both I would repot first and let the strength from the foliage build the new roots and following season you can style, provided the tree grew well.

The best time of year to style a juniper is late winter/early spring just before the new growth starts. The tree will start to “green up” from its winter dull colour. We can do heavy bending and reduce foliage at the same time, as the new spring push will let the tree recover.

If you plan to do heavy bends on main branches it is a good idea to first wrap that branch with Raffia. Always remember to wrap the raffia in the same direction as you are going to apply the wire. Clockwise if you are bending to the right and anti-clockwise if you are bending to the left. I prefer to use copper wire on junipers as I can use a thinner gauge to hold the branch. Just remember that you must use a wire that will hold the branch in place once it has all the new growth on. If you use a wire that is too thin it will start to drop as that branch gets heavier with all the new growth. Leave wire on until it starts to bite in.

Be sure to catch Brett's video on heavy bending of junipers here.

Late winter/spring is the same time that repotting is best carried out. Once you start to see the new growth emerge, this is the best time to carry out repotting. If you repot do not remove foliage. The stored energy in this foliage will help the tree build new roots. You should never bare root a juniper. Always leave a portion of the old soil. If it is in really bad soil you can remove half that bad soil in one repot and then the next time you repot remove the other half.

The second best time to style a juniper is early autumn as the second flush of growth hardens off. Again this would be the second best time to repot if needed.
The reason this is a good time is that the cambium is thickening which causes wounds to heal quickly. Note that not as much work can be done as in spring.

Insert: Before styling in spring. Tree has been allowed to grow freely. Foliage has built up and the tree is strong.

Insert: After initial styling. The tree had much of the foliage removed and two major branches were removed and made into jin. The roots were not disturbed at all. Wire was placed only on structural branches. In this case many of the strong growing tips were left on the tree so that growth could continue.

Yes the previous owner had grown that cascade branch for 15 years but I had seen a much more compact tree inside.

After the initial work the tree was fed well and allowed to grow freely. The more foliage it put on the stronger it became. The deadwood was left untreated to dry out.

Insert: Two years later the tree was repotted into a growing pot. After it recovered it was given a styling to begin building the pads. Note this was done in autumn as the tree showed good growth after the repotting done in spring.

The following year it was allowed to grow freely. Only trimmed to keep shape.

Insert: After a year of feeding and light trimming the tree was ready for another styling at the beginning of spring.

Insert: The tree after the styling

After four years of building the tree and maintaining it, it was ready for display. All that was done in these four years was to follow the yearly cycle as described.

Insert: The tree on display only four years after first work started. The only thing now was to get it out of the training pot as it looked way to big for the tree.

After another year the tree was finally put into a pot which I felt suited the tree.

Deadwood/Creating Shari

Deadwood can be cleaned at any time of year. A simple scrub with water and a toothbrush will remove any algae. We can then treat with lime sulphur.

Bark flakes on junipers when it is old. This makes a perfect hiding place for insects to hide. Removing the flaking bark helps to minimize this. Peel away the flaking bark with a sharp scraper. If you hit “white” then stop. Little nicks of the live vein will heal over quickly. If you wish you may then scrub the new bark with a brass brush, this will cause the bark to redden which looks great against the white deadwood (this is a matter of opinion, each to their own).

If we want to create Shari (deadwood along the live vein) or simply widen the deadwood it is best done in late summer/early autumn. The reason being is that the cambium is thickening, which in turn heals the new cuts very quickly. A good idea is to apply putty type wound sealant along the live vein to stop it from drying out. We don’t want to do this during spring and summer as the sap flow is strong and the cambium separates from the hard wood very easily.

Pruning

Always prune junipers and never pinch. The constant pinching will weaken the tree over time. Try cut between needles and always back to a growing tip.

Always cut to two branches, any more in one junction and the branch will swell. This process is called bi-furcation. Simply put it is 2 branches, which become 4, which become 8, each time splitting into two. In three years you can have a very ramified branch.

After the spring growth hardens off (the new light green foliage starts to take on a darker green) we can prune to help shape the tree. This waiting till the foliage has hardened off also allows the tree to rebuild its strength after using much of it in the spring push. The tree will then put on a second growth. This second flush is not as strong as the first and should not be trimmed again till autumn.

Maintenance

In early autumn it is a good idea to “thin” out the foliage. We remove all weak growth that has no growing tips. This foliage is actually using more energy than it is giving back to the tree. We remove crotch growth (the only time we keep crotch growth is if you have a long branch and need foliage further back, we then use this growth to cut back too. It must however get strong enough before cutting back to it).

The reason for this is to allow light back into the tree. If this is not carried out we end up with an overgrown bush in a year or two. By opening up space we allow the light into the inside branches which in turn encourages back budding. This back budding can then be used to cut back to so we can keep the shape of the tree. If we don’t the tree will just get bigger and bigger.

When cleaning the tree it is also important to clean the underside of the pads. This gives a crisp feeling and defines the pads. The following pictures show what has just been done to the tree. It is now autumn and time to carry out maintenance.

Insert: The tree after strong growth this season. If left many of the internal branches will die due to lack of light.

Insert: The tree after cleaning up the pads. Notice how the under side of the pads are flat, defining the pads. Also note that the deadwood has been cleaned and that lime sulphur has been applied. Also cleaned the pot for good measure.
There was no wire used in this process. Just by cleaning we have given shape back to the tree.

Common faults

I have seen many procumbens nana that have been made into bonsai with the following “faults”. This makes the tree look artificial and man made. We need to try and steer clear of these faults or redesign a tree that has them.

The first and most common is the cascade style of this species. Procumbens naturally like to grow down, they are after all a ground cover juniper. The fault comes in when the first bend going down on the cascade branch is a loop or curve and not a sharp angle. A branch that comes out of the trunk at more than a 45 degree downward angle is considered natural. I see too many that have been wired down and a semi circle or loop has been formed. Watch out for this. This is a fault that starts at the beginning of the tree and is hard to rectify.

The Herringbone look is another. Remember that at any one junction there should be only two, the trunk is considered one. This means that only one branch should come out of the trunk at any one point. Also try to stagger branches left to right and try and differ the spaces between them.

Allow branches to thicken up. The previous owner of the tree above took 15 years to get that cascade branch to thicken to the right size (he has forgiven me). This makes the tree look in proportion. I often see I trunk that has all the branches coming off it too thin. Take your time, you will be rewarded in the long run. I have rushed this before and ended up with a tree that looked ok but those thin branches always bugged me. I eventually cut the tree back and started again losing so much time.

Want to read some tips for better junipers? Find them here.

Conclusion

Juniperus procumbens is a fantastic tree for bonsai whether you are a beginner or an experienced grower. There are so many design possibilities and the tree is very forgiving. If a juniper procumbens is treated correctly the needle foliage will actually become scale like foliage. The tree above has much of this and my goal is to see how much I can convert to this. It is not very difficult. Follow the steps at the right time of year as above and you should see results.

Be sure to view my Juniper gallery for more inspiration.

Happy growing!

Brett Simon is a prolific bonsai artist and grower in the Western Cape of South Africa. He has and continues to contribute much to the local bonsai fraternity. Not deterred by convention, Brett loves to experiment with techniques and species. His enthusiasm is contagious and I am certain you will look at your procumbens junipers differently now.

  •  

How to choose a bonsai pot

Overview

A bonsai cannot properly be appreciated until it is combined with its essential compliment, the bonsai container. In actual fact the word bonsai means a potted tree!

When choosing a container for a specific tree, were you to ask several people for their choices you would most likely get as many different answers. It is also very likely that none of these answers would really be incorrect. Selecting a suitable container for your tree is very much a personal decision and one should definitely not rely on rules or popular thought to make this decision for you. It is an artistic decision, and you being the artist should make this decision for yourself. That said there are some suggestions which might assist or guide you along the way and help you to select a particular shape, finish or size of container. Being aware of these may aid you in finding a pleasing combination as the art of bonsai is not only the styling of a tree but also the image of the tree and container combined.

In Japanese bonsai the container should never overpower the tree. The container should complement and "elevate" the tree only. If ever in doubt and you have a selection from which to choose, pick an oval or rectangular bonsai pot which rounded corner, straight sides and plain feet. Where color is concerned, an unglazed pot or glazed pots which have a light colored glaze are preferred.

Its usually better to shop for a container once the tree has attained a certain degree of development as the "feel" of the tree should be echoed in the container. So for example if the tree is powerful a more masculine or heavier pot can be used. Feminine tree should be combined with lighter more delicate bonsai pots.

The width and length of the trees branches are equally as important as the height and the thickness of the trunk. The colour of the flowers, fruit and the bark as well as the leaves all play a role. This will be discussed in greater detail in this guide.

Lastly, aesthetic considerations aside, the size and depth of the pot will be influenced by the horticultural requirements of the tree species being grown in it. Some trees quickly consume the moisture in the growing medium and therefore require a larger container. Some require better drainage and therefore require deeper pots.

Size

There are two ways in which the length of the container can be calculated. The first method is that if the tree's height is greater than its width, then the length of the container should be around 2/3 to 3/4 of the height of the tree. If the width of the tree is greater than the height, then the container should be 2/3 to 3/4 of the width of the tree.

Usually the depth of the container should be roughly equivalent to the diameter of the base of the trunk. However this suggestion is certainly not going to work for younger developing trees, or trees with a more slender trunk. Therefore this and the preceding guideline should not be strictly applied.

Shapes

Aside from the influence of color and the basic essence of the tree in the selection of a suitable container, containers themselves might be active or passive in what they contribute to the overall feeling of the composition. There is a characteristic, however subtle or challenging it may be to define, that containers add to the composition. Strong trees have a strong, wide trunk, strong angular branches, heavily textured bark and finally a mature, surface root system. A feminine tree is the exact opposite, so a more slender trunk with flowing branches and a younger bark or a bark which is of a more juvenile color. Selecting a pot which is appropriate will enhance these characteristics, but selecting an inappropriate pot will create visual confusion.

The following are a few pot shapes and their influence on the composition

Square

Provide a sense of stability to a bonsai composition. When used to plant a cascade styled tree the square pot compensates for the flow and movement typical of the style. The cascading branches are also less likely touch the pot.

Rectangular

Used to add to the feeling of strength projected by a tree. Informal upright trees are usually complemented by rectangular shaped pots. A shallower pot will enhance the appearance of trunk girth, although please consider cultivation requirement when using shallow pots. Some forest plantings work very well in rectangular pots, generally this is when there are some masculine or thicker trunks in the composition though

Oval

Particularly suitable for deciduous species of bonsai. As far as styles go, the clump style and grove or forest styles work well when planted in oval shaped bonsai pots. Fruit bearing trees also look good in oval containers as do root over rock plantings.

Round

Can be used for both conifer and deciduous trees. They are also very suited to the literati or bunjingi styles and windswept styles. They can also be used for cascade styles but sometimes it's square pots are better for this style as branches are less likely to touch the pot.

Here is a quick reference guide to the classical styles and the container usually used to plant with:

 Style Container shape
Formal upright

Shallow or medium depth rectangular

Shallow or medium depth oval

Informal upright

Shallow or medium depth straight side, oval.

Shallow irregular oval.

Slanting

Shallow or medium depth rectangular or oval.

Irregular oval.

Shallow round.

Irregular round.

Semi-cascade

Round, square, octagonal, hexagonal, semi-deep.

Cascade

Deep, hexagonal, octagonal or square.

Windswept

Rock slab, shallow.

Shallow free form.

Shallow, rectangular or oval.

Literati or Bunjin-gi

Shallow round.

Shallow free form.

Twin-trunk

Shallow round.

Shallow free form.

Multiple trunk

Shallow or medium depth square, hexagonal, octagonal, petal shaped.

Rock slab.

Shallow rectangular or oval.

Sinuous root and raft

Shallow oval, rectangular.

Free form.

Rock slab.

Decorative features

Here are a few typical decorative features you may find on a bonsai pot and what influence it may have on the tree.

  • A lip on the upper rim of the pot provides a feeling of stability, even when a strong tree is planted into it.
  • Straight sides that slope outwardly at the top work well with delicate trees.
  • Straight rims have sharp lines, but do not detract from the strength of the tree.
  • Soft corners, essentially soften the outline of the pot and make it slightly more feminine.
  • Rounded corners make a bonsai pot look a lot softer and perhaps even results in it beginning to resemble an oval pot.
  • Feet with a cloud design make the pot appear older and more valuable. It also adds a degree of elegance to the bonsai tree planted into it.
  • Stepped feet provide a sense of stability and add a little interest to the tree.
  • Short or almost inconspicuous feet are stable, but add nothing to the tree so are ideal for feminine trees such as Japanese maples or Stinkwoods with delicate branching. Not all trees combine well with pots with ornate feet, so a bonsai pot with simple feet can harmonize with the visual strength of the tree while not over powering it.
  • Side panels on a bonsai pot will add a little interest to the composition of pot and tree. These work best with strong trees of a more formal appearance.
  • Reliefs or raised ridges will generally echo the shape of the pot. It adds interest but is not as dominant a feature as side panels for instance.
  • Pots without ornamentation on their side walls do not detract from the trees strength in any way and are well suited to informal styles and delicate trees.
  • Convex sides which bulge complement strong trees in informal styles

Unglazed pots

With conifers, unglazed pots are generally used although they can sometimes be used with deciduous trees. However unglazed pots can be found in different colour hues of clay. It is best to choose one which harmonizes well with the tree. Brown can be considered a universally acceptable colour as it is the colour of the earth.

Glazed pots - Selecting a glaze colour

When choosing a pot of a certain colour, usually one takes into consideration the feature of the tree which you wish to enhance and then select a complementary colour to that feature. It is not uncommon for a tree which is to be exhibited in a specific season, to be repotted into a container which will enhance the most attractive feature of the tree at that time. To help you better be able to choose the right color for the feature you want to enhance in a tree it is necessary to have a little understanding of colors and their relationships with one another. The easiest visual tool with which to do this is the color wheel.

The color wheel

As you know, visible light is light which we can reduce to a spectrum ranging from purple to red. A very easy to use and familiar representation of this which most people would have seen is the colour wheel. The colour wheel shown below depicts the 12 main colours.

Primary colors

As is suggested by the heading, these colours are the main colors in the wheel and are the colors which all the others are made up of.

Secondary colours

By blending the primary colors we are able to create the secondary colors.

Tertiary colors

The last colors which are created to complete the full spectrum, at least those which we will discuss, are the tertiary colors and they are made up of the colors between the secondaries.

Analogous colors

Colors which are adjacent to a specific color is known as an analogous color. When these colors are used they produce a sense of harmony and it is also the color scheme which is normally found in nature.

Complementary colours

The complementary colors are those which are exactly opposite one another and therefore they are also known as enhancing colors.

It is this color combination which is the one most often used when we combine a tree with container. This is as when such schemes are employed the one color enhances the other. To use an example, the pink color of a flowering coleonema will be enhanced by using a green container. This is as green complements and enhances the pink.

Analogous complementary colors

Analogous complementary colors (a mouthful I know!) are those colors which are immediately adjacent to a complementary color. On occasion when such a color scheme is used visual tension can result. However they are often used as its not always possible to find a container in a color which is the perfect complementary color to the color being enhanced.

Color triad

A color triad is simply a combination of colors which can be found the same distance from one another on the wheel. When these colors are combined in a planting they may produce uneasiness in a viewer. So in bonsai it is not advisable to combine these colors. For example, where green is the dominant color of a tree and where the fruit or flowers are pinkish dont use a blue pot. This would essentially amount to being a color triad and will not be pleasing to the eye.

Warm colors

When we talk about warm colors we're essentially talking about color such as red, yellow or orange. You will note they are all adjacent to one another. These colors give the viewer a sense of warmth and comfort. They also possess a feeling of energy. These colors are also said to advance towards the viewer.

Cold colors

Shades of blue to green are know as cold colours. These colors when used in combination with a tree can provide a feeling of freshness. In contrast to the warm colors, cold color recedes from the viewer.

The following colors are the most popular in bonsai containers.

Green

Green is the most prevalent colour in all bonsai. Colours which harmonize perfectly with green are earth tones. Dark green pots complement variegated plant species well.

Dark

Darkest pots are best to emphasize flowers as they are usually white in colour. With flowers of a colour other than white, use a colour pot which complements the colour of the flower. They are also always used when you wish to display a tree without leaves but with fruit, such as a quince.

Blue

Bonsai pots with blue glazes are very popular as they are very versatile in many compositions. Powder blue will best complement red berries of a Rockspray, the fiery red of Japanese maple leaves in spring or the winter branching of a trident maple. A medium intensity blue will be ideal for any tree with an orange berry such as a Firethorn or an orange flower. Dark blue is best for yellow berries and flowers.

Cream/Bone

Greyish bark like that found on maples, stinkwood and hackberry harmonize very well with very light coloured pots, such as the creams. Light coloured pots are also traditionally used when you wish to display fruiting trees with fruit and leaves. These light coloured pots are not distracting and therefore are focus the viewers attention more on the tree and less on the pot.

The following table is provided as a quick reference.

Main color of the tree Suggested color of the container
White Light yellow, green, celadon, matte red, dark or light blue, white, very dark colors
Yellow Dark green, dark without glaze, blue, celadon, bone color.
Red Light blue, dark blue, green, off-white
Orange Dark brown, green
Pink Blue, green, white, bone.
Blue Red, yellow, matte white, bone, steel gray.
Variegated or whitish leaves Black or dark green
Evergreen conifers Brown, reddish, black, unglazed gray, matte white.
Junipers Unglazed brown or reddish
Deciduous leaf of soft and delicate appearance Soft gray (with or without glaze)

For further reading and to see some of these considerations above in action please read this article.

  •  

Miyajima Goyomatsu: Grafted White Pine

Introduction

This tree was imported from Japan by Bonsai Tree in 2019. It had been bare rooted as part of the export procedure, so on arrival it was immediately potted into a good soil mix and allowed to recover and acclimatize itself to the local conditions and seasons.

After a season of just being watered, fed and basically allowed to laze in the sun, I carefully inspected the tree to see how the tree had responded. Based on my observations and confirming the health of the tree would permit it, I decided to style the tree.

It is this process which I would like now to share with you. The season in which this work was performed is also important to point out:

  • I did this work during Autumn to take advantage of the thickening which takes place at this time of the year as trees prepare for overwintering.
  • This would result in any wire which I would apply being highly effective as this growth would help to ensure the branches would remain in position after the wire is removed.
  • It would afford me the opportunity of thinning old needles and to remove any dead inner branching to allow maximum light into the tree to strengthen and focus the tree's energy to the buds which remain.
  • Sap flow is relatively low so the tree would bleed less from the cuts of any branches removed, much less than if this work was done for instance in spring or summer.

A bit of a giveaway regards the timing of the work is the colour of the older needles which die and begin falling from the tree.

Tree inspection

About

The Miyajima Goyomatsu or grafted Japanese White pine is an exceptionally strong grower which possesses many qualities attractive in a bonsai tree including the tendency to develop density very rapidly. The soft needles which develop in clusters of 5 (instead of 2 as is the case in two needle pines such as Japanese red and black pines) have a very interesting grey-green colour.

The trunk and roots are Japanese Black pine but the branches and foliage is White pine. In time the bark on this tree will become increasingly more plated.

However the most outstanding feature to point out about these trees are that they are grafted onto Japanese black pine roots. Non grafted White pine can be challenging to grow outside of the climate which they would naturally be found in but when grafted on the much more vigorous Black pine roots we have a "super" pine which possesses the quality most revered in Black pine; the coarse bark and the soft, dense needles of the White pine. This also creates for us as bonsai artists many styling opportunities.

Tree Analysis

On close inspection of this tree which was field grown by one of my suppliers, one can see that the oldest needles are beginning to turn or have already turned yellow and are beginning to fall off. Part of the work which will now be done will include removing these spent needles.

Inner branches have died as a result of too little sunlight.

When the branches are separated you can see that many inner branches, which perhaps at one stage were simply weak, have now completely died back. This is as a result of lack of light penetration. These branches should be removed as part of the cleaning and preparation of this tree for wiring and subsequent styling.

Taking a step back; when presented with a bush like this and the material is carefully assessed for its merits, it's terribly exciting as the work which will now be done and the styling decisions taken largely determine the next 5, 10 or even the rest of this trees life. Therefore it is advisable to study at length, the tree from all angles and sides before launching in.

Styling

Change of angle

Using a few pieces of wood to alter the angle

The first step in styling this tree was to elevate the left side. This moved the trunk off from the vertical line created by the original planting angle. It is also the first step in creating movement.

Branch removal

Although there is a place for branches coming towards the viewer in this case a very heavy branch was directed straight forward and also obscured much of the trunk. This branch would need to be removed as a result. 

There are two methods for removing a mature branch such as this.If you want the scar to heal over then cutting it flush with the surrounding tissue and then sealing with the appropriate putty type sealer would be the method of choice.

Utilizing stubs of branches as jin.

However another approach would be to utilize a portion of the branch as jin. To achieve this one cuts the branch shorter but allowing a substantial stub to remain. If you want a much longer jin then stripping all the needles from the branch will also result in the branch dying back. At this point however do not remove the bark flush to the trunk as this will result in an effort by the tree to heal and thus a lot of sap will be produced at this area and will essentially be energy lost. Rather leave the bark on the branch for up to 3 years before stripping the bark off. This ensures that resin will penetrate the branch helping to preserve it. You can split the branch with blunt tools such as a root cutter though to give it a little character for now.

Exercise caution

There is a sort of euphoria which comes over a bonsai artist when they begin pruning. With the removal of each branch there is this belief that the structure of the tree is improved. However although this may be so, there comes a point both for the health of the tree and for its design that this can go too far.

Removal of this branch at this time is fundamental to the styling of the tree and there was no alternative.

One of the fundamental differences between a conifer and a deciduous tree is that you cannot cut a conifer down to a bare trunk or even denude it of most of its foliage without killing it or at least severely weakening it. With experience as an artist and knowledge of the species you are working on, you will come to know how much can safely be removed at a time.

Branches which are directly above one another are less than ideal, however for now some of these can remain, to be removed later.

No material is perfect, and no doubt one will find problem branches on every piece of material which makes its way onto your worktable. One approach is to remove all these problem branches all at once and set the tree back, the other is to take a more cautious approach and over time eliminate these branches but for the moment use them and the strength they give to the tree to assist you in developing the tree.

Needle removal

It is necessary to remove not only the yellow, dying needles from the tree but also some of the 2 year old needles, with a focus on the needles at the bottom of branches and in congested areas such as at the forks of branches. Removing these needles further increases sunlight penetration into the tree and cleans the lines of the foliage pads.

When removing needles, don't pull them unless you can ensure that you will not tear the bark when you do so. Its safer to cut the needles.

However when removing these 2 year old needles do not remove all of them. These needles are claimed to possess certain hormones which are important to the health of the tree, and although they may not be as functional on a photosynthetic level as this years needles, they still perform an important role and should be preserved.

Back budding

As is the case with most trees that have been field grown or emerging from the development stage, branches will tend to be leggy. Sometimes it is necessary to graft inner growth but fortunately this type of white pine readily forms buds on older wood.

It would be great to encourage buds on leggy branches like these. 

What is needed to generate these back buds is a healthy tree in good light. The more needles you have on a branch the more likely it is to produce a profusion of buds. By allowing these adventitious buds to form and develop aided by suffiicient sunlight, you will eventually be able to cut back to them and rebuild the branch thereby improving the structure (including branch taper and movement) as well as ramification.

Wiring

Although anodized aluminium wire is readily available and many will find it easier to work with, annealed copper is unbeaten in its ability to hold a branch in position. The artist is also able to use considerably thinner wire for a particular bend as opposed to the thickness of aluminium which would be required. Because of these qualities I chose to use copper wire for the wiring.

Whenever it is possible, it is always preferable to use a single wire versus multiple wires laid in parallel. One really should not use more than 2 strands of wire. (Take a look at some of the wiring tips and videos I have made available for your education)

As this is the first time this tree will be wired, and as our focus is on the positions of the primary branches we will apply "structural" wiring. What this means is that although I will apply wire to most branches of the tree the emphasis is on the structure of the tree which I need to get correct, and on this solid foundation then build the secondary and tertiary branching etc. Failure to complete or perform this step correctly will inevitably translate into a loss of time down the line when at least some of this work will need to be redone.

Order of wiring

One should always wire the most important branch of the tree, the one which defines direction first. Usually this is the first branch, but not always. 

A completed branch pad, wired and with branchlets placed to allow each to get their own portion of sunlight.

Part of the reason for setting the structure of this branch first is to imprint the aesthetic approach which will be applied to the rest of the tree and its branches. In other words if you are going to wire the first branch in a slightly upward fashion, this will influence the position of all remaining branches. If you are going to create a pointed or rounded pad, this will influence how the remaining pads on the tree will be formed too.

Branch breaks and splits

In bending branches you are very likely to notice some tears and splits. Another of Miyajima Goyomatsu's characteristics is that once the branches are around 3 or 4 years old they become incredibly stiff and are extremely difficult to bend, if not impossible although young branches are very flexible indeed.

Branch breaks or tears should be sealed as soon as they are noticed.

When they have begun to stiffen they will break easily when bent beyond a certain point. One needs to be careful with these breaks, sealing them as soon as they occur to prevent loss of resin, but these breaks can actually be used to our advantage as once healed they will serve to keep the branches in their 'healed' positions.

The apex

For many, the design of and creation of an apex in a bonsai is a challenge. I have heard it being described as an information upright tree in miniature. I do not subscribe to this philosophy at all. The apex is the strongest, densest area of the tree (barring some exceptions such as the satsuki and other basally dominant species) and thus it should be the most ramified and least defined area. Different species demand a different approach to the apex stylistically.

The completed apex. In time the structure of the apex will be improved as buds develop into new branchlets which are better positioned than existing branches.

The apex also performs an incredibly important role in the design of the tree as it, together with the defining branch provide movement. (For example, an apex positioned vertically over the base of the tree will be a visually stationary tree. However move it to the left or to the right and the suggestion of movement follows in the same direction). In the case of this tree, and as the defining branch moves to the left, the apex also needs to be positioned to the left. It also follows then that to further emphasise this movement we will hold back foliage mass on the left and allow it to develop more on the right. Although there are exceptions and other approaches to design what I have described is what could be called conventional design.

Styling complete, for now.

Aftercare

Single flush pines, of which Japanese white pine is one, produce a single flush of needles on candles which develop in spring. As a result unlike double flush pines that should be fertilized strongly in spring, single flush pines should be fed well in autumn and again lightly after needles have hardened off in late spring or early summer. Fertilizing these pines while candles are extending will result in excessively large candles and needles so should be avoided. After styling this tree I applied a few sachet of BonsaiBoost.

As a fair amount of foliage has been removed the loss of moisture through the needles will be reduced. This means that the tree will require less water, so I need to be mindful of this when I am watering and be sure to reduce water given to this tree.

In summer, in South Africa, these trees cannot be exposed to full, all day sun as the needles will burn. However as it is now autumn and the sun considerably weaker it would be fine to expose it to more sun which will also serve to strengthen the inner buds which will now get more light with excess foliage having been removed.

At some point in winter I will treat this pine, along with all my other trees with a solution of lime sulphur and water. This is part of annual maintenance and helps to control fungal issues, and it is also claimed it helps to reduce or event prevents the overwintering of some pests.

Video

  •  

Japanese Black Pine: Autumn Maintenance

Introduction

One of the concepts in bonsai cultivation I believe is often forgotten is that the techniques you apply to a tree differs depending on the stage of the trees development as a bonsai. In case you are not aware what there are or have forgotten them they are:

  1. Primary development (growing the nebari and trunk),
  2. Structural development (growing the primary branches),
  3. Refinement (growing tertiary and finer branches),
  4. Maintenance.

It is important to know where in the above stages you are with your tree in order to determine the correct techniques to apply. When searching for knowledge to increase your skill set and you read a blog or watch an instructional video, it is important to place the tree and the work in the correct development phase. Should you not be mindful of this you may be utilizing good technique at the incorrect time that may lead to unexpected and or mediocre results.

So for context I will confirm that this Japanese black pine is in the maintenance stage as the refinement of this tree is mature, although one can most likely never say "complete," as there are always improvements to be made somewhere. The techniques and manner in which they are applied below are not necessarily going to be the same as what might be best suited in your situation.

The challenge inherent to the maintenance stage is that the tree has developed into the profile you envisaged for it and now needs to be held at that size, but here's the catch, you cannot constantly be nipping off new growth in order to achieve this as the health of the tree would deteriorate.

In deciduous material techniques frequently differ to what we will use in coniferous as the challenges are different. However, the goals are largely the same:

  • Maintain a dense network of twiglets with minimal dieback.
  • Maintain delicate branching ie good branch taper to the tips.
  • Ensure the future of the branches.

History and Observation

To better understand what course of action is required on a particular tree it is advantageous if you know something of the recent steps or actions. I imported this pine in spring one year, in winter of the same season it was wired. It was allowed to grow untouched for the full season that followed. In spring of the new season, as very weak growth was observed during the previous season, I repotted it to invigorate the tree (Typically the more mature the tree becomes the less frequent you want to repot as this helps to control growth - to a point after which the health of the tree begins to decline. Knowing when this point is reached is a matter of experience).

Usually, barring some exceptions, one does not decandle in the same year as repotting a tree of this age as the root system would have had little time to recover and thus would have few resources with which to respond to the decandling and push new buds. So it was not decandled and simply allowed to grow, but that now brings me to the current state of the tree.

Tree prior to the intended work.

With the tree on my worktable I can observe how it responded to the previous treatment. This is what I noted:

  • The tree vigor has increased substantially and wire bite is beginning to occur.
  • There are a number of fairly strong candles which have developed long needles.
  • Energy is very unbalanced with the apex being the strongest and the lowest back branches being the weakest.
  • A good number of adventitious buds have formed along the branches.

To do list

  1. Remove wire to avoid further wire bite.
  2. Pluck needles to balance energy for more even candle development in spring.
  3. Shorten overly long needles to promote light penetration.

Remove wire

I originally wired this tree with copper. Copper hardens as it is applied and this phenomenon increases its holding capacity but it also makes it difficult or impossible to remove all but the thinnest of gauges from the branches by unravelling. So the wire needs to be cut. It is advisable to use a bonsai wire cutter for this as the rounded nose is designed for repeated cuts of wire while limiting the risk of cutting the branch itself. I also find what is called a Jin pliers to be helpful for removing wire as sometimes wire needs to be dislodged even after being cut. If wire has bitten in you will first need to lift it using the pliers before being able to cut it.

See the wire I initially missed? This could lead to some nasty wire bite if left in place.

Copper wire oxidizes very quickly turning black in colour, which makes it more difficult to see on the branches so very thorough inspection of the branches are required to ensure you do not miss any wire. Failure to remove the wire completely may result in unsightly wire bite and you may ultimately need to cut the branchlet off.

Removing wire from a tree of this refinement takes time, I believe it took me an entire day, so you can guess how long it took me to apply! It is a good opportunity to study your own wiring technique, if you wired the tree to begin with, and see where problems lie and how you might improve your technique for the future. Care was exercised in gathering this wire into a bin as I don't want it to end up in a landfill, it can rather be taken to a recycle depot.

It's not about the money for the wire recycling - its about the environment.

Wire removed from the tree, neatly collected for recycling.

Needle plucking

Needle plucking on pines is performed using a purpose made bonsai tweezer and is a task which is performed for several reasons at different times of the year.

Without needles there is no sapflow to a branch and it will weaken and die. Bear this in mind when determining how many needles to pluck; too many and the branch is weakened and if this is done repeatedly over successive seasons the branch may die. Plucking too few and the reason or goal for plucking in the first place is likely to be missed.

Rather than get into all the variations of this technique I will speak entirely to this particular instance.

Strong candles make it easy to identify the strongest zones of the tree.

In order to begin balancing the energy ie. directing energy away from the strong parts of the tree to the weaker, more needles need to be plucked in the strong areas and the weaker areas are either left alone or only a few needles are removed. Usually when you read about the quantity of needles to remove, the author refers to pairs of needles and not individual needles. For this two needle pine I will pluck needles down to 3 - 4 pairs (6 - 8 needles) in the strongest areas and keep 6 - 8 pairs (10 - 12 needles) in the weakest. With more needles in the weak areas and less in the strongest more sap will flow to the weak areas strengthening them.

Buds on a weak branch. No candle extension occurred in this area during the past growing season.

Where candles did extend this past growing season, but where I also find many 2 year old needles I will thin some of the 2 year old needles making sure to keep some as they are said to be beneficial to the health of the tree. Start plucking needles at the bottom of the branches first, retaining those on top which are also more exposed to sunlight. This also produces a more aesthetically pleasing result, with clean undersides to the foliage pads.

Needle cutting

Many years ago I was told that cutting needles would eventually lead to shorter needles. Although perhaps this might very indirectly occur, needle cutting is not a technique utilized to achieve short needles. The main reason needles are cut is to increase sunlight entering the canopy on ramified trees where this is much reduced due to the dense canopy. In order to keep inner growth healthy, sunlight must reach them and this is one way to achieve this. The tree finds itself in need of needle cutting as the candles of this season were not cut. Were the candles cut the needles would have been much shorter and would not need cutting.

I must stress that needle cutting is used only in certain situations, it is NOT the go to technique for achieving short needles. The tips of cut needles brown, this is unavoidable and unsightly, although using short scissors and apparently misting, does limit the browning. I do not appreciate the very crisp, stylized and topiary-like aesthetic of the foliage pads created by the cutting of needles, the natural needle tip is very much more appealing however it is not uncommon to see especially shohin trees displayed in Japan with a few cut needles here and there.

Future proofing

As pointed out earlier in the text, the past growing season's candles were allowed to extend uncut. This extension increased the vigor of the tree. Once a tree has settled into the cycle of maintenance, controlling needle length and building ramification is the product of needle plucking and decandling. However in this case as decandling was not possible, some of the candles developed very strongly (as the tree was also not needle plucked) and this growth was coarse. Ultimately this growth will need to be removed to enhance the taper of the branches in the canopy.

Invaluable buds which need to be nurtured as they will ensure the future of this branch.

However allowing the candles to extend aided by a good feeding regime and with sufficient light, adventitious buds will form along the branches even fairly old ones provided bark has not formed on it. These buds ensure the future of the tree as it is to these buds that the branches can eventually be cut back to, once the buds have developed into strong enough shoots.

Adventitious buds readily form on healthy trees

Encouraging the development of these buds is of the utmost importance during most phases of pine development but especially so in the maintenance stage.

Bear in mind that buds will never develop on the neck of the candle, the area which never produced needles. Buds can only develop where once needles were or still are.

Branch removal

In a previous post about the styling of a Japanese white pine, I remarked on the removal of branches and how to cut them, to a stub or to the surrounding trunk immediately.

The outcome of two approaches to dealing with branch removal.

Here you can see the outcome of two different approaches.

On the left a branch was cut and a considerably long stub left. After a couple seasons had passed the dried wood of the stub was shaped into a small jin using a jin pliers. You can see a complete absence of swelling at the base.

In comparison, to the right you can see what happens when a branch is removed completely, the cut shaped with a knob cutter and not treated with putty type sealer. The callous formation is both ugly and the swelling has contributed to reverse taper. Instead of cutting clean and gouging the cut should have been shaped to a peak, proud of the surrounding tissue and then properly sealed with conifer putty type sealer.

End result

I would like to acknowledge Mr Koji Hiramatsu of Hiramatsu-Shunshoen for his guidance in the scope of work detailed above although he has neither read nor does he endorse what I have written.

  •  

Lophophora williamsii, ancient & mythical cactus

The following article was written by Gerhard Vermeulen of Cactus and Succulent Collectors

Background

An intriguing history

The ancient Lophophora Williamsii, commonly known as Peyote, is undoubtedly one of the most mythical of all cacti. It originates from the area between South Texas and Mexico. Here, it has played a prominent role in the religion and culture of the indigenous native American Indians for over 6000 years and is still used today for religious and healing purposes. The mind-altering psychoactive properties of mescaline, which is found in the body of the plant, is used as a vessel to transport minds to the ancestral spiritual realm.

The attraction

For avid collectors of cactus, however, the peyote’s beauty lies in its plump blue-green, soft thornless skin and cute button-like appearance. The small tufts of soft, white or yellowish-white woolly hairs that grow from the cusp areoles, add to the charm of the plant. These soft white tufts of hair that give the peyote it’s charming and recognizable appearance, are actually only apparent in cultivated plants. In habitat, the tufts are ‘missing’, mostly because of wind and other harsh elements.

Diffusa 5yrs old

Williamsii 8yrs old

Species diversity

There are quite a few species of peyote, but only two of them are accepted and registered. These are the peyote williamsii and the peyote diffusa, which is also known as the ‘false peyote’. The most obvious difference between the two plants is the colour and firmness of the button. The diffusa is yellowish-green in colour and the body, the ‘button’ is not as firm as that of the williamsii. When people refer to ‘peyote’, they are generally referring to the williamsii, as it is the oldest and by far the most loved and cultivated peyote. For the purpose of identification, I will be highlighting the differences between the two species

Growing in cultivation, with habitat in mind.

Williamsii in cultivation

Natural habitat

In its natural habitat the peyote is extremely slow growing. It can take up to thirty years to reach full maturity, sometimes only flowering after ten years. It seldom becomes bigger than the size of a golf ball. Because of the slow rate of reproduction as well as the excessive removal of plants from habitat, the peyote williamsii is regarded as ‘under threat’ in the wild. Fortunately, in cultivation the peyote grows a lot faster. From a seedling to a flowering adult could take as little as four years. In habitat, peyotes grow between rocks, in crevices and under shrubs and plants. In cultivation, the same part sun / part shade principle works well.

Container selection and growing medium

Peyote plants have an enormous tap root and this makes them quite prone to root rot. A deepish pot will work to accommodate this long tap root.

Williamsii showing tap root

Peyotes grow well in very gritty soil, with good drainage. They generally don’t like compost or plant matter. In order to keep the medium loose and airy, I recommend using a mixture of Pumice and Akadama. This mixture provides the ideal base for the roots, but does not provide the nutrition that the plant needs to grow. A good general fertilizer will work for feeding. Ideally though, a high potassium, low nitrogen fertilizer is preferred. This will ensure that the plant doesn’t grow too quickly, as this could cause the soft skin of the peyote to burst.

Watering

One should also avoid overwatering, as this is another common cause of burst skin and also dreaded root rot. Overwatering can also cause the plant to become elongated and unnatural in appearance. Peyotes grow in summer and as with all cactus, are dormant in winter. During this time, they should be left to rest. I personally do not water my peyotes at all during their dormant season. Initially it may be difficult to know exactly how often to water, but a good rule of thumb is to remember where the plant grows in habitat and to err on the side of ‘too little’ rather than too much.

Pests

One of the most important things to do when growing peyote in cultivation, is to keep the plant clean. Dust is like a magnet for red spider mite, enemy number one for a peyote. Red spider mite is active during the warmer months. These nasty sap-feeding mites, commonly known as red-devils can kill a plant by destroying the epidermis, which in turn creates a scab-like crust. These scabs leave horrible scars which can take years to heal. This damage also slows down the growth of the plant. Once the damage is done, there is very little that one can do to treat the plant. Fortunately, a peyote is fairly resilient and can heal itself. Actually, it is quite a good healer but it is essential to ensure that the spider mites are eradicated quickly to stop further damage. (Read more about pests and diseases here)

Williamsii 30+ years old showing earlier red spider-mite damage

Flowering

A mature peyote will bloom frequently in summer with up to three flowers. The flowers grow from the woolly tuft in the centre and are magnificent shades of pink and soft white. The flowers are followed by small pink fruit. Once mature, these fruits will be brownish-white and dry and will contain the peyote seeds. The peyote williamsii is mostly self-fertile, but certain variations can be self-sterile whereas the the diffusa is always self-sterile. Propagation from seeds is possible and fairly easy with the right care and much patience. A very mature peyote may produce pups, but growth is extremely slow, especially on the williamsii.

Flowering williamsii showing 3 flowers

Williamsii showing seed pod

Conclusion

Collecting and growing your own peyote is an extremely rewarding experience. The intrigue and charm of a peyote never fades and the plant can be admired by all for its natural beauty and ancient mythical history.

Gerhard Vermeulen from Cactus and Succulent Collectors, is an avid collector of peyote. He is based in the Helderberg area. You may contact him on whatsapp number : 071 370 8613 or via his Facebook page Cactus and Succulent Collectors at: https://www.facebook.com/collectorsworldwide/

  •  

What is seaweed and is it good for your plants?

The following article has been written by Jackie Wiggins of Rawkelp

Overview

Kelp (Ecklonia maxima) – also known as brown seaweed.

Seaweed is an algae found in and around our South African coastline.  It is the only plant that grows from the top down and as it has no root system, it is held on to a rock by a holdfast.  All nutrients are drawn from the ocean through the fronds (leaves) which enables elongation of the stipe (stem) to gain access to the sun for photosynthesis.  Once harvested, the fresh seaweed goes through a cold press process to extract the nutrient filled liquid and this is manufactured into growth stimulants for plants and widely used in agriculture.

kelps beds

Kelp beds along the South African coastline.

Kelp and Micro nutrients

All land plants need macronutrients, nitrogen, phosphorus and potassium (NPK) to grow.  Often overlooked by new growers is the equal importance of micronutrients which naturally become depleted in your soil even when fed well.  Both macro and micro nutrients are found in abundance in kelp.

dry kelp

Ecklonia maxima beachcast

Auxins and Cytokinins

Kelp also contains auxins and cytokinins which are effective growth promoting hormones. The quantity present of these hormones is small but only a small amount is required to make a big difference to your plant growth.  An auxin is the natural occurring Indole Acetic Acid which is in fact a weak organic acid.  It has a simple chemical structure but is strong in controlling cell division to promote amongst others, root growth.  Auxins are also responsible for the plant “growing towards the light”.  Auxins naturally move to the side of the plant away from the light and as they cause the stem cells to elongate, they cause the plant to lean toward the light.

harvesting kelp

Harvesting fresh kelp

Cytokinins work together with auxins.  They are also found in roots but travel to stem tips, leaves, new fruit and flower buds to aid with cell division and growth.  They do this by increasing protein production needed for mitosis.

How to use kelp

Dried kelp holds all the same goodness as the liquid format but dried kelp flakes and kelp meal have the added benefit of its water retention ability.  Therefore, if you add kelp meal or flakes to your soil at planting stage, it retains moisture.  The kelp is therefore hydrated within your soil and not only feeds the underdeveloped roots with valuable nutrients, it slowly releases the moisture too.  As it breaks down, it adds humus to your soil and creates a healthier environment for your plant.

liquid kelp

Sea-Rock and Kelpak are liquid extractions of kelp which can be used in agriculture as part of a complete fertilizing regime.

dried kelp

Dried kelp chips are a popular additive to growing media in container gardening.

Dosage

A little goes a long way.  There is no point in “overfeeding” your plant, it will just go to waste.  Stick to the application instruction on the packaging and frequency suggested and your results will be very satisfying.  You generally need to feed your plant kelp at planting stage and one week later and then every second or third week thereafter.  If your plant is under stress, feed once a week until the plant regains strength.  Feeding instructions will be found on the packaging of your kelp product.

Conclusion

Make sure you use organic kelp products without unnecessary additives which your plants cannot uptake.  That said, kelp is not a complete fertilizer, it would be beneficial to check your soil quality to determine your full requirements.  Happy growing and keep it green.

RAWKELP is based in Gordon's Bay, Western Cape and sells largely raw material to manufacturers of organic fertilizers. We have recently entered the online retail market with our liquid kelp suspension, SEA ROCK® and our dried kelp flakes DRIKELP® to bring the wonders of this natural growth enhancer to the home grower. You can contact Jackie Wiggins of Rawkelp on 082-8995130 or [email protected]. Or visit their website: www.rawkelp.co.za

  •  

Icons of the African Savannah

The following article was written by Leigh Kemp

Introduction

Described as grotesque by some, but looked upon as majestic by most, the baobab [Adansonia digitata] is a dramatic part of the African landscape. Legends of Africa tell that the baobab is the portal from where all life on earth emanated. Today it still provides for man and animal alike. Revered by the people of the continent the baobab is protected by this reverence.

A striking photo of a group of baobabs in Tanzania at sunset

One of the most striking symbols of Africa, the baobab defines the landscape in the savannah regions across the African continent, from the north eastern parts of South Africa, through east Africa into West Africa and the Sahel region that buffers tropical Africa from the Sahara. The baobab is known as the Tree of Life in many cultures on the continent, said to be where all life stemmed from and because of its life sustaining qualities. A single tree is capable of storing up to 100 000 litres of water and can live for thousands of years, adding to the legend of its supernatural powers.

Baobabs are very difficult to age due to the faint growth rings but it is determined they can live for thousands of years. This ageing is done through radiocarbon dating. The oldest known baobab to date is 2500 years. It is believed that the largest baobabs in Africa range between 750 and 2000 years old.

Against the odds

Another fascinating aspect of the tree is its ability to survive great damage. The bark of the baobab has been used by humans for centuries to make ropes and mats. Unlike most other trees that have their bark peeled the baobab can survive this debarking. Today the signs of human activity can be seen on many of the baobabs around Africa in the scars on the lower parts of the stems. This gives the baobab its gnarled look.

Evidence of fresh elephant damage on a baobab.

More evidence of damage inflicted by elephants on a Tanzanian baobab.

Modelled by climate, terrain and animals baobabs grow in numerous very interesting shapes. Elephants are known to shape baobab trees by pulling down branches to be able to access the inner pulp and to get at the fruits. The broken branches will continue to grow if they still have some contact with the main tree. Elephants will also dig out the inner pulp of the tree for the moisture and fibrous nourishment. The tree will continue to grow after the apparent demolition and many trees today with hollowed out insides are used as restaurants, bars, toilets and even prisons.

Baobabs may fall, or branches may break, but they will continue to grow. From barrel-shaped stems to slanting and straight style the baobabs of Africa showcase a variety of shapes. There are single standing baobabs, some split from the roots and some straight and spreading from the apex. In some places in Africa there are baobabs occurring in groups and within these groups there are differences in shapes and styles.

There are eight species of Baobab in the world. Six species are found in Madagascar, one species in Australia and one species in Africa. There is a debate as to whether the African baobabs represent two species or only one. Some scientists are of the idea that the baobabs in some of the highland areas in East Africa are a separate species due to smaller leaves and flowers.

Madagascar is renowned for its lemurs, but for botanists it is the baobabs of the country that are the star attraction. Of the eight species of baobab in the world Madagascar has 6 species, with the most famous being the Giant Baobab [Adansonia grandidieri]. Reaching up to 30 meters tall, the group known as the Avenue of the Baobabs is a much-photographed group of baobabs in the western part of the country.

The smallest baobab in Madagascar is the Fony Baobab, [Adansonia rubrostipa], that grows up to 5 meters tall and can be found in the Spiny forest Reserve near Ifaty on the South-west coast of Madagascar.

Examples multi-stemmed baobabs in the Pafuri region.

Baobabs often look as though they are more than one tree. This is a result of the young stems splitting from the roots, and sometimes from germination. There are a number of examples of multi-stemmed baobabs in Southern Africa: in the Pafuri region in the north of the Kruger National Park and the Big Tree in Victoria Falls in Zimbabwe. The Big Tree seems to be seven different trees but botanists have proved that it is one tree.

Flowers and seeds

Large white, and sweetly scented, flowers usually emerge in the late afternoon in early summer. They fall from the tree within a day or two – after night time pollination by fruit bats and hawk moths. The hawk moth pollination is still debated by scientists, although I have personally photographed hawk moths feeding on the baobab flower. Some scientists say hawk moths are nectar thieves and not pollinators however.

Convoluted hawk moth [Agrius convolvuli] and baobab flowers.

Though beautiful to behold, it must be remembered that baobab flowers are sacred in many cultures – it is believed that if you pick a flower from the tree you will be devoured by a lion.

The fruit is a large oval-shaped capsule consisting of a hard woody outer shell enclosing black kidney-shaped seeds that are covered by a white powdery substance. This substance is soaked in water and used as a refreshing drink. The drink is also used to treat fevers.

Legends of the upside-down tree

There are local legends that say baobabs grow upside down: when the tree has no leaves it seems that the roots are in the air. The one story is that God gave the seed of each tree to an animal to plant. The hyena was given the seed of the baobab and in spite that God had made him so ugly he decided to get revenge, by planting the seed upside down.

Another legend goes that at the dawn of time God put the baobab in the valley, but the tree was unhappy, believing that it should be on the mountaintop to showcase its regal stature. God listened and moved the baobab to the mountain top. After some time the winds and snow on the mountain top was too much for the baobab and it complained to God, who then picked up the tree and threw it far off into the plains of Africa. The tree landed upside down and has been so ever since.

Sunset image of the upside down tree in Botswana.

Baobabs dying out

Over the past few years there have been a number of incidents of baobabs falling and dying for no apparent reason. Botanists are at odds over the causes of these trees dying. It is hoped that these incidents are the exception rather than the rule. It is thought to be that the lengthy drought over the past decade has affected the water content of the tree and they are dying of dehydration. Another train of thought is that the dying trees have reached a certain age where they cannot adapt to climatic changes fast enough.

About the author: Leigh Kemp grew up in nature on a remote farm in the Eastern Cape. This geared him to a life of travelling the wild places of Africa for more than 35 years as a wilderness guide, tour guide, travel writer and conservationist – learning and collecting information and images on all aspects of the African wilderness. Visit his site here, contact him directly on kempleigh06[at]gmail.com or call him on +27 79 596 6671.

  •  

Acacia: African Inspirations

The following article was written by Leigh Kemp. If you missed his other articles be sure to read them here.

My dad once told me a story about a tree in the Sahara that he had heard of whilst fighting in the desert during the WW2. He had heard that the tree was the only one for 250 miles in either direction. I cannot remember the circumstances around the telling of the story but it resonated deeply. The idea of a gnarled, remote tree surviving against the odds has inspired me throughout my life’s journey.

I now know that the tree my dad was telling me about is the Tree of Ténéré in Niger, the loneliest, or most isolated, tree on earth. It was the sole survivor of a group of trees that thrived in less parched times. The tree stood alone for decades. The Tree of Ténéré was an acacia – the species was either A. tortillas or A. raddiana

The loneliest tree on earth, or it was till it was knocked over!

A landmark for caravans of the Sahara, the tree finally succumbed in 1973 – knocked over by a drunk truck driver. The only tree for 400 kms and a drunkard drives into it!

Fascination with acacias

During my early years I was also fascinated by images of flat topped and umbrella shaped acacias on the plains of Africa. These trees were often alone in pictures, giving the impression that the trees were dotted sparsely across the plains. Giraffe and topi antelope were sometimes added to the picture.

A Topi surveying the land from its vantage point

Acacias of Africa have now been renamed into two genus’: Vachellia and Senegallia – the genus Acacia now applies to the wattles of Australia. For the sake of the story I will continue to refer to the African trees as Acacia

Over the years I have been privileged to have travelled in many parts of Africa and seen many species of Acacias. The shapes and styles of the different species have had me intrigued for as long as I have travelled. The Acacias have provided inspiration for artists, photographers, writers, conservationists and dreamers for centuries. Arguably the most famous of these inspired artists is South African painter Jacob Hendrik Pierneef.

Umbrella thorn, Pierneef form

Pierneef’s work was inspired by the South African landscape, with the acacia’s playing a massive role in his art. His ideal was to simplify the landscape and bring harmony and order to nature. Such is his artistry that his name is used to describe one of the African styles of Bonsai by South African bonsai artist; Charles Ceronio, now deceased. This style is associated mostly with Africa acacias such as the V. tortilis or Umbrella Thorn and the V. erioloba or camel thorn.

A wise old Acacia at the foot of Mt Kilimanjaro

Both the umbrella thorn and the camel thorn can grow into the famed umbrella crown, but both can grow into untidy and scrubby bushes depending on the soil and animals that feed on them. In areas where goats are kept, the trees seldom grow into anything resembling the characteristic crown.

The umbrella thorn is the tree that provides the classic images on the Serengeti plains and as such is one of the most photographed species in Africa. An iconic image of the African safari is of a leopard lying on a branch of an umbrella acacia – or feeding on a carcass it pulled into the tree.

Seeking shade under the umbrella of an Acacia on the plains of the Serengeti.

A point of interest is that the wood of the umbrella thorn was used by the Israelites in the Old Testament in the making of tabernacle furniture, including the Ark of the Covenant.

Flat Top Form

Tanzanian Acacia in the so-called Flat Top form.

Another African style of Bonsai inspired by acacias is the Flat Top Style which is mostly based on the paperbark acacia [V. sieberana] and the flat top acacia[V. abyssinica]. Unlike the Pierneef style umbrella shaped trees with dome-type tops, the flat top trees are exactly as the name says, flat topped.

It must be stated that many species of acacias can develop either a flat top or umbrella top depending on circumstances.

Why umbrella or flat topped?

During my guiding years I was often asked about acacias and why they grew as they did on the African Savannahs. After many years of research and personal observation I can offer explanations ranging from herbivore activity, soil type, climate and niche playing a role. I can safely say that all these factors play a role.

Typical forms of Acacia seen in the Eastern Cape.

I grew up in the Eastern Cape Province of South Africa, in the Kei River Valley, where the sweet thorn [Vachellia karroo] is the dominant acacia in the area. The tree grows in various sizes and shapes according to where it is in the area and what stock grazes on the farm. The acacia trees on cattle farms are larger, and more varied in shape, than the trees on goat farms. As we know goats will eat everything in their path and the trees are kept well and truly trimmed.

Acacia in both flat and umbrella forms growing in a group.

As with many acacias the sweet thorn is controlled by climate and soils. In higher rainfall areas and deeper soils the trees are taller and larger whereas in areas such as the Karoo they are generally smaller. Karoo trees are also kept trimmed by greater use by herbivores.

The largest sweet thorn acacias I have seen are in the Okavango Delta in Botswana on the larger permanent islands where the soil is fertilised by the annual floods.

Giraffe do a great job of keeping Acacia neatly trimmed.

But why the Umbrella or flat tops?

The open savannahs are the places where we find the most dramatic flat top and umbrella shaped trees. In the Serengeti ecosystem, the vast open grassland in East Africa, you can find isolated trees, or small stands of acacias with the artistic shapes. But why is it that in this seemingly very fertile plain there are so few acacias?

Not to go into too much detail, but the Serengeti has a very shallow soil deposit which ensures the nutrients stay in the shallow layer – and the grass provides for the great herds. The reason for the shallow soils is because of the layer of lava from the ‘explosion’ of the Kilimanjaro-type volcanic mountain that stood where the Ngorongoro Crater now is.

Acacia growing in the Ngorongoro Crater with its wide canopy, perhaps to protect the shallow root system below.

The lava deposit covered a vast area, which over time was covered by dust blown earth. The grasses took root and flourished but the deep-rooted trees struggled in the shallow soils. It is said that the umbrella shapes happened so as to protect the now-shallow root system by providing shade from the heat, and as some have surmised, providing shade for the animals to shelter under and as such preventing other animals from digging up the roots.

Another explanation is that in wooded areas the trees grow upwards to seek sunlight but on the open plains there is no competition so the canopies grow outwards. Animals such as giraffe do feed on the canopies but not in great enough numbers to keep the tree trimmed.

Providing for nature

The pods of acacia trees are used as fodder for domestic stock and are much sought after delicacies for wildlife, including antelope, baboons and monkeys.

A drowned Acacia is a popular roost for birds seeking refuge from predators

I have watched impalas waiting under camel thorn and umbrella thorn trees whilst baboons feed on the seeds in the trees. The impalas know that the baboons will drop seed pods. Elephants have a taste too for the pods, often shaking a tree to dislodge them. The leaves are also fed on by giraffe and elephants. It is not unusual to see elephants standing on their hind legs to reach up to the leaves in the crown of the tree.

A Gerenuk impressively stands on its hind legs to reach the tastiest Acacia leaves

Inspired by nature

There are many reasons given for the shapes of the acacia trees of Africa and in these reasons are disagreements. One thing is not argued, however, and that is that the Acacias of Africa are inspiring in whatever shape they may be growing in.Tall, gnarled and even seemingly deformed, these trees enhance the landscape.

About the author: Leigh Kemp grew up in nature on a remote farm in the Eastern Cape. This geared him to a life of travelling the wild places of Africa for more than 35 years as a wilderness guide, tour guide, travel writer and conservationist – learning and collecting information and images on all aspects of the African wilderness. Visit his site here, contact him directly on kempleigh06[at]gmail.com or call him on +27 79 596 6671.

Styling an Acacia in the Pierneef style, watch it on my YouTube channel!

  •  

Two Needle Pines from Seed: Early Years

The following article follows from a video which I did with Mark Polson about growing pines from seed. I extracted the key points from the video, which you can watch at the end of the article and embellished on the content. You can also read this article which will provide more detail on the earliest stages of development.

Choice of container

The type and size of container you choose to develop your pines in has a major influence on the resulting growth you get. Below are the most used frequently containers you will most likely select from:

  1. plastic pot
  2. colander
  3. clay containers

Plastic pots

Advantages

They are the cheapest option, easy to find, in fact you most likely have several on hand around the garden. Available in many different sizes, you need to use a size which is appropriate to the age of the tree and not be tempted into thinking that a large container will result in faster growth as in reality you are more likely to overwater your pines which will in fact retard the growth and possibly lead to fungal problems in the root system.

Healthy young pines in plastic containers

Disadvantages

Be sure to use plastic containers which have plenty of drainage holes at the bottom, as you want excess water to drain rapidly. Plastic does not allow moisture to evaporate through the walls so your watering and growing medium needs to bear this in mind. Roots can circle the container which means that attention needs to be paid to pruning the roots carefully when repotting to achieve a pleasing nebari in later years. Plastic containers are usually deep when in fact what is more desirable for bonsai cultivation are shallow, broader containers.

Colanders

Advantages

Growing pines in colanders seems to be the most popular method in the West and is based on a technique developed in Japan by a pine enthusiast some 30 odd years ago. It is said that this method can lead to greatly accelerated growth and in turn trunk thickening, essentially speeding up development of pines. It is claimed that as roots reach the perimeter of the colander and are exposed to air, the roots stop developing, and more roots are issued from the base of the tree. This is said to greatly increase the number of roots on the tree which increase its ability to absorb nutrients.

Disadvantages

Colanders do not last awfully long as they were not intended to be exposed to the sun, least of all the South African sun. After a season or two, they will need to be replaced due to the UV degradation of the plastic. However, when the pines are small enough, the colanders we offer which were originally developed for the hydroponics sector are adequate and more robust. You will need to locate increasingly larger colanders from plastics retailers as the trees develop and although the cost of these will be more than plastic pots, they are cheaper than clay containers although they will not last as long.

Clay containers

Advantages

Good quality fired and unglazed clay containers have been the container of choice for many years and remains the most used from my observation. It has good thermal characteristics and water can evaporate through the side walls of the containers. Unfortunately, once again the challenge is finding containers wider than they are deep, the most appropriate we have been able to source locally are commonly referred to as azalea pots. Available in a wide range of sizes these containers can last indefinitely and would become rapidly inoculated with mycorrhizae spores rapidly which will benefit pines planted into them in future.

Disadvantages

These containers are likely the most expensive of the three options but given they will last an exceptionally long time and could be recycled to develop many more trees over the years they do offer good investment. They are however more fragile than the other options too and can break if dropped or knocked over by the wind.

Creating Exposed Root Style pines

Working with a rooted seedling you gather the roots and carefully place them into a cylindrical means of containment such as a piece of pipe then barely inserted into more conventional growing medium in a second container below.

Young pines being developed for exposed root style in 80mm drainage pipe.

The choice of growing medium in the cylinder should be incredibly fast draining allowing plenty of oxygen flow around the root zone. Examples include stone or pumice particles of roughly 8 – 10mm in size. This will encourage the roots to rapidly develop downwards and into the more water retentive mix below, it will also allow more frequent watering and if using solid organic fertilizer will further accelerate development.

I should add that to initially assist and protect plant growth immediately after repotting, you should top dress with some water retentive media or very coarsely grated sphagnum moss.

This image illustrates nicely how to layer various grades of growing media within the cylinder when developing exposed root and cascade style pines.

Allow the tree to develop for a few seasons after which you can remove the tree from the cylinder exposing the roots. The roots, as they snake their way through the large particles of media into the lower container may produce some interesting bends, however if you are not happy with the result you can wire the roots as you would branches.

A young tree being trained in the exposed root style

You could also produce cascade pines using this method however instead of using such coarse material in the cylinder, you will use finer media as you will eventually need to reduce the root ball in order to fit it into the final bonsai container.

Root treatment

One of the methods of treating the roots when the tree is still at the earliest stages of development is to treat it like a cutting. This method produces roots that emerge at the same point along the trunk and radiate outwards. Regardless whether you intend growing small or large pine bonsai this method is the best way in which to achieve the most pleasing nebari. Aside from enhancing the appearance of the roots, this shortening of the stem also results in growth closer to the soil level; growth which can be used as sacrificial branches to thicken the trunk and is particularly useful when growing mame or shohin sized pines. The cutting process is described in greater detail in a previous article which you can read here.

A mature specimen Japanese black pine with good nebari.

Growing Mediums

One of the requirements your growing medium should comply with is the ability to provide sufficient water retention that frequency of watering is sustainable for you. In other words, although a very coarse mix might produce superior growth if you need to water three times a day to provide sufficient moisture but you are away at work all day, then that is not a sustainable medium for you. However, the extreme opposite being for instance a medium that consists of a high degree of water retentive and compacting organic material will retard growth and will produce root rot related problems. Somewhere in between is where you need to find the sweet spot for you.

In the video Mark mentions that he favours a mix which consists more or less of equal parts Akadama, pumice and our Professional Mix (80% Leca / 20% Peat) which he has found to provide his plants with excellent drainage. The Akadama and small quantity of peat provides sufficient water retention for his needs and he values the CEC value of the akadama which means his fertilizing regime can be more effective as nutrients are released over an extended period (as opposed to rapidly or as a “glut” of nutrients which pass through the medium unutilized).

Pines are not thirsty plants, certainly not when compared with deciduous species such as maples. This is in part at least due to their leaves being needles which by design transpired dramatically less. They can also tolerate much drier conditions and detest wet feet, thus growing media should make provision for this. Probably the most used mix for pines and in fact conifers in general would be Akadama, Pumice and crushed Lava stone in equal parts with a small amount of agricultural carbon added (known as the “Boon mix” by many).

Position

Pines love full sun. The more sun you can give these plants the better. If you live in an area which receives a lot of wind, which just so happens to be the case of both Mark and myself, you can expect less fungal related issues with them too as the wind helps to keep trees dry. If you do not live in such an area it is advisable to make an effort to only water the soil and not wet the needles when watering. As you are likely to wet the needles to some extent anyway, it is advisable to rather water earlier in the day to allow sufficient time for the needles to dry before the day ends.

Some of the authors pines in full sun, exposed to the wind.

An added benefit of wind is that it causes the plants to transpire more, which means you need to water more often (meaning you can apply more fertilizer) but it also means that these nutrients are being transported throughout the tree more rapidly too.

Wiring

How and when you apply and remove wire from a pine is an important step in its development.

All conifers have a springy nature so they have the tendency to return to their pre-wired state when wire is removed. The more you allow wire to bite in, the less this is likely to happen as the biting in is caused by the tree putting on more wood which if growing in that position should help the tree to remain so when the styling aid of wire is removed.

Wire bite like this produces a thicker trunk is less time and creates interest too 

Wire bite is usually something to be avoided however it can be utilized very effectively to assist in the rapid thickening of a pine trunk, and usually Japanese black pines and thick trunks are synonymous. To make the most of this phenomenon it is best to ensure the tree has wire on starting in early Autumn as this is when this vascular tissue is developed by the plant. You will notice this in action as the tree appears to swallow up the wire. Its advisable to allow this to continue to a point where the surrounding tissue has thickened to around half the thickness of the wire. At this point you can still remove the wire from the plant without much damage. Should you lift some of the bark sealing it immediately with an appropriate liquid sealer will limit any damage.

Wait until the wire has bitten in this deep before beginning to remove it

It therefore stands to reason that you should use the thickest wire you can manage to apply to the tree without damaging it as this will allow the most thickening ie a very thin wire will be swallowed up very quickly necessitating multiple wire removals and applications in a single season. For this purpose, I find aluminium wire to be best as the trunk is still very flexible and as I can use a 3 or even 4mm strand on a young pine without damaging the bark. Should you need to reapply wire to a tree which shows signs of wire bite, try not to insert the wire along the same grooves, preferably next to them, however do not alter the direction of the wiring as you already altered the flow of sap to a degree when wire bite occurred the first time.

Adventitious bud formation aided by wire bite.

Another spin off benefit which I am not sure I entirely understand yet is the proliferation of buds which form because of wire biting in. I have observed this happening on all my Japanese red and black pines which all underwent the cutting treatment I described earlier. These buds are particularly useful for creating structure on shohin pines and for sacrificial use to thicken the trunk at its base. I believe these buds are as a result of auxins or cytokinins being concentrated by the wire bite in the plant tissue of these areas on very healthy plants.

Bends in the trunk should be exaggerated as they will mellow with time.

It is especially important to place drastic bends in pines which are to be grown to a maximum of shohin size from a young age. These bends might look exaggerated and unnatural at first but as the trunk thickens, they will smooth out more and more. If your bends are not sharp enough in the beginning the trunk will appear relatively shapeless. Should you wish to develop a larger tree then wiring at a young age, other than perhaps to accelerate the thickening of the trunk is not necessary. In such cases you can change the planting angle of the tree to introduce that all important first angle change from the soil level instead.

Pruning and Needle plucking

Pruning

Constantly pruning a pine is simply going to retard development. Much of the techniques presented and discussed on the internet are for more developed or mature trees, not so much for developing trees. In these early stages of development the focus is not on needle size reduction or on fine ramification. Your efforts should be directed towards:

  1. Developing good surface rooting (nebari)
  2. Developing a trunk with sufficient girth for the size of the tree (Of course bunjin style is the exception here)

To achieve the first objective every occasion when you are repotting, which at this young age is most likely every 2 years, then you need to spend time arranging the roots.

Two pines being developed in two ways; on the left the trunk was not pruned and will be allowed to thicken the trunk, on the right the trunk was pruned which encouraged both more branches lower down which can be used as sacrifices but it also resulted in multiple shoots developing at the terminal. 

To achieve the 2nd objective is far more complex, however once you understand the basics then you should not feel intimidated. In essence the more needles you have, the more sap flow. The more sap flow you have the more thickening that will occur. Sure there are certain techniques such as wire bite which can contribute dramatically to thickening however sacrifice branching is the main technique used.

Sacrifice branching not only refers to branches which are developed long, adding to the girth of the trunk below it, but will eventually be removed. It also refers in fact to the trunk or leader, which is allowed to grow uncut and for several seasons until it is reduced and then finally removed altogether.

The strong growth to the right of the vertical shoot is still being used to develop the trunk, but ultimately will be removed and the shoot will replace its role.

Decandling is not a technique appropriate for this early phase of development. This comes later, however when the tree moves into the next phase of development you will begin to use the younger shoots close to the trunk to develop structural branches with. Initially these too will be allowed to grow until there is a pleasing taper in thickness from the trunk to primary branch thickness. This branch is then shortened and the process of developing secondary and tertiary branches begin.

Needle plucking

This is a technique which if you have done any prior reading regarding the development of pine as bonsai you will have read a lot about. Needle plucking during the more advanced, refinement stages of development of a pine is mainly used:

  1. To balance the tree’s energy producing more evenly distributed growth.
  2. Needle plucking is also important for allowing light into the canopy to keep small inner shoots alive and to encourage the development of adventitious buds (which develop on relatively young wood on healthy trees).

Pines must be needle plucked occasionally at this stage to allow sunlight to enter the canopy of needles and strengthen the inner buds.

During these early stages of development needle plucking is mainly used to achieve the 2nd goal. With all the sacrifice branches you are likely to have on the tree, the needle mass will shade out small inner buds. However, these buds are of paramount importance to the future development of the tree as it is with these buds that you will develop the final network of branches and the trunk line too in fact. So only needles which need to be removed to accomplish the goal of allowing sunlight to these inner areas should be removed, but no more than this. Remember, the more needles you have the stronger the trees growth will be.

Fertilizing

If you expect your pines to reward you with explosive growth then you need to provide an appropriate amount of fertilizer which in this case is a lot, especially in the case of the colander method.

Organic fertilizers are recommended, and you can use solid or solid and liquid organic fertilizers. Liquid fertilizers only are not ideal as the nutrients are too quickly leached from the soil due to the frequency of watering.

When developing pines be liberal will the organic fertilizer if you expect good growth.

The key difference between solid and liquid is that solid fertilizers release nutrients over an extended period of time. It could be said that liquid fertilizers are a faster method to introduce nutrients to a plant however when using a very open structured, fast draining medium much of these nutrients will pass through the container which is also why using a medium which has a good CEC value will be of benefit as it will withhold a greater amount of nutrients.

Video

  •  

6 Easy Tips for growing Venus Flytraps

Article written by Peter Hewitt of Pan's Carnivores. Be sure to read other articles by this South African carnivorous plant guru here.

Introduction

Dionaea Muscipula or the Venus Flytrap is the most recognisable of all the carnivorous plants.

I think most of us have killed at least one or two of these fascinating little plants as a child and it is for this reason that most people think the plant is impossible, or at least very difficult, to cultivate. While delivering plants, I have often heard a stern warning coming from the mouth of a well-meaning parent to their excited offspring, not to get attached to the plant they hold in their hands as it will probably die the minute they get home. This guide will hopefully dispel some of the myths and innuendos associated with the Venus flytrap, and give you some confidence with cultivating this gem of a plant.

Venus flytraps naturally occur in boggy areas

Dionaea is a monotypic genus, which means there is only one species within the genus, and that should also mean that all the plants of this species should be similar in appearance. This could not be further from the truth. Through the many years of flytrap cultivation, many different forms, colours and shapes of flytraps have emerged. The plant is native to boggy areas within North and South Carolina, with its main area of distribution being within (roughly) a 100km radius of Wilmington North Carolina.

Dionaea Muscipula as a genus is somewhat under threat in its natural habitat, because of fire suppression and over-collection. The latter problem is somewhat less of a problem now, since plants are now propagated in tissue culture, which is a means of propagating large numbers of plants fairly easily in a lab.

Care instructions

The biggest killer of Venus flytraps, is the misconception that these are tropical plants requiring very high humidity and shaded conditions, much like Ferns or Orchids. This error normally results in the plants struggling along with low light, and too much moisture for the amount of light given. Venus flytraps require a lot of direct sunlight, as this is how they grow in nature. It is true that the habitat of the Venus flytrap is also home to grasses and other plants, which sometimes end up shading individual plants. But the healthiest populations emerge once the areas have received a good burn, which is also a natural occurrence in this biome.

If growing your plants on a windowsill they must receive the right amount of light in order to grow strongly. This plant may start to decline due to lack of sunlight.

Since these are bog plants, it naturally follows that they enjoy a fair amount of water in their growing substrate. The easiest way to accomplish this is to keep the plant sitting in a shallow tray of water which is kept full most of the time. It is a good idea to let the level of water in the tray fluctuate from full, to slightly dry on a weekly basis. You could even keep the plant sitting in water at all times during the growing season, but it is never a good idea to let the water level rise above the rhizome level of the plant. The Rhizome is the fleshy white portion of the plant, situated under the soil level to a depth of about 2-3cm. I keep my trays filled with about 3-4cm of water most of the time, but allow the trays to dry out at least once a week; I leave the trays (not the soil) dry for just a day, before adding more water.

Always keep your plants immersed in a few centimeters of water.

You can cultivate your flytraps indoors or out, as long as you are aware of the plants need for a lot of sunlight (at least 4 hours) and this needs to be direct unfiltered sun. Most of my plants grow outdoors in full sun, and this is where the strongest, healthiest specimens can be found. Some of my customers prefer to grow their Flytraps indoors in a sunny Kitchen windowsill or similar, and this is just fine, as long as the window receives at least 4hrs of direct sunlight every day. Also, try not to forget the origins of your plant in Bogs and seeps, which means the regular filling of water trays lest your plant dry out. If your plant gets a little dry in the media, it is not cause for panic, but if the substrate (Soil) dries out completely, it could well result in the death of your Flytrap. These plants are very tough when given the full light and water conditions they prefer, and thinking of them as delicate and fragile, will not be to their benefit.


Have fund with your choice of container and even combine several different flytraps for a miniature bog garden.

On to the subject of water quality and humidity; since these plants (like all carnivorous plants) come from nutrient deficient soils, they do not appreciate water with a high level of dissolved solids like chlorine and other chemicals. This does not necessarily mean that you can’t water your plant with tap water. In our country, the water quality is somewhat good. Although the water is chlorinated, it usually is not so much that it will cause immediate harm to your plant. If you have the facility to test your tap water, a level of dissolved solids of somewhere in the region of 100ppm is usually safe for Venus flytraps. That being said, it is far preferable to water your plant with water that has been filtered to remove the dissolved solids. You can purchase this kind of water at most grocery outlets and specialist water stores, and it is not very expensive. If you intend to have, or already have a large collection of carnivorous plants, it might be best to invest in a reverse osmosis filtration system, which will remove most of the dissolved solids from the water. This is the device used by most people with a love of these plants who have a large collection. If you do water your plant with tap water, it will be necessary to re-pot it in to fresh media on a yearly basis. The substrate I recommend is simple; 50% peat and 50% sand or perlite is the ideal mix to use. You can purchase ready-made media and containers from Bonsai Tree.

The subject of humidity is also something that might concern the new Venus flytrap grower, but is probably the thing you need to worry about the least. Dionaea can be grown in normal household or garden humidity ranges with excellent results. Even though the area that these plants are native to is very humid, they acclimate down to a lower humidity very well. A general humidity range of roughly 50% or even slightly lower is perfectly acceptable for successful cultivation. There is one point you must consider however. If you purchased your plant from a garden centre or nursery, it probably will have been sitting indoors or in a fairly sheltered position before you purchased it. This will mean that the plant will need to be re-acclimated to lower outdoor humidity over a period of 2 or 3 weeks. You could just place your plant in a slightly sheltered position for a few days, and progressively give it more light each day, until it can stay outside for the duration of summer. It usually only takes a week or two of giving your plant an hour or two of direct sunlight until it will be tough enough to be put into its final position in the sun outdoors. If you intend to grow your plant indoors in a sunny window, it will probably be fine to just place it in its position without any preparation. This is might result in the plant looking a little rough for a couple of weeks, but it will certainly recover.

If possible and if you are keeping your plant indoors, during winter, keep your plant outside where it can get cold and thus provide a good winter dormancy rest for it.

The next piece of cultivation advice I need to give is one of the most important. Your Venus flytrap is a temperate plant requiring a winter rest period. This is commonly called a winter dormancy because your plant will stop growing and most likely retreat down to the soil line looking quite dead. Rest assured; your plant is just underground regrouping its energy resources for the winter. You must keep your plant just damp at this time, and it will return to active growth in spring. One other important point must be mentioned. In spring your plant will most likely send up a flower stalk. It is best to cut off the stalk as soon as it is noticed, as flowering can often exhaust plants in cultivation, which will result in sluggish growth or even the death of your plant. So if you are not a very experienced Venus flytrap grower, it is best to cut the flower stalk off, and your plant can use these resources for strong growth during summer.

The traps of your plant are used to catch insects; you should not attempt to feed it with meat, egg or pieces of cheese. This will result in the killing off of that particular trap and possible damage to your plant as well. It is also not advisable to trigger the traps of your Venus flytrap with your fingers or other object. The traps can only trigger a few times, and when they do get triggered without the intended insect meal, the plant can become exhausted. It will probably not result in the death of the plant as a whole, but will certainly damage the trap and eventually kill the trap off entirely. Let your plant do what it was designed to do. The last important point is this; never fertilize your Venus flytrap in any way. This will almost certainly kill it! The plant is designed to catch its own nutrient, so no fertilizer is needed.

6 Tips in summary

  1. Keep your plant in a very sunny or full sun position.
  2. Keep your plant sitting in a shallow tray of water during the growing season
  3. Water with rain water or water that has been reverse-osmosis filtered. Tap water is not the best, but can be used. Certainly never use mineral water.
  4. Cut off dead traps, just below the trap attachment point.
  5. Let your plant go dormant in winter, at which time just keep it damp. NB: it is not dead!
  6. Last but most important…Keep your plant in a position where you can view it regularly. They are charming little plants that are a joy to grow…enjoy them!

Venus flytraps are available in a wide range of leaf sizes, colour and shape. Be sure to check out our current range here, including this plant "Alien!"

Read more articles about carnivorous plants here.
  •  

Who eats what?

Article written by Peter Hewitt of Pan's Carnivores. Be sure to read other articles by this South African carnivorous plant guru here.

Background

We've received a lot of queries about the ultimate Fly and pest busters so here's a breakdown of which carnivorous plant is the most effective plant for particular pests.

Sarracenia (Trumpet pitcher plants)

The best fly and roach catchers around!!

Once each trumpet has a few pitchers and once each opens up, it is open for business!! 

The plant itself will catch as many flies and insects as can fit into each pitcher, which can be as many as hundreds, per pitcher, per day; ergo the taller and wider each pitcher on the plant gets, the more pests it can fit in the hatch.

Shop Sarracenia now.

Did you know that carnivorous plants are smart?

The Sarracenia produces pheromones and nectar trails, undetectable by us, which attract their prey and when they cannot resist and land on the plant it doses them with a chemical that makes them very happy, so that even if they don’t go into the mouth immediately, they are now hooked and will return to that exact plant (even if there are 10 just like it in the same area) until they drunkenly enter the pitcher’s mouth and slip into oblivion with a smile their face so that they don’t damage the plant.

Drosera (Sundews)

The ones to call on to bite them mosquitoes back!

Sundews don’t just look pretty, but are also highly effective at catching mosquitoes and fruit flies.

These wolves in sheep’s clothing attract insects to their sweet, sticky dew-drops where they get stuck; after which the tentacles curl around the insect to maximise the surface area contact.

Shop Drosera now.

Dionaea muscipula (Venus Fly Traps)

These iconic carnivores are one of very few plants capable of rapid movement.

While they are fast and AWESOME, they can only eat one fly/spider at a time, per head.

Each head closes about 4 times in its lifetime, so as much fun as it is, sticking our fingers in them to activate the trap unfortunately robs the plant of a meal.

Don’t fret though, because healthy fly traps will have more small traps growing than crossing the void.

Shop Venus fly traps now

Nepenthes (Tropical Pitcher Plants or Monkey Cups)

These pitchers do not discriminate and attract a wide range of foraging, flying and crawling insects. They are however particularly effective roach and ant eaters!

The bigger they get, the more they can eat and in time these guys can each get big enough to fit a wine bottle inside!!

Don't be surprised to see geckos and mice peering in and stealing snacks from within the pitcher's mouth. They seem to have a symbiotic relationship, as they themselves sometimes find themselves on the menu, although not as often as you might think.

Shop Nepenthes now

Surely all those pests piling up will smell?

The plant wants to stay healthy and therefore not only digests insects quickly but also produces an antifungal inside it to prevent anything from rotting, so there is no foul smell whatsoever!

Read more articles about carnivorous plants here.
  •  

Ficus - Roots from the sky

The following article was written by Leigh Kemp. If you missed his other articles be sure to read them here.

As a young boy growing up on a farm in the Kei River Valley in the Eastern Cape I was fascinated by nature, and stories of nature. The plants and animals of the area were explained to me through the stories of the Xhosa people, and from the vast library my mom had put together over many years. I was also able to observe many of these natural wonders that I learnt about first hand.

One of the stories that stayed with me is of the tree that grew on other trees that needed support to strengthen them, or if not in a state to continue growing then to grow a stronger tree from the demise of the old tree. I was told that the seed of the support tree would be deposited on a branch of the tree that needed support – either by a bird or a monkey – and the seed would sprout and spread to the ground. The roots would then grow into stems to support the ailing tree.

Roots from the sky

If the old tree was too weak to continue then the new roots would simply embrace it into making way for the new tree to grow strong. The new tree provided shelter in the hollow-out section where the old tree trunk used to be and also food through the fruits that were produced. This was the way nature interacted.

I knew the tree as the ‘saving tree’ but later learned that it was one of the strangler fig species [Ficus sp.]. These trees grew in very artistic shapes, embracing rocks and uneven terrain, growing what often seems like many stems – which I also later found out were all roots from one seed.

Strangler Figs

The figs from my youth were the common wild fig [Ficus burkei] and the forest fig [Ficus craterostoma]. Both these species are from the group known as strangler figs. The strangler figs do indeed grow from a seed deposit through faecal droppings on a branch or in a crevice of a host tree. The seed sprouts roots which grow downwards, eventually taking root in the ground. The roots thicken and even intertwine and as they grow larger they begin to constrict the host tree which more often than not dies and rots away. This explains why many of the large fig trees have hollowed out trunks.

Roots strangling host

There are examples where the host tree survives and forms a symbiotic relationship with the fig. It must be noted though that not all strangler figs grow in this way. There are some that will grow from a seed that falls directly on the ground – or on rocks!

The seemingly multi-stemmed figs are actually meshed roots from the original seed. The roots were shaped by the barriers they grew over on or near the host tree, be it a large branch or even a rock.

The Strangler fig is often thought to be one species but in fact there are number of ficus species that use the ‘strangler’ method of growing.

The legendary banyan trees of India are ficus species of the strangler variety. The Great Banyan Tree in the Acharya Jagadish Chandra Bose Botanical Garden near Kolkata covers nearly 14,500 square meters, making it the widest tree in the world. When seen from a distance it would seem that the tree is a forest, but what appear to be individual trees are actually aerial roots of one tree, over 3500 of them.

The rock-splitting tree

I have been asked on more than one occasion: ‘There is a tree growing out of the rock. How did it get there?’ I always take time to answer this question as it is the story of the Ficus genus. The question normally comes when we come across one of the rock fig species or even a strangler fig where the seed has fallen in a crevasse of the rock.

Fig growing on rock

These trees could be a ficus of any number of species that has been deposited in a crevasse and has sent out roots that take hold in the ground. It gives the impression that it is the tree that has split the rock.

Species specific interaction

The ficus family is renowned for its intricate shapes and angles of growth but there is another side to the genus that is just as fascinating.

Fig root art

All figs are pollinated by tiny wasps, the largest wasp species being 2mm. The wasps are attracted by scent and enter the fruit. A fig fruit is a flowerhead that has turned in on itself, meaning the flowers are sealed up inside the casing. The female wasps enter through a small opening, the ostiole, and lay eggs in the flowers, pollinating at the same time.

The wasp larvae feed on the developing seeds and the fully developed wasps then mate inside the fig. Only the females will leave the fruit after the wingless males have opened a hole in the wall of the fig. The whole process then starts over again.

The fig ripens and is eaten by birds, bats and primates – and also eaten by animals that pick up the fallen fruit from the ground. The seeds are dispersed through the droppings of the various feeding species.

Wild fig fruit

A fascinating fact about the wasps and fig association: each fig species has a species specific wasp associated with it, which means that the fig species will not survive without its specific wasp species. A particular tree will continue to grow but it will never propagate without its species specific wasp.

There is a species of fig in Kirstenbosch Botanical Gardens, Ficus craterostoma, where no species specific wasp occurs for the trees so the flowers remain un-pollinated and no seeds or ripe fruits are produced. There are many places around the world where fig trees were introduced without the species specific wasp – and these trees have not propagated.

Studies are been done on the adaptations of wasps to hybridised fig species – and in some cases the wasps have adapted to the hybridisation.

The uses of the Ficus

Aside from the nutritional value of the fruits figs are used for curing ailments ranging from tuberculosis to stomach cramps. The wood of most fig species is soft and not ideal for furniture but in parts of Africa it is used in the making of cow-hide drums and some of the caskets for mummies of ancient Egypt were made from fig wood, in particular the famous sycamore fig.

One of the better known fig species from history is the aforementioned sycamore, [Ficus sycomorus]. It is mentioned numerous times in the bible and was the tree that Zacchaeus climbed in order to get a better view of Jesus in Jericho.
The Kikuyu in East Africa revere the tree as sacred and all sacrifices to the great creator are performed under a sycamore tree.

About the author: Leigh Kemp grew up in nature on a remote farm in the Eastern Cape. This geared him to a life of travelling the wild places of Africa for more than 35 years as a wilderness guide, tour guide, travel writer and conservationist – learning and collecting information and images on all aspects of the African wilderness. Visit his site here, contact him directly on kempleigh06[at]gmail.com or call him on +27 79 596 6671.

  •  

Nepenthes Essentials

About

Nepenthes, commonly known as Tropical Pitcher Plants, are the largest of any carnivorous plant varieties. Native to Southeast Asia, their modified carnivorous leaves form pitfall traps with digestive fluid-filled bottoms, allowing them to climb and capture prey.

Habitat

Over 300 species, with small growing ranges, often limited to specific islands or highlands, span Nepenthes. Their habitat ranges from cool mountain highlands to warm sea level rainforests, with most diversity in the Malay Archipelago. Generally, they divide into "Highland" and "Lowland" species, differentiated by elevation: Highland, >3300ft (1000m), and Lowland, below. Carnivorous Plant growers with cooler winters may favor Highland varieties, while those in warmer climates might prefer Lowland.

These plants usually thrive in sunny, exposed spaces, creeping up shrubbery and trees or in grassy plains. Soil is usually acidic and poor in nutrients, being composed of sand, volcanic material and peat.(Check out our acidic media including Kanuma, Lava and Akadama)

The pitcher

Their traps are great at luring, catching and digesting insects. They catch more than any other carnivorous plant, including stink bugs, yellow jackets and wasps. Pitcher Plants, Sarracenia, look and work similarly, but traps form on mid-vein tendrils. In the wild, pitchers hold 20-30% digestive fluids, secreted by the plant and diluted by rain.

How to care for Nepenthes

Sunlight

Nepenthes prefer bright light without much direct sunlight -- usually up to 50%. For optimal growth, dappled shade or plant lights with a broad spectrum are recommended, but should be kept at a distance to prevent overheating. Poorly developed plants and discoloration can be indications of light that is too weak. Sunburn may appear as red or dead zones on the apex of the plant, facing the sun or light source.

Water

Nepenthes require a consistently moist substrate, and should be intermittently inundated to reduce the concentration of any salts that may have accumulated. Water from rain, distilled or purified sources should be employed, but tap water may be acceptable in areas of low salinity and chloride.

Humidity

Nepenthes typically require a fairly humid atmosphere to produce the highest number of pitchers but survive in lower humidity levels. Greenhouses, terrariums, and makeshift tents with clear plastic bags are some ways in which to achieve these higher humidity environments for the plants but this is often not necessary and the average house has sufficient humidity.

Temperature

Most varieties thrive in temperatures ranging from 12-35 deg C, with the Highland species flourishing when nights are cooler (near 12-16 deg C) and days are milder (21 - 30 deg C). Lowland types, meanwhile, can tolerate higher temperatures and are usually easier to cultivate.

Planting Mixes

A successful planting medium may include long fiber sphagnum moss, peat moss, pumice, perlite, lava stone, akadama and kanuma. Mixes featuring combinations of these components are recommended.

Containers

It is vital that the environment be well-ventilated and the container sufficiently drained. Avoid clay pots as salts tend to accumulate in them. A replanting should be considered when the media degrades, the plant shows signs of excessively dryness, or a more substantial pot size is need. One of the best ways to grow and show off a Nepenthes is a plastic hanging basket. When growing on a surface a plastic container considerably taller than it is wide is best. 

Feeding

If you are growing the plant where it cannot catch insects for long periods, you can add an occasional small insect such as a fly, a cockroach or a few very small insects to mature pitchers. This is not normally needed. You can also mix a dilute solution of Seagro or Seabrix and inject this into the pitchers with a syringe. Margaret Roberts Supercharger liquid fertilizer has also shown to produce good plant growth when used as a foliar feed.

Propagation

Nepenthes are typically propagated from cuttings, and seed, but it can take a while to get a good size plant, even years. Tissue culture is another common propagation technique, especially of interesting clones. Nepenthes should be repotted with fresh soil mix every few years.

  •  

Tanuki Bonsai

Please note, the image banner above is not a Tanuki. This is an award winning Taiwanese masterpiece. However it does provide inspiration for the reader.

For updates on these tanuki be sure to check the videos on my YouTube channel.

Introduction

If you are not familiar with the term, you will of course be wondering what it means so lets get that defined first and go from there. "Tanuki" is a Japanese word which directly translated means "raccoon." What has this to do with bonsai you must be wondering! Actually the explanation is rather humorous. The raccoon is an animal that has featured prominently in Japanese folklore and the arts throughout the centuries. This legendary animal is said to be mischievous and jolly. It is rumored it is a master of disguise and even capable of shape shifting.

This meaning gains significance when you understand the context of how or why the word is applied to bonsai. I searched many Japanese bonsai books I have in my library and none describe Tanuki as a style, in fact I could not find a single mention of it at all. I did however find it described as a substyle under deadwood techniques on Wikipedia. Here is an extract:

In tanuki bonsai, a living tree is joined to an interesting piece of deadwood to create a composite in the driftwood style. The deadwood usually has the form of a weathered tree trunk, or at least its lower portion.

You will find the full article on Wikipedia here.

Natural driftwood-style bonsai can only be collected from nature and are thus rather rare and or costly. In the case of Junipers, at least within the South African context, impossible to collect. Using the process or technique of Tanuki it is possible to create a very similar looking specimen although it is in effect cheating. For this reason it is said that Tanuki is not an acceptable bonsai technique, which explains why I could not find it in any of my reference books, and furthermore may not be exhibited in any formal Japanese exhibition. It is frowned upon in Japanese bonsai, certainly it would seem, amongst professionals.

Getting started - what you will need

It is my intent with this article, with the help of Brett Simon in video, to show you how you can create a Tanuki as I firmly believe there is a place for it, certainly in countries where it would be impossible to collect such a tree. 

The deadwood

Depending on how long you have been practicing bonsai you may already have the material you need in order to create a Tanuki. This would include an interesting trunk from a tree which did not make it after collection, or perhaps even a piece of driftwood (although be careful of salts). If you don't have a trunk of a dead tree you most likely can speak with a local bonsai nursery or bonsai enthusiast you who may be able to oblidge.

deadwood trunk

This piece of deadwood is from a juniper I collected from an urban garden, which unfortunately did not make it. It possesses some interest and potential as part of a Tanuki planting.

I have heard of people using pieces of Mopane wood which you can find at pet stores as it is often used in fish tanks. If you buy this wood elsewhere be sure it has not been treated with chemicals which might kill your living tree, and if you are unsure I should imagine soaking it in some water for a few months, changing it occasionally, should leach this from the wood.

I'd encourage you to stay away from soft wood. Bear in mind that you want this creation to last for many years and in order to ensure the trunk does not rot naturally it will need to be treated. If the wood is soft this process is accelerated so try to use wood considered hard. This would include but not be limited to species such as juniper, olive, and even bladdernut. Soft woods include pine, maple, false olive (Buddleja) or in general any deciduous tree. 

Living tree

You can create a Tanuki with any species of live tree provided it is flexible and vigorous enough to withstand the process. However I would suggest that the most suited species is the juniper. The reason I say this is as the resulting planting is characterized by a pronounced live vein on the otherwise dead wood. If you wish to have any resemblance to a natural tree then wild juniperus is species which immediately comes to mind as it develops this character in very old, mature trees. Very old olives also do develop live veins and with plenty (I presume) of collected olives around which never made it one can make good use of them and give them a chance to be reborn.

A lot can be written about your choice of live material and as I do not wish to make this article any longer than needs be I would rather suggest certain questions you might ask yourself when making your choice:

  1. Does it suit the style you want to create?
  2. Does it present the best genetics the species has to offer (leaf or foliage size and shape, internodal distance, colour etc)
  3. Can it physically be worked onto the deadwood? (Is it flexible or brittle)
  4. Will it live long enough for this planting to mature and develop interesting character or is a short lived plant such as a shrub?

Tools, fasteners and more

Carving. A groove is often carved in the deadwood, into which you will lay your living tree. You will need the necessary carving chisels or power tools and bits for this.

deadwood carving

Nibbler carving bits can remove fairly large amounts of material rather quickly and will allow you to create further interest in your deadwood.

Securing. Decide whether you will use plastic cable ties, raffia, screws, wire or other means to secure your tree into the groove. The fastener should be easy to use, especially if you are working alone [as most of us do]. A branch jack will come in extremely handy as it will allow you to really get that live trunk right up against the deadwood. If your live tree is thin enough you can use a piece of rope and a metal rod to twist the rope, tightening the trunks together.

cable ties

Make sure you purchase strong enough cable ties for the job at hand or they will simply snap when pulled taunt. A metal rod and strong rope helps compress the tree against the deadwood.

Sealer. You might need to make a number of cuts to remove branches which get in the way. You might even split the trunk of the live tree. In any case, sealing this exposed live tissue is best to promote healing and also prevent infection.

conifer sealer

With the size cuts you are likely making the putty type sealer is preferable. Use the green lidded type for conifers and the white for deciduous.

Growing media. You will ideally want to disturb the root ball of the live plant as little as possible, as this will further weaken it. However you will most likely be potting the tree up into a new container to accommodate both the deadwood and live plant, so additional media will be needed. I would suggest a growing media which drains well and will encourage rapid growth in the live plant.

Container. Whether you use a plastic tub, purpose made wooden box or a ceramic pot, I would encourage you to use the smallest container you can possibly fit the final planting into. Overpotting may lead to overwatering (and rotting) and will at the very least be a waste of resources (read fertilizer and water). This might mean that you will need to secure not only the planting into the container, but also the complete planting to a surface to prevent it from being blown or knocked over.

Design

It goes without saying that you need to have a fairly clear idea of what you want to create. Unlike more commonplace bonsai design where you are working with a trunk with existing branches, Tanuki presents an opportunity for the artist to create almost from scratch.

I would strongly suggest a fair amount of time be given over to study of old, wild specimens of the species you intend reproducing. Pay particular attention to the deadwood character; flow, texture, thickness, tapering line and more. Consider carefully the live veins (which you will emulate with your live plant/s), where they originate from at ground level for greatest interest, the line they follow on the trunk and where they occur ie in depressions or protrusions.

Koji juniper

I saved this image of a semi-cascade juniper created by well known Japanese bonsai artist Koji Hiramatsu. This, I believe, was the first styling of this tree but it was still quite inspirational to me.

Yes, yes I know. Don't make your bonsai look like a bonsai... however this is my attempt at achieving something similar. With a little imagination (OK, a lot) you can see how an otherwise useless piece of deadwood, combined with this common garden variety juniper has the potential to provide hours of fun and one day become something rather interesting.

The most important aspect of design at this stage of development will be the interaction or relationship of the live to the dead. The canopy will come later and will be formed from existing branches which of course might naturally develop from the live trunk or may be grafted. Grafting in fact elevates this technique to another level as you will also be able to determine the foliage type in the case of junipers.

Preparing the deadwood

You may want to carve some additional interest into the trunk and it is best to do as much of this before you attach the live plant as possible. The Nibbler bits combined with either a Dremel tool or a die grinder allows you to get really creative and safely remove wood rapidly.

carved deadwood

Old junipers often possess these "blades" and by carving the already oblong shape of the trunk, thinning it and created some indentations, I was able to create some additional interest.

If the wood calls for it you may want to have it sandblasted to remove bark and other debris, soften tool marks or even add texture.

deadwood trunks

These are 3 pieces of deadwood I worked with root cutters and jin pliers to give some character to the sawn off ends to the branches.

post shotblasting

The same trunks post shot blasting (not sandblasting) which rapidly removed the bark, tool marks and also created a lot of texture from the process itself, but also as softer wood was removed leaving the harder grain behind and more exposed.

close up of shot blasting

This is a close-up of the texture created by the shot blasting. Of course it is very unnatural at the moment, but I expect it to smooth out, crack and fissure over time. The trunks will not be treated until the desired surface finish is achieved however long it may take.

Applying a wood preservative might be appropriate now, it just depends on how weathered the wood is already and whether you want to halt that process. If not then don't apply the preservative yet, but rather allow the wood to weather and gain character over further exposure to the elements.

I am not experienced enough on what wood preservatives are currently available, however undiluted or slightly diluted lime Sulphur with or without ink (for a more natural colour) is the traditional solution for deadwood preservation although I know more modern products are available on the market.

root cutters creating jin

Root cutters are robust tools which can be used to split wood, which can then be pulled with jin pliers to create a very natural looking jin. Do not use your branch cutters to do this please. 

If you are going to carve a groove into the deadwood with the intention of allowing the live plant to gain girth and become firmly wedged in place, you need to bear in mind that you will need to create an undercut. If you don't, you might as well not create the groove as the tree will simply pop out. An alternative to creating a groove will be to firmly secure the tree against the deadwood with cable ties so it can grow into that shape. After a season or two you can then systematically remove the ties and fasten the trunk into place using appropriate screws. These screws are left in place and the tree will callous over them.

One step you should definitely not forego, or you may regret it later, is to flat cut the base of the trunk. This is an important step in order to ensure your planting can fit into a suitably size bonsai pot in the future. If you fail to perform this step you might find your choice of container is limited, or that the container you are compelled to use does not visually balance as it is too deep. Furthermore you may wish to drill and then insert a metal rod or rods onto which you can attach wires to secure your planting in the container.

metal rods

To the flat base of the trunk, wood pieces have been secured (which can be replaced as and when needed) to elevate the deadwood as close to the surface of the planting as possible to reduce the onset of rot. An additional measure would be to use a medium like pumice, stone, LECA or basically anything which will not retain moisture immediately adjacent to the trunk.

Live wood preparation

Depending on the species you have chosen to work with, you may need to proceed differently to what I describe below.

Assuming your plant is in a nursery bag, you are most likely going to need to reduce the soil mass, which is also in part why you need to create Tanuki at the time when you would normally repot the species being used. However as the roots will be exposed while you assemble the Tanuki, take precautions to protect them from drying out. You can wrap them in plastic wrap for instance or simply mist them often.

If there are branches obviously in the way, it will be easier to cut them off now before you find your hands otherwise occupied.

If you have opted to lay the plant on the surface of the deadwood instead of inside a channel then I would encourage you to split the live tree in half. Although this may not work for all trees, it is quite safe to do this on a juniper provided you have sufficient foliage remaining to assist plant recovery. The advantage of splitting the plant is that you will start with a half round sort of shape which better resembles a live vein. If you leave the trunk in tact you will need to wait for it to form on the surface of the deadwood but I would suggest the tree will simply expand outwards and not begin to spread on the deadwood unless somehow forced to do so, so it is more likely to retain the appearance of being "attached" rather than "part of" for much longer.

splitting the trunk

You can split the trunk of your live plant, discarding the unused side (as you will retain all the roots on the side you keep). The flat side will be pressed up against the deadwood and will achieve the appearance of a live vein faster.

Assembly

After preparing your deadwood, live plant, all the fasteners and whatever else you think you are going to need then you are ready to start.

Position your tree in the desired spot on the deadwood taking care with the level of the roots; not too deep so a gap remains between the roots and the base of the deadwood, but also not too high up the deadwood leaving a significant portion of the deadwood buried as this will accelerate rotting. Fasten your live tree in place using your chosen method ie screw, cable tie or other.

compacting

You may find that there is a gap between the live and deadwood. You need to make your best attempt to close this gap. The best way is with a branch jack. If you don't have one you can use some rope and a metal bar; twisting the bar will tighten the rope. Use padding to protect the bark of the live tree if you need to.

raffia

I wrapped raffia on the one planting after securing the tree to the deadwood. The idea behind this is similar to the reason it is used when bending; it helps to retain moisture which facilitates healing of the micro breaks in the trunk. Not sure if it will make too much of a difference but hey, every effort is worth it to ensure the tree's survival.

Continue along the length of the deadwood, securing the live tree well as you go. When you reach the apex you can place your final fastener. Do not cut the tip of the live tree as you will want to encourage it to grow for at least a full growing season. This uncontrolled growth will help to conform the tree to the contours of the deadwood, initiate callousing of any cuts you might have made and generally ensure the health of the tree and the future of the Tanuki planting.

secured tree

Note the height of the old soil line/root level and how close it is to the base of the deadwood. You can use multiple live trees depending on your design, although it does become rather challenging when doing this on your own!

Aftercare

The aftercare of your Tanuki is very important if you want it to flourish in the season ahead. Essentially you will want to treat it like any recently repotted tree. This means you need to shelter it from wind as much as possible. Shading it for at least the first month or even more (up to 6 months where more drastic work was done) is a good idea, exposing the planting to morning sun but shading it from hot afternoon sun.

finished tanuki

The creative possibilities with Tanuki are extensive. Make use of these opportunities and get really creative. 

You can foliar feed your planting after a few weeks when you see positive signs of recovery such as new growth. Roots need time to settle and begin developing so solid fertilizers should be withheld for at least a month. However fertilizing with solid fertilizers earlier will do no harm, it will just not fully be utilized by the plant yet.

Keep an eye on watering like you would any other recently repotted tree, there will be less moisture loss than normal and you don't want cause roots to rot by exposing them to constant moisture.

Bonus Content!

Go out and make a Tanuki. Have fun and if you do it just right you will have everyone fooled, you raccoon you!

  •  

8 Tips for growing awesome shohin pine

The following development tips are intended for enthusiasts growing Japanese black pine from seed for shohin trees. The pines featured in this article are in their 3rd year of growth (in Spring 2021 they will be 4 years old).

You may want to read my other blog posts for relevant information. Although some of the advice might be applicable to enthusiasts who wish to grow larger trees I have not written the content from that perspective. 

Tip #1. Remove needles only when necessary

The more needles you have on a tree the more rapidly the tree will develop. Simple.

However as we are growing smaller, compact trees we need to make sure that we keep the lower, inner buds healthy as we will use these in the future for our structural branches. These buds will weaken and potentially die should they be overly shaded. To promote penetration of sunlight we therefore may need to thin some of the needles on parts of the tree.

If you need lower branches but don't have buds in the right pots, then you can still graft what you need on.

You will need to assess your trees and determine if there really is a shading problem or not. For the tree above there isn't really an issue and if the tree is grown in full sun there should be no need to further expose the lower growth. So I did not remove any needles.

However in the example above, some needles were indeed removed and the lower portions will now receive more sunlight so they will strengthen.

For this fairly upright tree shading was a bit more of a problem and so some of the older needles were cut. However as the older, mature needles are said to contain certain hormones missing from younger needles, it is important to keep as many of them as you can.

Tip #2. Pull needles if you don't ever want buds. Cut needles if you do.

For the Japanese White pine and perhaps others, it is always advisable to cut needles from the tree as pulling them can sometimes damage the needle sheath at the base. At the base of each needle sheath there is potential for a bud to develop.

Although the needles of Japanese black and red pines do not usually pose a risk of damage when plucked from the sheath there is always the possibility. So if you don't want buds to form in a particular area then pull the needles. If you think you may want buds then I would advise you to rather be safe and cut the needles. You can make the cut a few mm away from the needle sheath.

Tip #3. Cage wire to thicken the trunk quickly and add interest.

There are several techniques which can be employed to increase the trunk girth of this species. Sacrifice branches and growing in colanders are two which immediately come to mind. However in my experience, and at this early age of the plant where sacrifice branches have not really had time to develop to a size where they really do contribute to this goal, so called "cage" wiring is a fantastic technique which can make a marked difference.

The trunk above of this 3 year old pine was cage wired in the previous growing season. The wire was removed and then reapplied. The wire bite from the first wiring has largely healed or smoothed over and this is what has contributed to the substantially thicker girth of this tree when compared to others of the same age which were treated differently.

When cage wiring there are several things to keep in mind for the technique to be effective, some of them seem to contradict conventional wiring good practice. For instance rather than wire at a regular angle the angles should purposefully vary so as to create a more interesting trunk, a result of the intentional wire bite and subsequent healing you're aiming for.

Tip #4. Coil "cage" wire tightly and start as low as possible.

Choose the thickest aluminum wire you can apply to the tree, this increases the surface area in contact with the trunk and will accelerate thickening. I also think the heat conducted by the wire may play a positive part.

Anchor the wire properly in the container, hold the tree and wire firmly when coiling it.

It is very important that you apply the first coils on the lowest portions of the trunk, tightly and almost without any angle at all. The trunk will only thicken when the wire makes contact with the bark. If the wire is loose, which happens easily especially with poorly anchored thicker wire, you will find that higher up on the trunk where it is easier to wire tightly the trunk will begin to fatten sooner, but not lower down. This will lead to inverse taper, which is usually not desirable. (If creating bunjin style trees this is not so much of a problem but for all other styles that come to mind, reverse taper would be a flaw)

Tip #5. Allow wire to bite in thoroughly and only remove wire from those parts.

You will need to ignore your first reaction which will be to remove the wire when it begins to bite in. It is only when the wire begins to bite in that this technique begins to work its magic.

Here wire has been allowed to remain on the tree until the wire is just about to be enveloped by the live tissue making it then impossible to remove without damaging the tree. This is a little far and you might wish to remove the wire before this point but for me I think its not a problem what so ever. Even if I cannot uncoil the wire I am able to cut it and push it from the sections where the tissue has begun to roll over the wire.


With the wire removed you can see just how much girth the tree has put on since the wire was applied. Magic!

If when you remove the wire any live tissue is exposed you will need to seal immediately at these points to protect the exposed areas and to promote rapid healing.

Its important to leave the wire on until it begins to bite in good and proper. So you might wish to begin unwinding the wire towards the tip, unwind a coil or two and then leave the tree for a few more weeks to allow it to bite in further, then come back to it and remove a few more coils and leave it again. This will ensure the lower portion of the trunk will have thickened the most as the wire had bitten in there the most. 

Tip #6. It's never too early to start working on the nebari

Its rather important to begin working on the nebari of your trees at the earliest possible point in their development. It is very difficult or even impossible to correct flaws in this area when the tree is older.

The ideal is to have surface roots radiating in all directions from the trunk at a slightly downward angle, appearing to firmly anchor the tree to the ground.

Roots which overlap others should be removed revealing the roots immediately below them. 

Use scissors to cut any roots which rise out of the soil. You may use an old branch cutter or a root cutter to remove thicker roots.

Where possible and or necessary, make a kind of hairpin from wire, pressing it deeply and firmly into the soil forcing any raised roots into the soil again.

Its likely that I will repot these trees as they are just about to go into their 5th year of growth. This will be a good time to properly trim and organize roots, although growth in the season after that will be substantially less due to the root reduction.  

Tip #7. Take precautions for strong wind to prevent broken pots.

I live in the Western Cape and experience a lot of wind. Although this helps to control fungal problems which are so common with pines it does mean I often find trees falling over in the gusts.

I use plastic bread trays as they:

  • Help me to space my trees apart so each tree has its own exposure to sun, but has plenty of air movement between it and its neighbor.
  • The bottom of these trays are also grids so water cannot accumulate and in fact air can move freely through.
  • When I want to work on them I can carry several at a time, saving me from having to walk back and forth dozens of times.
  • However and perhaps most importantly should a tree topple over, which is already a frequent occurrence but will only worsen as sacrifice branches increase in size, the pot will not smash. 

Tip #8 Develop your own maintenance plan

  1. Spray at least monthly with Odeon fungicide and a miticide such as Seizer during periods of hot, dry weather. Be sure to use a wetting agent such as Sporekill or other.
  2. Always provide maximum sunlight to your pines.
  3. Don't overwater your pines, the soil should dry somewhat before watering should be performed again.
  4. Don't water pines at night or when then there will be insufficient time for the needles to dry properly  before sunset. Failure to heed this advice might lead to fungal problems.
  5. Feed like crazy. I always have BonsaiBoost on my developing pines, which is changed every few weeks. I also perform weekly foliar drenches of Seagro or Sea Secret.
  •  

Aquaria: An Introduction

By Cecil and Monique Dunhin

Overview

In this first part of a series on aquariums, the Dunhin’s introduce the reader to some of the decisions a hobbyist will need to make when getting started. The example below deals with the setting up of a tropical tank. The choices made by the authors are not explained in detail in this part but will be explored in greater depth over the series.

The object of this series is to help the reader set up their own tank whether it be a planted, shrimp, tropical or mixed tank.

Getting started

So you have decided to start a tropical tank. Your first step in a long-term commitment. What type of tank are you choosing to do? Fish tank – Nano, community, single species tank or shrimp tank. Once you have decided, it’s always a good thing to do a little research about the type of livestock that will be introduced into the tank.

For us, we decided to go with a shrimp breeding tank.

aquarium hardware

The tank

The next most obvious step is the tank. What size tank will meet your requirements? There is nothing wrong with shopping around, in fact you should, look for what is going to meet your requirements. If you don’t find something off the shelf, ask your local pet store or FB Groups if they know of, or could refer you to someone who custom builds tanks. Our decision was based on a few factors:

  1. Firstly, our long term goal of breeding with shrimp was the biggest influencer for us.
  2. The space that we had marked out for this project was somewhat limited. With this in mind, we then had to decide, were we going to go with multiple separate tanks or a single tank? Again, the space we had available was the deciding factor for us. However, we could have both options by having one large tank that was divided into five sections. We had seen this concept at various pet stores, but on a much smaller scale.

The other choice that we had to make was, were we going to go with an acrylic tank or a glass tank. Acrylic tanks are on the whole, more expensive due to the construction and labour intensive process. Another factor to keep in mind with acrylic tanks is that if you are not careful, they can scratch easily. We chose to go with a glass tank this being the more cost effective option for us.

We were referred to Aquatic Discovery, where we then discussed our idea and dimensions of the tank, 1.2m long x 46cm wide x 30cm high. The dimensions of the tank were then then divided into 5 sections or “mini tanks’’ measuring 25cm wide. So our journey begins.

Filters and Pumps

The second thing that you are going to look at is filters and pumps. Once you have established your tank and what size your tank is going to be, you will then need to get an appropriate sized filter / pump, internal or external? These are all questions to answer before going out and buying the first filter / pump that could work. Keep in mind that this is going to be a vital part of your tank and keeping your tank healthy in more ways than one.

aquarium filter

For us, we wanted each tank to have its own sponge filter. The reason for going with the sponge filter is that it is a compact filter and essentially only required for a small tank. Another reason behind choosing the sponge filter is that it reduces the risk of the shrimplets from being sucked up and into the pipes.

After doing a lot of research our choice narrowed down to the Qanvee Bio Sponge Filter 100A. The pump that we decided on, is the Sobo SB-860A this genius little pump is a work horse and an added bonus, it’s designed as a near silent pump and energy efficient. Both the filters and the pump were purchased from Parrot Inn, in Centurion.

For this setup to work we purchased a metal 5 way splitter along with the tubing, these were purchased from Aqua Empire in Randburg. The sponge filters each have a section where you can add bio filter media.

Bio filter media aids in the breaking down of the bad bacteria in the tank and additionally assist with the development of natural healthy bacteria in your tank. The ceramic bio media was purchased from Family Pet Centre in Centurion and the Lava Rock bio media was purchased from Mcmerwe Pet Store in Bloemfontein.

tank divisions

Substrate

The next step is to decide what substrate to use. This is a critical decision. Once the substrate has been added to the tank the only way to go back, is to start over. Our decision was an easy one. We have used aqua soil in our other tanks for planting live plants and have been very satisfied with the outcome. For our tank this time around, we chose to use Japanese Akadama 1 – 3 mm granules 14L bag.

akadama fish tank

The Japanese Akadama lowers the PH levels and with the small granule size, it’s ideal for the shrimps to forage in. It also contributes to plants flourishing in the tanks. We then calculated how to split the Japanese Akadama between the 5 tanks. This worked out to 2.5L of soil per tank and sits at a depth of 2 cm per tank. The Japanese Akadama was not pre-rinsed or sifted before adding to the tanks.

Cycling

Then the fun begins. We only use Reversed Osmosis (R.O.) water in our tanks. As slow as possible, we started adding the R.O. water to the tank. This did mix up and move the Japanese Akadama around and yes, the water did turn muddy with all the fine particles of the Japanese Akadama floating around. Once the tanks were filled, we left them to cycle through the night. The next morning, the water was almost perfect. After cleaning the filters off and removing the bigger particles (small twigs and grass) and letting the tanks continue to cycle. A few hours later the water was crystal clear.

cycling fish tank akadama

Over the next week, on a daily basis Seachem Stabiliy, ADA Brighty Green Neutral K was added to the tank as well as Shrimp GH Salts. Dosing was done as per instructions of each product to each tank. It is a very important step to cycle the tanks. You want your tanks to run for a few weeks before adding any livestock. This gives the tank a chance to settle as well as stabilize.

Adding livestock

Two days of letting the tanks cycle, we proceeded to add Amazon Sword plants an aquatic low maintenance and a great plant for beginners and it adds height as well. As these are breeding tanks, we did not want to over plant the tanks. We also used christmas moss to cover the terracotta pyramid hides to add another shade of green to the breeding tanks, the terracotta pyramids were purchased from Saturn Shrimp in Centurion.

christmas moss aquarium

Feeding dishes are not a necessity, however if you decided to use them, it boils down to personal choice. The feeding dishes that we chose to go with are terracotta dishes these tie back into the natural theme that we are going with for our breeding tanks. The terracotta dishes were purchased from our local nursery.

feeding dishes aquarium tank

Four days into the cycling we added in Betta fish to the tanks for the cycling process to encourage natural bio additives for the tank. The tanks have continued to cycle.

Lastly the lights were added to the tank. There are a multitude of options out there, endless choices of styles, sizes, colour variations. Lights can be mounted over tanks in various ways. You can also get lights that can be submerged inside the tank. The options are endless. Our choice was to go with an LED clip on lights. Again our choice was that for us it would create the natural light and that an LED light is energy efficient.

planted aquarium

Conclusion

If you are new to this hobby it’s very easy to get carried away. Remember to consider all aspects of your tank and to do thorough research and planning before you get started. Your tank should first and foremost be for you to enjoy and we are going to help you with the process. Check back soon for the next part where we will focus on getting started and the types of tanks you can create in your home.

completed aquarium

Cecil (41) and Monique (38) have been married for 10 years and have a son (7). They live in Centurion. Cecil has been keeping tropical fish tanks since primary school, as well as bonsai trees. Monique has been keeping tropical shrimp for a year now. They decided to create an all-natural tropical fish tank for their son to ignite his interest into the hobby as well. Their experience in creating tropical tanks is an ongoing process and they continue to learn from each tank that they create. This hobby allows for the beauty, creativity and freedom to experiment and build on each new tank. Contact Cecil & Monique Dunhin in Centurion on [email protected] or [email protected]

  •  

14 Tips for Field Growing Bonsai

I have written a number of blogs on my experiences with growing material for bonsai. You can read them here if you have not done so already. However this post summarizes much of the knowledge I have accumulated to this point, and I also managed to produce a video on the same content to demonstrate many of the techniques I write about.

Over the last 17 odd years of field growing I have learnt a lot, and continue to do so. When I started I made many mistakes, fewer so these days, but my hope is that the content below will help you to shortcut at least some of mistakes I made.

Tip #1. Rapid development

There is simply no substitute for growing trees in the ground. You will not be able to produce the same growth no matter how hard you may try or how much fertilizer you apply to a tree in a box let alone a ceramic container.

For this reason, if you have access to a piece of ground - use it! You can even plant your garden full of plants you are actually field growing for bonsai use. Many beautiful bonsai were once part of garden hedges.

You are not going to get this kind of development from a seed in 15 odd years if planted in a container or even in a wooden box.

Tip #2. Preparing your tree

My preferred source material to field grow are cuttings. This is as the plant is already off to a great start as its roots already all emerge from the same level which will lead to better nebari in the long term. Additionally it is assumed that you will only bother to take cuttings of plants which have good genetics such as good leaf size and or shape, short internodes, good bark characteristic or other.

Depending on the size of the material you are starting with you might plant it upright and change direction of the trunk is successive trunk chops or you might plant the tree at and angle so that from the ground there is already movement. If you want a tree with lots of movement you may wish to wire the tree before planting it in the ground (remove the wire before it disappears into the trunk though).

Cuttings are a great source of material to field grow into something special. Choose material based on some desirable characteristic of the mother plant.

Tip #3. Planting

If the soil you are planting in needs some amendment you may wish to add some organic material; just follow basic guidelines available anywhere for planting trees when it comes to soil preparation.

I have used raised beds in my backyard, which my back is very grateful for, but planting at ground level is also fine. Or you might simply place the tree on the ground and mound soil up around, this latter method makes digging the tree from the ground in the future much easier.

Brick growing beds like these are great for field growing too. You may need to share some of the space with the family for growing vegetables though.

Tip #4. Planting on a surface

When planting the tree you may wish to use a flat surface such as a tile on which to place the tree. 

The benefits to using a tile are:

  • roots are forced to grow off the edge of the tile and then down into the ground, and this produces a very pleasant trunk flare.
  • when you dig out the tree you need only find the edges of the tile, sever the roots and the tree is loose. In contrast, without a tile roots are free to grow straight into the ground which makes the work of digging trees out much harder.

This trunk flare at the base is due to the fact that it was initially planted on a tile, forcing roots to grow horizontally first, instead of just straight down.

Tip #5. When to cut the trunk

You need to have some idea of the end result you want to achieve, for without this forward thinking you will not know when to cut the trunk of your tree.

Here's a scenario; you have allowed the trunk of your tree to grow uncut for several years and its just about the thickness you want or need for good proportions. You need to cut it now so that you can:

  • change the direction of your trunkline by developing a branch that grew after you made the chop.
  • create taper in your trunkline, which is critical for visual interest. 
  • develop growth above the cut in order to aid healing of this cut scar.

Once the trunk is cut, although there will be some further thickening of the growth below the cut, it will be minimal. So cut the trunk only when you have reached your goal, no sooner.

It should be fairly clear to you the several trunk chops which have been made on this tree, and the gentle taper into the next portion of the trunk.

Tip #6. Season to cut

The trunk chop must be made in a season when you are likely to get the most back budding as plentiful back budding will give you lots of new growth from which to choose your new leader to continue your trunk line with.

Late spring, when spring leaves have hardened off and become slightly leathery is the best season in my experience as this is when the tree is full of energy.

This trunk was chopped at the right time, and as a result a lot of new growth emerged low down on the trunk. This growth can be thinned, keeping only a few to develop further.

Tip #7. How to cut the trunk

When I first started out field growing I read in books to cut at particular angles and how cut was to be shaped. I have learnt that this is a waste of time.

Cut the trunk just above when you want the change of direction to occur, bearing in mind that there will be some dieback. Using a sharp saw cut the trunk at any convenient angle being careful not to damage any surrounding growth, if there is any. You do not need to shape the cut at this point.

A simple straight cut with a sharp saw is ideal initially.

Tip #8. Seal the cut

After making the cut described in tip #7, you need to seal the cut with a good sealer making sure that any live tissue is covered. This will protect the cut ends from bacteria or other attack.

I always seal my cuts straight after making them. Whether sealing the entire cut is necessary I am not sure, but I'd rather be safe than sorry with all the borers, bacteria and other nasty things we have these days. 

Tip #9. Angle of the trunk chop

In the season following the trunk chop, either late autumn or early spring when it is clear that a new line of sap flow has been established and surrounding new growth has developed enough, you can go back and cut the trunk again. 

This time you will want to cut at an angle that will promote callousing of the wound, and this is usually done in the direction of a branch you have decided to use as your new trunk line.

Don't bother making shaped cuts until you know where a new sap flow line has been established. This is visible after a season or two.

Tip #10. Shaping the cut

Cuts of significant size need special treatment or the tree will find it difficult to callous over, and the resulting callous formation will also not be very attractive. To aid the flow of callous tissue, you need to round the edges of the cut, and hollow the center portion.

A good, sharp gouge chisel or other suitable implement is great for working trunk chops at a later stage. 

Tip #11. Treating wounds

Callous tissue will not form on rotting wood or any non-sound surface for that matter. I wish I knew this years ago!

Should you have any large wounds inside which you find rooting wood, this must be thoroughly cleaned out first. After cleaning out the wound you can fill the hole with a cement product. This forms a great surface over which callous tissue can form.

In the video I prepared for this blog post, you will notice that I filled large cavities that resulted from callous formed around old wounds. Rather than expect callous to "roll" into and fill this space, simply filling it and then encouraging callous to form over the cement, dramatically reduces the time required to hide such large defects in the trunk.

Filling large cavities and then scoring and sealing the edge of the live vein will ensure callous tissue forms quicker and the scar looks better once properly healed.

Tip #12. Treating branch cuts

I don't develop branches in the field, when I am growing relatively small trees. However when growing larger trees the benefit of the superior speed of growth produced by field growing can accelerate the building of structural branches.

The treatment of branch cuts are much the same as trunks in essence. When making the branch cut I once again do not go to much effort to cut at any particular angle, however it is important that you do not cut beyond any dormant buds, or the entire branch will die back. I simply seal the cut and leave it. Once the growth which developed after the cut has matured enough, after say one or two growing seasons, then I go back and shape the cut based so that the future callous or healing, will be pleasing.

A combination of tools are available for working or shaping branch cuts and trunk chops. Here I am using a knob cutter.

Tip #13. Wiring in the field

Wiring in the field can be of great value, just be careful. Wire bite can happen quickly and may be the demise of a branch. Once again one needs to be mindful of how fast things happen when trees are in the ground especially in autumn and spring.

On larger trees, I like to use wire to guide structural branches initially. Be careful of wire bite though.

Tip #14. Field root work

Doing frequent root work will dramatically slow the development of your trees. Every time you uproot a tree you lose at least a full year while the tree issues new roots as it prepares for growing branches.

The advantage of uprooting the tree, at least initially, is that you will be able to form the surface roots much better as you will be able to cut them and arrange them. However the alternative would be to allow the tree to remain in the ground and when you have finished developing it and you are ready to pot the tree, you ground layer it. This will produce a lot of fine roots which will sustain the tree.

Although it is safe to do root work like this on field grown trees, due to their immense energy, it does slow the tree down and you will lose some development time.

Video

The above tips are explained further and demonstrated in the following video I did. I hope you enjoy it and please be sure to like my channel and share the video with others you think will enjoy the content.

  •  

How to hide large scars quickly

When creating bonsai trees, scars are almost inevitable. Whenever possible it is best to make these scars to the back of the tree so they cannot be seen. If they are visible from the front, encouraging them to heal over is of course a strategy but sometimes this can be rather challenging for the following reasons:

  1. The cut is particularly large.
  2. The species of tree has trouble forming callous over the cut.

This post presents a simple solution that address both of these but can only be used on species which forms a heavily plated or coarse bark.

The subject

For demonstration purposes I will use a Cork bark elm I purchased from Stone Lantern Bonsai in Joostenberg a couple years ago. Originally field grown by Stephen le Roux, he typically leaves multiple branches in order for the person who buys this stock to be able to choose which to cut and which to keep. This does however mean that you will create some large cuts when removing some of these unwanted limbs.

The problem

The drawback with this species and other species which produces thick bark such as the Acacia, is that when a large cut is made it is either never going to properly heal over and take on the characteristic cork bark surrounding the cut, or it will at the very least take a very long time.

Large, visible scars like this are not pleasing to the eye; not while the tree is in training and of course completely unacceptable for a tree on display.


The Solution

There is a really simple solution; hide it.

Lets be clear, this is not first prize. That would be for the scar to heal completely naturally. However what we are planning on doing will not hinder callousing and perhaps one day our "patch job" can be removed or will fall off and we find we don't need it any more.

The Process

Quite simply, we will use pieces of bark from the same species, although not necessarily collected from the same tree to conceal the scar below.

Step 1

Before starting, it is a good idea to ensure the cut has been properly prepared and sealed with a good, waterproof sealer such as Top Jin Paste, so that you have a sound surface onto which to attach your pieces of bark, but also so that your tree can continue healing naturally, behind the concealment we are going to fabricate.

Step 2

You should then collect some suitable pieces of bark, ideally more than what you think you will need so you have plenty of choice. A variety of sizes is great. Precise colour is not critical as it will age to the same as the surrounding bark as it is exposed to the same elements it is.

Step 3

You then can decide what to use as your adhesive. I used an epoxy putty which hardens like stone for this application but in the past on an Acacia I performed the same operation on, I used a bonsai cut sealer. The sealer has the added advantage that the colour is a little more camouflaged and it is flexible. You could probably use superglue too, but this has no gap filling properties so I think you might find the bark pieces will fall off easier.

Step 4

Try to remove any loose debris like dust or sand from the rear of the bark piece you plan on attaching, as well as from the surface you plan on attaching it to.

Step 5

Play around with different pieces of bark, placing them at different angles but you should mimic the direction of lay of the natural bark on the tree.

Step 6

Apply some of your adhesive to the back surface of the bark, and if necessary, to the scar. Attach the bark firmly but carefully so as not to damage the bark plates. Add further pieces of bark so that the entire scar is covered.

Step 7

Repeat the process until all scars you have on the tree are concealed. You can now allow the adhesive to dry completely after which you can treat the tree as normal. In time the colour of the bark will blend perfectly with the surrounding bark and you will actually forget the concealment is there.

Simple and fast. Now you can go back to designing your tree and not worry about scars distracting the viewer.

  •  

Swamp Cypress Bonsai Styling

Background

A customer asked me to style this swamp cypress which was part of his collection.

I thought I would video and also write about the process I followed to style the tree. The intention and hope is that this might help you to formulate an approach when you have just added a tree to your collection and wish to work on it.

The tree before commencing any work

Assessment

I would advise strongly against just sitting down in front of a new tree and beginning to chop off branches, however tempting it might be to do so. After bringing the tree back to my place it was with me for about 2 weeks, with me passing it every day and giving it the once over each time. Finally, I was ready to work on it. This time allowed me to have some idea of what I wanted to do with the tree before starting to work on it. 

Here are some of the questions I asked myself when studying the tree:

the roots

  1. Are there any weird contorted roots which don't suit the rest of the tree, or which demand immediate attention when viewing the tree?
  2. Are the roots one-sided ie. all emerging from one side of the tree?
  3. Can you see the roots or are they buried - can you remove some soil to expose them a little more?
  4. Do the roots need to be improved through grafting or even ground or air layering?

the trunk

  1. Which angle presents the trunk best? Does tilting it backwards, forwards and or rotate it look better?
  2. Does it have any scars which you do not want to be visible? If it does can you make it a feature of the tree in the future?
  3. Does the trunk have taper and if not can it be rotated for better visual taper? Would cutting it shorter enhance the taper by bending a branch up, making it the new trunkline?
  4. Is there movement in the trunk, do you want or need more? Can you rotate the trunk to improve the movement?

the branches

  1. Where are your branches situated angled in relation to the viewer (and potential front of the tree)? What is the best compromise between finding the best solution for the preceding considerations and finding the best angle to display the available branches?
  2. Do you have multiple branches originating from the same position along the trunk which you need eliminate to prevent swelling at this point (assuming it hasn't already started)?
  3. Are there branches directly above and close to one another which could cause weakening of the bottom branch?
  4. Do you have handlebar branches which need attention. This refers to branches which are directly opposite one another on the trunk, allowing such branches to remain can result in reverse taper but depending on how prominent they are can create a cantilever look on your tree.
  5. Would grafting branches to the tree be an improvement?

Branches vertically above/below one another in near proximity and of equal girth are less than ideal

The above are only some of the considerations which go through my head when sitting down in front of a tree which needs to be styled. The questions will differ depending on the species, the style and also very much on the stage of development the tree is in.

When making decisions on the above some might need to be taken immediately and some can be postponed. For instance if you already have a grouping of branches causing a reverse taper problem then it would be prudent to remove one or more of the branches immediately. However in the same situation but where the reverse taper is not visible yet perhaps the branches can remain to serve one or other purpose such as healing a scar lower down the trunk.

Sometimes its best to remove excess growth before it begins to create problems. Knowing when to cut and when not to is a skill developed by experience and understanding the result of actions taken.

My strategy for this tree

For most of you, when determining your strategy for a tree you can do so without considering another party. In my case this is not my tree. I need to consider what my customers' expectation might be with regards to the styling. For instance I cannot simply decide I want to chop off all the lower branches and keep those in the apex. Sure, sometimes such styling happens in consultation with the customer but as I mentioned for most of you, your considerations will be what you and you alone are striving towards.

In determining my stylistic approach to this tree I went with something fairly orthodox however based on my idealization of these trees in their natural form. As you will see from the work once completed, there is much room for improvement. However one can only work with what there is available at the time, with a view of how it can be improved in the future and the strategy you will apply in order to attain it.

For a complete assessment of this tree please view the video I did of the process at the end of the blog article.

Structural branch work

As this tree is very much still in a development phase my focus is mainly on positioning the structural branches, forming the skeleton of the tree on which to later place the "meat." Of course secondary branches, where there are, will be used to begin formation of ramification though.

From experience I can tell you that wiring and bending a swamp cypress branch is not a long term solution. When the wire is removed the branch will simply spring back to almost its original position. The only reliable method of bending these branches is to cut wedge and bend the branch down. The branch heals in this position and will remain set once wire is removed.

Good wedge cuts require a little practice. Fortunately swamp cypress are relatively forgiving being such strong growers.

When cutting the wedge do so with a sharp, fine toothed saw for the best result. Try ensure that when bent the two halves meet cleanly. For some species this is critical but with swamps, as they are such strong growers its actually a good species to learn this technique on as they tend to be more forgiving. You can choose to use wire only or wire with a guy wire anchored elsewhere on the tree.

Guy wires worked best for me on this tree

Wiring

Choice of wire

For this tree I used aluminum wire in various thicknesses. I personally do not prefer to use very thick aluminum if I can avoid it as I feel that it can easily crush the plant tissue as you apply it to the branches. 

Procedure

One always starts at the base of the tree, working up into the apex. I prefer to wire a branch and then set it into the position I want, adding any curves to the portions being bent as I go along. And don't forget to add curves in a 3D manner, I see FAR too many trees wired so branches look great - for a bird - but when viewed from the front they appear perfectly flat.

Wiring for volume

To create volume to your foliage pads you need to wire accordingly. The concept is a little challenging to describe in words, bonsai is after all not a theoretical pursuit, however in principle using side and top branches, try to create volume to your pads so that all branches do not lie on the same plane. It is possible to use bottom branches to, however bear in mind that they can weaken over time as they are usually shaded out by branches above them, I generally tend to eliminate bottom branches.

Branch angles

I often see secondary branches on bonsai which have been wired into very unnatural positions, for instance at angles of 90deg and greater to the structural branch. Please do yourself a favor and go study trees in nature; this seldom happens. Such branches tend to have a much more acute angle, and appear much more fluid as opposed to having jarring changes of direction. In this tree, in many places, I closed the angles quite considerably and you will find that when you do this, it will just look right.

Position of wire

There is a simple RULE, yes I said it, I swore - sorry. If I want to bend a branch down I wire over the branch, if I want to lift it I wire under the branch. This supports the bend when I apply the force to the wire to change the branch position. Break this rule and break your branch, or at least risk breaking it.

Anchoring wire

Should you need to remove any branches you might consider using them as anchor points for your wiring. Sometimes such jin's already exist and can be used immediately.

For some video tips on basic wiring please read this article. 

Sealing cuts

It is important that you seal any cuts you make. I prefer to use sealers developed for use on plants. Plant sealers often have disinfecting properties and even hormones to assist with callous formation.

It is advisable, when you make large cuts with a branch cutter or similar tool, its a good idea to neatly trim the edges with a grafting knife or blade of some sorts. This will accelerate healing of the area and reduce the risk of infection.

On the wedge cuts which I made on most of the branches, I used the putty types of sealers. On smaller branch cuts I used the Top Jin paste applying the sealer with a small brush.

The apex

For now there is no real apex. The termination of the tree felt a little too abrupt to me so for now I have trained a fairly thick branch into the position on which a future apex can be built. This branch has been left uncut and should remain so, acting like an escape or sacrifice branch. The more sapflow into this the more the region will thicken and at the same time it will assist healing over the cuts which I made.

When this branch has done its job it will be dramatically shortened and side branches will be encouraged and ramification can be developed in this region.

Natural VS Stylized

There is a debate which has been raging on for some time now and will most likely continue for many years to come. Not that I profess to have been enlightened myself yet, but it seems at the very least that it is the "in" thing to claim to be styling in a natural way rather than I guess unnatural (seeing as this is the opposite to natural). In my view, without delving into the debate too much, and neither do I wish to oversimplify it, no bonsai are natural, they are all artificially created. I will admit that some trees do appear more random or chaotic than others which appear highly stylized or perfect. For me there is room for all in the bonsai world. One is not better than the other, the beauty is always in the eye of the beholder. (Have you ever taken a peak at the greater art world???) *

young swamp cypress

I took this photograph of a very young swamp cypress just outside Stellenbosch. Take particular note of the angle of the branches.

older swamp cypress

I took this photograph of a group of swamp cypress, also outside of Stellenbosch. These trees are a little older but still project an image of young trees.

Some examples of older swamp cypress, taken off the internet. The downward branch angles depict older more mature specimens, and it is this image which I prefer.

So to reel in the debate to the tree in discussion, this swamp cypress. There are some examples of this species which have been styled very differently to what I perceive as the norm, and these have been dubbed at least by some as being very natural - thus perhaps by default claiming others as fakes. I can style my swamp cypress like a baobab tree if I wanted to (which I do not) or perhaps more accurately if my customer wanted me to. However I like to believe I took inspiration from nature for this styling and did consider how the species grows where I live and indeed other parts of the world too. My goal is not to reproduce precisely what nature has created, although beautiful, sometimes this is not possible for horticultural reasons or others. Usually designs will be to a lesser or greater degree a stylized version of the natural tree form.

Concluding remarks

I have made a number of comments in the video which I hope you will watch, like and share (and do subscribe to my channel for when I do more like them). However in brief, the tree offered me certain opportunities for styling. I know this species to be a very strong growers and over time new opportunities will be presented.

You can rest assured that whenever I am asked to work on this tree, it will be done with a view of improving it - which may or may not mean I will remove certain major structural branches in favor of branches deemed to be better positioned. Some of the branches are also a little long and might be shortened when the tree has had a chance to respond to this styling.

There are certain areas of the design which are a little empty but I am confident we can fill those up in a relatively short space of time. Given that these trees are such strong growers it will be a tree which will have to be watched quite carefully if wire bite is to be avoided.

To build and maintain ramification will also present a challenge to the owner if the balance between health, fertilization and watering is not good (Lots of fertilizer + lots of water = lots of coarse growth) however I hope to post again about this tree in subsequent blogs and videos so you too can watch its progression, so be sure to subscribe to my newsletters so you don't miss this.

* One should always strive for creativity. If every tree in your collection looks the same then I would encourage you to experiment and break from your comfort zone a bit, the results might surprise you and you might feel revitalized by your new-found artistic freedom. 

  •  

How I style bonsai and you can too

There are many approaches to styling bonsai and perhaps you already have some established routines or processes which you use. If so, that's great as bonsai should never be a mindless pursuit. In all honesty I find styling bonsai fully engrossing and while I am working on my trees I am completely absorbed will little to no mental capacity to think of anything else. Perhaps you can relate?

In this blog post it is my intention to share some of the thought processes which go through my head when I sit down to style a tree as a bonsai. I hope that some of the information which will be shared will be useful and helpful to you.

A healthy Hinoki Cypress before shaping.

Observation #1

First and foremost, before you can work on a tree that tree must be displaying clear signs of good health. There is no point in working on a sick or weak tree as the tree is unlikely to respond positively and in all likelihood will weaken further. If this implies that you need to wait for another growing season then so be it, that's certainly better than losing a few branches due to die back or worse yet, the entire tree.

Action: Ensure your tree is growing in well draining, soil and that you are providing it with a well balanced feed. If you think you need to repot your tree then it is better to repot before you restyle the tree. Develop and stick to a pest and fungal prevention plan; red spider mite can severely stress a tree before you have time to act.

Observation #2

Knowing the species which you are working on is certainly a big advantage. By this I mean horticulturally how the tree grows for example if it is an apically dominant tree or not; when the best season is to do the work you wish to do on it and then also how the tree grows in nature. It is always easier to work 'with' a tree instead of against it. Written differently, if the species has a tendency to form suckers like a flowering quince then do not try to grow a bunjin style bonsai with it. Rather create a clump or group planting.

Action: Before you touch the tree, you need to be inspired or at least have a mental image of what you want to achieve. If you don't have this then you at least need to have a thought, sometimes as you begin to work the tree reveals itself to you. You can also find inspiration in books such as Charles' Ceronio's "Bonsai Styles of the World" and on the internet.

Observation #3

When you study mature trees in nature you will observe that the lowest branches and therefore also the oldest, hang. The angle at which the branches emerge from the trunk of the tree will usually be horizontal or below that. As your eyes travel up into the tree this angle changes and becomes more vertical as branches reach up towards the sunlight.

Action: Make sure that your branches emerge at a horizontal or downward angle low down on the trunk and then as you move into the apex of the tree adjust the angle towards the vertical.

Getting the branch angles correct is a very important consideration best handled while the tree is still young. Changing these angles when the tree is mature is a lot more difficult.

Observation #4

You will also notice that the secondary branches in the lower regions of the tree are fairly well spread out. This is most likely as sunlight has difficulty penetrating this area sheltered by a canopy of leaves. However in contrast to this, when you view the apex or crown of the tree it is dense as a result of sunlight exposure. These subtle {or not so subtle really} visual cues are important aesthetic conventions which can help us when shaping our bonsai to achieve the image of a mature tree, as this is usually the goal.

Action: When creating the lower foliage pads spread your branches out a fair bit and in contrast in the apex make them fairly tight. 

Create your foliage pads in the lower portion of your tree with ample space between branches.

Observation #5

Another noticeable characteristic of a trees canopy is that the negative or open space between branches in the lower parts of the tree is far greater than the spaces between those in the apex. You will often find the remnants of old branches which once existed lower on the trunk but which weakened over time and eventually died due to a lack of sunlight.

Action: Vary the spaces between your foliage pads, reducing the space as you draw nearer to the apex. The effect of this is definition in what would otherwise be either an unorganized tangle of branches or just one large mass of foliage. Finally, definition in the apex itself may reduce until all the foliage blends together and our eyes read it as a single shape.

Consider negative and positive spaces, they both play a very important role in the aesthetics of your bonsai trees and the interest they will generate.

Observation #6

All trees have an outline or a silhouette, beyond which branches will rarely grow.

When you view the overall shape of a tree you could draw an imaginary outline, in fact as kids this is how we would often draw a tree. You will not usually see branches randomly jutting out from this outline. This outline is very much dependent on the species of tree and how its environment has influenced it to grow.

Action: The above phenomenon is essentially what the classical bonsai styles are based on. When you want to style a tree one of the first decisions you will need to make is what style it is going to be in and then all your design considerations follow on from that single decision. In the case of an Acacia {Senegalia} which naturally grows in a Pierneef or Flat Top style, structural branches are arranged very differently to say were you to want to grow it in the Leaning trunk style.

Furthermore when positioning your branches, you need to ensure they comply with the overall shape suggested by your chosen style and that the tips of the branches do not exceed the silhouette or outline of the tree canopy. Sometimes you may need to put additional or exaggerated bends in branches to shorten them, at least until such time as some better piece of growth can be used to replace it with.

View your trees from above too. This quickly draws attention to areas which need to be developed or held back.

Sometimes, at least in the interim until a better branch comes along, you may need to resort to some drastic bending to visually shorten branches to fit the tree outline.

Observation #7

Studying the branch pads of trees you will notice they have volume. If they did not, a tree would appear to have some sort of scaffolding. If you view the individual branches you will see that they have movement up and down and from left to right.

Action: Creating foliage pads can appear natural if you creating bends in your branches in both plains with wire (Shop for wire here). If your branches are very young remember to exaggerate the bends as they will become less pronounced with time. Then use branches from within the structure of the tree to create volume by positioning them with some vertical space between them. You should also avoid placing branches directly above one another, as this will result in the top branch becoming strong and the lower becoming weak.

In creating interesting foliage pads, put bends into them using wire in both plains. Create volume by overlaying branches.

Conclusion

Wire is very useful when shaping bonsai trees. Results can be achieved very quickly as you are able to immediately alter the shape and position of branches as you desire. However you could also apply the clip and grow approach where branches are pruned using scissors to dormant buds facing the desired direction in which you want the branch to grow. This method results in a rather more angular growth pattern and takes longer but this technique really becomes invaluable when your trees reach the refinement stage. That however, is a subject for a future blog post.

The final images of this Hinoki after this styling session. The foliage will rapidly close some of the negative space between the foliage pads and it will then be up to routine maintenance to keep definition in the tree.

Video

  •