About 4 years ago I started this project where I cut off the weird looking roots entirely from a Ficus I bought at the local grocery store. Here’s how that was done.
Today I repotted the tree in it’s first bonsai pot.
This is how the wannabe Ficus bonsai looked after 4 years in it’s training pot that had gotten too small.
The branches have thickened nicely over the years.
I prepared a rivetted drum pot I once bought from the lovely people at Willow Bonsai all the way from South Africa.
Once the tree was removed from the training pot the roots got combed out and some thick roots got pruned.
A nice set of fine roots had formed at the base of the tree.
Then the tree went into the pot and the rest speaks for itself.
Looks a lot better now.
The base of the tree widened significantly due to the growth of all those new roots. And it will continue to do that the next years I hope.
2 Years ago I started some cuttings from my Acer Arakawa bonsai. I used material from branches that I cut during it’s 1st styling. Here’s a picture of my arakawa, unfortunately I don’t have any pictures from the cuttings that I took.
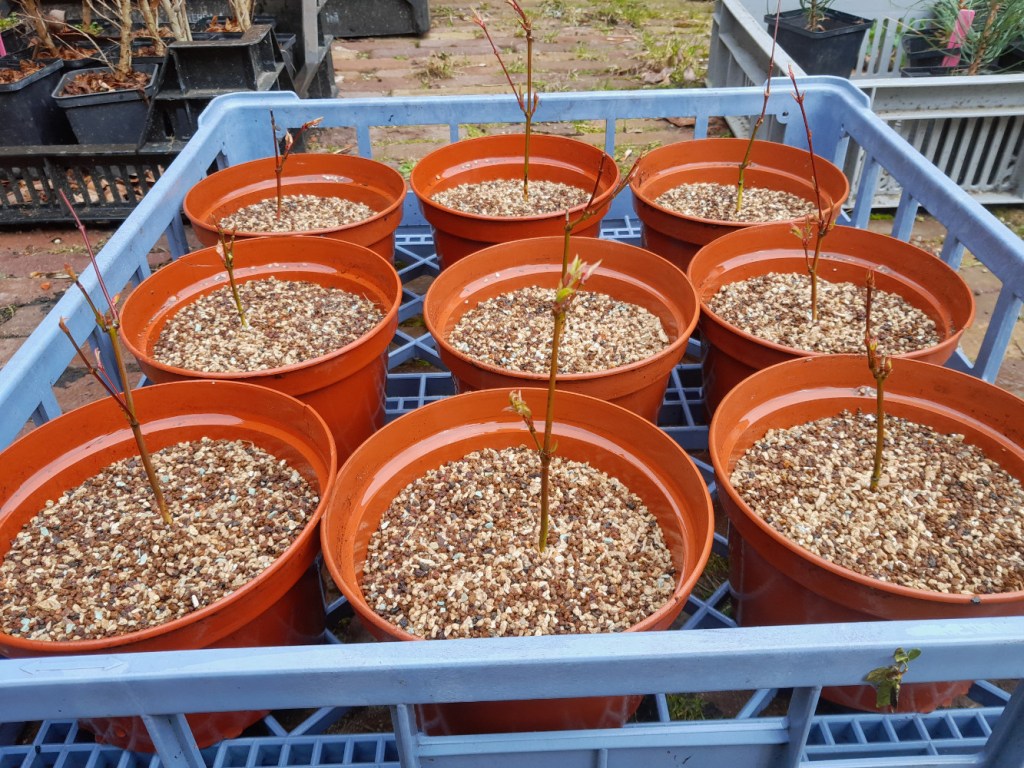
So now almost 2 years later it was time to put the acer arakawa cuttings that rooted into their own pot. I started with 20 or so and 9 develloped roots, not a bad ratio. The medium I used to root them in was pure perlite.
The batch that had to be repotted:
When I tried to remove the first one I noticed that I had used a fine screen mesh to cover the bottom of the propagation tray which caused the young roots to grow right trough the mesh. So it would take some surgery to remove the roots safely without damaging them.
A cutting with the roots grown through the screen mesh:
After cutting of a small piece of mesh I had to remove the last bit very carefully.
So after performing some delicate surgery I managed to get all the roots out relatively undamaged. The root spread on all but 1 of the was pretty decent.
So now it’s time to pot them up in their new container. Again I used some screen mesh to cover the bottom of the pots. The roots that will grow through it now I will be able to just cut off with the next repot.
I used a mixture (akadama, pumice, lava, zeolyte) of the smallest sieved bonsai soil that I got when sieving my bonsai substrate. I’m not using this for other purposes but for this application it will do just fine.
After potting them up I watered all of them extensively and now it’s just wait and see if they survive. Since it’s going to be freezing in the next few nights I will keep them inside (cold room) for now.
3 years ago I ground-layered an Acer Buergerianum that I put in a wooden growbox 4 years ago. Since that last post I kind of neglected the tree for almost 3 years. It just sat there in a corner of my garden getting watered together with the rest of the trees.
The plan was to remove the ground layer last year but for some reason that didn’t happen.
Today I finally found the time to see what had happened in those 3 years.
Ofcourse I forgot to take a picture before I started removing the screen mesh but anyway, here’s a picture right after I removed the screen mesh. It looks like some new roots grew…
Let’s look a little closer…
After removing the wooden growbox it’s obvious I can’t use it again, bottom was pretty rotten, just the way it should be.
After combing out most of the soil and cutting back the roots a great new nebari appeared, this was beyond my expectations. Like always the picture doesn’t do the real thing justice.
After potting up the tree it looked 10 times better than before. Now it’s time to start working the branches, but first I’ll let the poor thing recover for a while.
Today it was time to remove the ground layer from the original rootball. The buds were starting to swell so the timing was right.
Here’s how the tree looked before I started working on it today:
Despite having the ground layer happening the tree grew pretty good this year. As you can see the buds are starting to swell:
I removed both ofthe pots from the tree. Where I put the little pot for the layer, roots are clearly visible, so that’s a good sign (to be honest, I checked if roots actually emerged above the cut that I made before removing the pot just to be sure the whole thing worked)
Lots of roots in the little pot!
Cheap as I am I will re-use the ground layer pot for the next one I will do.
Time to get out the big toys now. I used some big pruning scissors to cut the ground layer from the original rootball .
After removing the sphagnum moss the new roots became visible. The root spread was pretty good, I removed a few that were in the way of others that were better placed.
The new roots seen from above and below:
Now it was time to put the tree in a container, I made sure the roots were spread out evenly and horizontally for a better nebari.
All that remained was to fill the rest of the pot with some soil and water it thouroughly.
The tree is now on it’s own roots and not grafted on the acer palmatum root stock anymore. It will remain in this container for 2 years so it can recover the 1st year and get some strong growth next year. After that maybe a wooden growbox for some years.
Today it was time to remove the ground layer from the original rootball. The buds were starting to swell so the timing was right.
Here’s how the tree looked before I started working on it today:
Despite having the ground layer happening the tree grew pretty good this year. As you can see the buds are starting to swell:
I removed both ofthe pots from the tree. Where I put the little pot for the layer, roots are clearly visible, so that’s a good sign (to be honest, I checked if roots actually emerged above the cut that I made before removing the pot just to be sure the whole thing worked)
Lots of roots in the little pot!
Cheap as I am I will re-use the ground layer pot for the next one I will do.
Time to get out the big toys now. I used some big pruning scissors to cut the ground layer from the original rootball .
After removing the sphagnum moss the new roots became visible. The root spread was pretty good, I removed a few that were in the way of others that were better placed.
The new roots seen from above and below:
Now it was time to put the tree in a container, I made sure the roots were spread out evenly and horizontally for a better nebari.
All that remained was to fill the rest of the pot with some soil and water it thouroughly.
The tree is now on it’s own roots and not grafted on the acer palmatum root stock anymore. It will remain in this container for 2 years so it can recover the 1st year and get some strong growth next year. After that maybe a wooden growbox for some years.
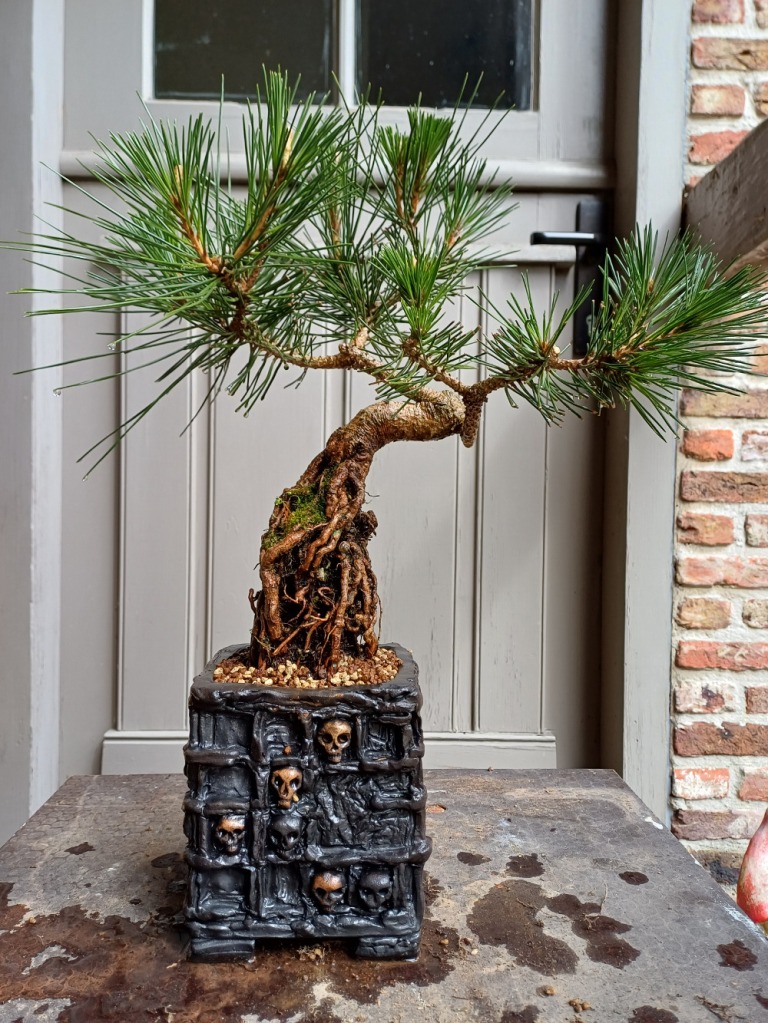
So I was planning to repot my exposed roots style Pinus Thunberghii into a bonsai pot. I had 3 pot candidates. Not sure if I picked the right one but anyway, I picked one today
Here’s the tree after I pruned a few branches away before the repot.
The tree pots that I had to choose from where these ones:
The round one and the skull pot are pots made by Zoran Slavkovic. The natural rock looking one was made by Ginkgohatás pottery.
After combing out the roots I tried to fit the tree in all the pots.
This would be a winner if the pot was just a little bigger.
Not bad either, but the pot looks a bit too big this time.
After loosening the roots a bit more the tree fits this pot and there should be enough space for new roots to grow. For now it’s good enough.
Let’s tie the tree nice and steady in the pot and fill everything with bonsai soil making sure there are no air pockets left between the roots.
A little close-up of the exposed roots.
There even was a visitor that survived the repotting
Now the tree can grow freely for the first few months, maybe in june I’ll do some decandeling but that’s yet to be seen.
So I was planning to repot my exposed roots style Pinus Thunberghii into a bonsai pot. I had 3 pot candidates. Not sure if I picked the right one but anyway, I picked one today
Here’s the tree after I pruned a few branches away before the repot.
The tree pots that I had to choose from where these ones:
The round one and the skull pot are pots made by Zoran Slavkovic. The natural rock looking one was made by Ginkgohatás pottery.
After combing out the roots I tried to fit the tree in all the pots.
This would be a winner if the pot was just a little bigger.
Not bad either, but the pot looks a bit too big this time.
After loosening the roots a bit more the tree fits this pot and there should be enough space for new roots to grow. For now it’s good enough.
Let’s tie the tree nice and steady in the pot and fill everything with bonsai soil making sure there are no air pockets left between the roots.
A little close-up of the exposed roots.
There even was a visitor that survived the repotting
Now the tree can grow freely for the first few months, maybe in june I’ll do some decandeling but that’s yet to be seen.

 Login
Login