All trees? No. Not all trees. Repot with a reason! One reason could be that the tree has been in the pot so long, that it is filled with roots. Or, as in the case of this trident, because you are working on building a good nebari. Then more frequent repotting can help build the base you are looking for.
Fig trees, or Ficus spp, are often encountered in commercial trade. Vilified as mallsai (e.g., the ginseng ficus), most of these are mass produced. As such, many people believe ficus to be unsuitable for bonsai practice. Nothing is less true. Well-trained and cared for properly the species make for excellent tropical bonsai.
Ficus benjamina (left) and microcarpa
Note that most of the ficus ‘bonsai’ sold in large furniture chains and supermarkets are often the combination of two varieties or even species of fig. The main trunk is often a regular Ficus macrocarpa. This is a fast-growing species with large leaves. When the trunk is grown, these are grafted with a dwarf variety of the same species (e.g., F. macrocarpa ‘green island’) or even another species. Cutting off the grafted foliage can lead to sprouting of the original trunk and thus, coarser growth branches.
Ficus carica, the species which produces the edible figs, are only rarely seen as bonsai. In mediteranian climates however some growers are successful and leaves may reduce down to about 5cm.
Ficus bonsai identification
Ficus is a large group of tree species characterized by inverted flowers. The most commonly used species are fast growing species which in the tropics grow out to a height of 10+ meters tall. The leaves are staggered rather than opposing and when healthy, highly glossy. The leaves from F. microcarpa en F. Benjamina have a slightly pointed end, allowing for water to drip off more easily. When a leaf or branch is cut, a white sap comes out, natural latex.
Do not mistake Ficus bonsai with
Ligustrum spp. The foliage of ficus is sometimes mixed up with privets. Privets however have much smaller, and semi-opposing leaves.
Ficus bonsai position
All fig species are sunlovers. In full sun sufficient water is however crucial.
Ficus are tropical to Mediterranean species. As far as I know, only the edible fig, ficus carica, can stand light frost. All others need to be brought indoors during cold spells (sustained temperatures below ~10c and/or frost). The indoors spot needs to be as bright as possible. A window with southern exposure is optimal. Over summer the plants are best outside in full sun.
Hint: When ficus is brought indoors for winter, often many leaves drops. This is a response to changes in position as well as the dry air indoors and frequently reduced water availability. Ficus is adjusted to dry-seaons by dropping foliage. Reduce this response by placing a transparent bag over the tree for some 2 weeks.
When moving the tree outdoors for summer, keep in mind it is not used to the direct sun, and sunburn is guaranteed if the tree is placed in direct sun. As such, first put the tree in the shade for 2 weeks, then in dappled sun, before moving it into full sun, otherwise part of the leaves will get burnt.
Ficus bonsai watering
Ficus are often described as species that likes to be kept dry. This is only the case when it is cold. If kept warm, the roots need constant access to water. Here access to oxygen is important, so an open substrate is required. Normal potting soil often is of poor quality and creates anaerobic mud (leading to root mortality)
Ficus bonsai trimming
Ficus can be pruned without constrained. Trimming is best done during late spring, after the tree has spent a bit of time in the sun outside. That leaves enough summer growing to recover, yet has allowed the tree to regain strength after a dark winter (This of course for people in cold climates). During winter indoors and directly after, figs are weak and may not respond as expected to a strong trim.
In late spring backbudding can be induced by trimming off all the growing tips. Do this only with healthy specimens.
Ficus bonsai repotting
Healthy figs fill a pot in 1-2 years and can best be repotted in late spring, after the weather has warmed up a little.
Ficus bonsai propagation
Ficus is very easy to propagate as cutting. Sticking any size branch in moist soil under warm conditions will have a high strike rate. Growing from seed is only for those who can source seed locally as seed loose viability quickly.
As you may have noticed, I like Larch, and I like working on them in the middle of winter. It is one of the species which I regularly buy and style, to eventually sell off again. I often come across larches which, with a little wire and pruning, can be made even more impact full. A good reason to explain a little how I go about styling larches
About growing Larch as bonsai
First and foremost: For Japanese and European Larch it is important to realize that there is no back budding. The living buds that are there, is what you have to work with. Very seldom do buds pop up on older branches so whenever working with Larch, ensure you do not accidentally break off buds, or trim branches beyond the last bud (If you want to keep a branch there). The buds in Larch are somewhat special: In spring the buds can grow a single rosette of needles, or can become an extending branch. Old larches often have many non-extending buds. By trimming old branches back one can trigger these into extending.
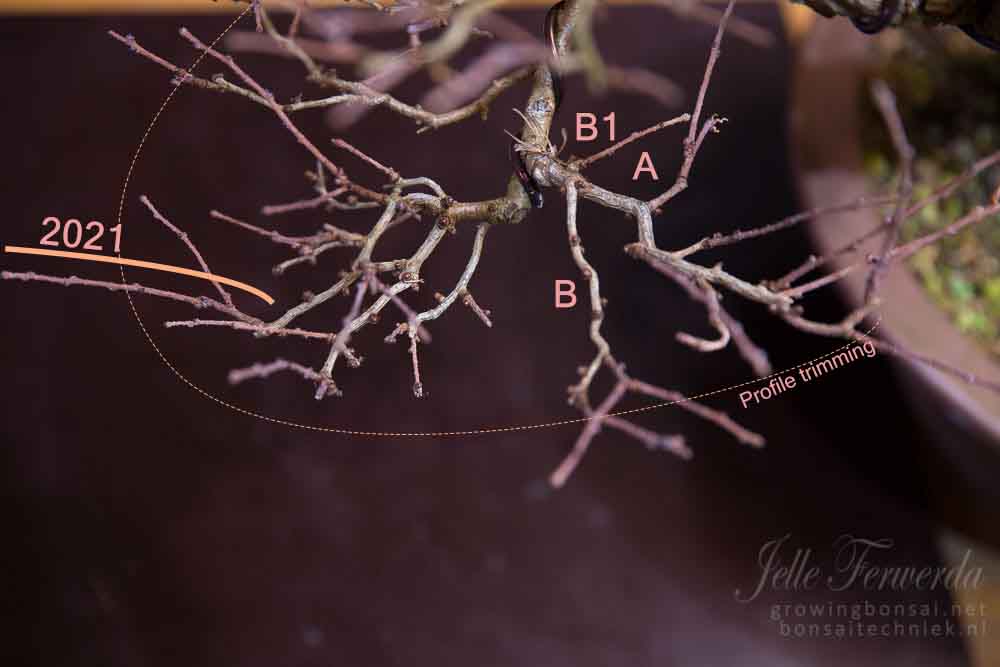
Larch branch before cleanup & wiring
Let’s take a look at this lower branch. It was last wired 2 years ago. There is still a supporting wire around the main branch, ensuring it sets properly in shape. That wire was replaced in winter 2020/2021 as the original wire was being enveloped by the thickening branch. Over summer, the extending your growth has been pruned to encourage sire-branches. The thin brown branches are all growth from this year (See annotated 2021 growth). The more greyish branches are older. Pruning back the new branches to the branch profile, leaving roughly 2 new buds on each branch results in a perfectly fine pad.
A side-view
Larch bonsai side branch growing inwards
Larch bonsai branch development
Larch bonsai branch development
Looking from the optimal viewing angle at the tree, one branch seems to grow towards the trunk. This is branch “A” in the annotated image. If we were to remove this, we can wire branch “B” down and create a pleasant continuation of the flow of the main branch. Branch “B” has a small side-branch “B1”, grown in 2021, which I will keep around so that in future work we can trim back to this. For now, it helps to fill the profile.
Some fine pruning of larch bonsai
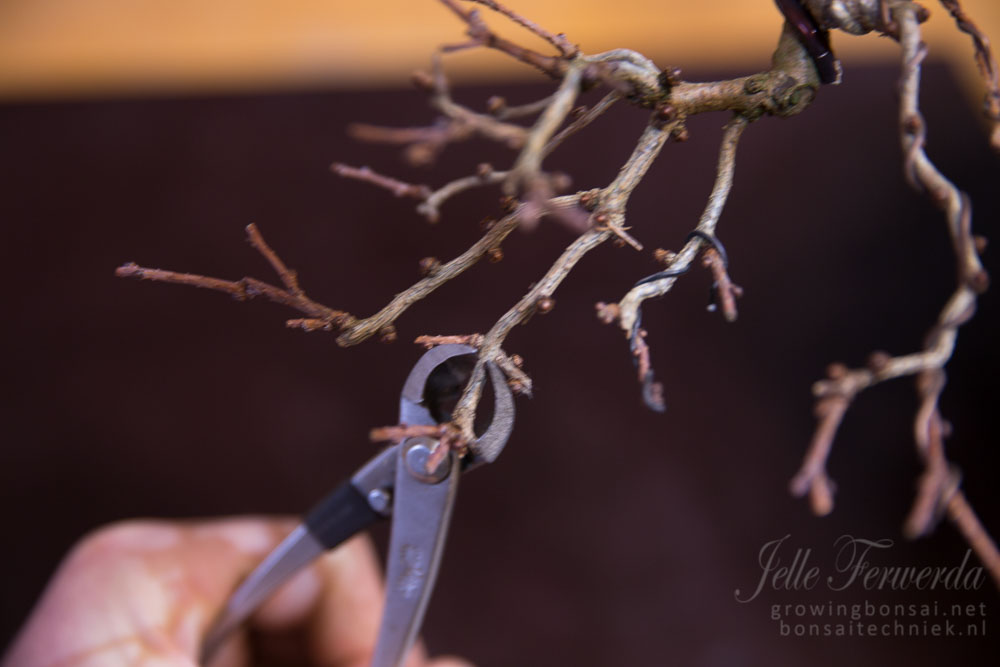
Larch bonsai remove triplets
Next, I look through the branch I am working on, and search for all spots where more than 2 branches emerge at junctions, and reduce each junction to two. Here I focus on taper (Removing the thicker over the thinner branches) and internode distance (Tighter internodes are better). Later on, if only trimming this years’ growth is no longer sufficient to reduce the width of the tree, cut-backs will occur into older wood, where a side-branch becomes a main branch.
Wiring a larch bonsai
Larch bonsai branch laid out
Larch bonsai branch laid out
After the pruning and selecting of branches, it is time to wire. When building the basic canopy, I wire all young branches every 1-2 years. The reason is that the new growth is usually quite straight. All branches grow in their own space yet do not form a consistent pattern. After wiring, I try to horizontally place each branchlet in its own space, with limited direct overlap on branches short below. This to reduce shading out of the buds one level below. At the same time, in the vertical plane, I like to position young branches by first wiring them up a little, off the main branch plane, and then parallel to the main branch line, creating, seen from the optimal front, a puffed-up branch pad.
In some cases, one would like to adjust the foliage on a juniper. The original foliage of the species might be very loose, or prone to diseases. In that case, grafting better suited foliage might be an option. Naturally, it is also a route to get branches at places where there are none.
Grafting in a process in which you take a part of one plant, and combine it with another. This works only when combining plants of very closely related species. In general, most junipers can be grafted on other junipers for instance. But not on pines.
The process works by allowing the cambium layers of the donor and recipient plant connect to each other, and over time create shared wood and bark.
Tools
For grafting, you need a few basic tools:
Grafting tape
A sharp knife
A pair of scissors
Some wires
A donor plant
A recipient plant.
Grafting steps
First of all, you need to pre-stretch the grafting tape. Doing this will ensure that the tape can attach itself to itself
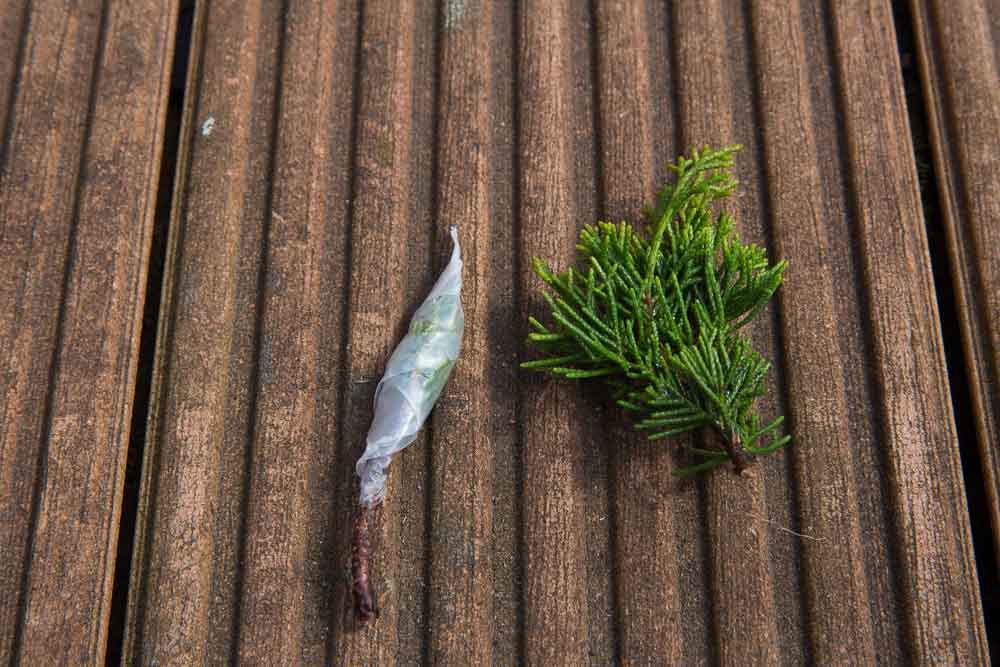
Then you clip a branch from the donor plant. Ideally, this is a branch that has turned woody. Reduce the foliage to the size of a cutting
Wrap the donor scion with grafting tape, making sure the woody part of the scion is left free. Each wrap of grafting tape needs to overlap with the previous.
Select the location where you would like to graft. With older trees, make sure you find a location with a strong sapflow
With the knife, cut a sliver of bark & wood of about 1cm long on 1 side of the donor scion. On the other side, cut a tapered end of about 1/3 cm
In the receiving plant, make a deep, slanting cut into the receiving branch of at least a cm long
Slide the donor in the slit, with the donor on the side of the cut so that the cambium layers are as near to eachother as possible. The long slit comes against the recipient branch
Wrap the connection with grafting taper, securing the scion in the cut
Aftercare
In order to give the graft the best change of success, you need to keep the grafts out of hot sun, wind and frost. For the first months there is barely any sap exchange between scion and recipient plant. As such, there is a real risk of drying out. And the callus formed during the healing, is for the first year or so weak, and easily breaks after which the graft with die.
My friend Wolfgang Egbert, a talented bonsai artist from Germany, created this little rock planting and kindly allowed me to republish his work as a mini-tutorial. (On facebook he regularly posts his work, if interested)
Materials needed to create a small bonsai juniper rock planting
A young juniper (Here: a 3 year old itoigawa cutting)
An interesting rock (Ideally with some crevices and taper)
Keto (A special substrate, consisting of a mix of peat and loam)
Wire in different thicknesses
Moss
Akadama
Preparing the rock
To get started, prepare “bonsai muck”, a mixture of up to 40% Akadama (Or other coarse substrate) and keto. The muck should be soft enough to easily mold, yet not so wet that water drips from it.
In the area where you would like to plant the juniper, stick the muck to the rock. Extend as far as you would later like to cover the rock with moss.
Preparing the juniper
First, the juniper is trimmed back, and inner foliage is removed to create a small open structure, where each secondary branch is well-defined.
In order to be able to position branches and trunk fitting to the rock, the juniper is completely wired with appropriate strength bonsai wire (Here: Aluminium in 1 and 2mm).
In order to place the juniper on the rock, the roots are combed out, removing most of the original substrate. Overly long and strong roots are removed, leaving mostly fine roots and a compact root ball.
Putting together a bonsai juniper rock planting
Take a piece of 2mm aluminium wire, long enough to wrap around the rock at the level where you would like to position the juniper
Gently spread the juniper roots and press them onto the muck
Just below the trunk, trap the roots with the wire, loop the wire to the back of the rock, and tighten enough to hold the juniper in place, but not so tight that the roots are crushed.
Bend the juniper branches in place, creating a pleasing canopy outline
Add muck over the roots, ensuring all roots are properly covered with a thin layer
Arrange moss on the muck to create a closed carpet. Muck is sticky and the moss should stay on by itself
Water gently
Done!
Aftercare of a young bonsai rock planting
Keep the rock planting in dappled shade. The rock can dry out very quickly so it is important to shade the composition from direct sun during the hottest part of the day. Placing the rock on a Suiban can help to keep the rock moist and the planting watered at all times.
In order to create good bonsai, often it is needed to perform some type of wiring on your tree. After all, we are working with trees that would like to grow up, into a large tree, and do not always agree with our ideal placement of branches which is more out than upwards.
Guy wires for bonsai development
A downside of wiring the bonsai by coiling the wire around a branch is that within a fairly short amount of time (Typically a few months to a year) the branch has started to grow around the wire (The wire is biting in) and the wire needs to be removed to avoid long-term visible scarring. Especially for some species (Notably Larch and Spruce) this is not long enough to get the branches set. But also for thicker branches on other species this is often not enough time.
Talking about thicker branches: These will need quite heavy wire, and technique needs to be perfect to get the bends to stick.
Using Guy Wires for bonsai
An alternative is the use of guy wires. Guy wires are a great bonsai technique to set branches. It took me a while to realize the potential of these. Instead of coiling the wire around the branch, you take a very thin wire. Attach it to the branch you want to bend. Here you ensure proper padding between the branch and the wire. I use pieces of rubber tubing. Ensure you have a very loose loop that will not restrict the branch when growing. In the direction of the intended bend, find a solid anchor point to attach the wire to. I often use a yin, but also another branch, a screw, root, the pot or wiring will work. Now you can position the branch in the direction you want, and use the wire to keep it in place.
In the example pictures I have used a stainless-steel screw to attach the wires. This juniper had been wired 3 times already, and every time the branches come back up after unwiring. So here I decided I will leave the guy wires on for several years. After removing the wires, I will remove the screw. The small hole should close with time.
When to use it
Guy wires only work in the direction that the branch is pulled. So I use them to pull a branch in a certain direction.
You can use it on many species. Some species, such as Japanese maples, scar very easily. Using a guy wire to put the main branches at the right angle, and regular coiling for the side-branches reduced the risk of wire biting in on larger branches that need long to set.
When not to use it
This bonsai technique only works for placing branches in 1 direction. So it is not good to build curvy branches. I typically do the shaping of branches with coiling, sometimes at a very young age such as baby bending. Positioning / setting the branch angle for thicker branches I do with guy wires.
To keep in mind
When you wire a tree by coiling, quite intense bends are being put in the branch. This causes internal trauma, to which the tree responds with additional growth in order to repair the damage. With guy-wires less trauma is caused, and the bend is usually placed over much longer stretch of branch. As such, fixing a branch in place takes disproportionally longer.
A few years ago, I was not sure what the best substrate for bonsai would be. As the global consensus is that Akadama is the best substrate for bonsai and root development, I decided to do a little trial. Naturally, not a scientific study, but just for fun. I decided it might be of interest to others what I found so, here goes.
Bonsai substrate test setup
Bonsai substrate experiment
Bonsai substrate experiment
For this trial I used 6 Malus seedlings. In early spring, a few weeks after they had started growing, I bare-rooted the seedlings. After sorting them by size, I allocated them to my regular substrate at the time, or Akadama. I ensured a balanced distribution with the two largest, smallest, and intermediate sizes each in one of the substrates. The roots were clipped to the same length at this time. Then they were potted in a 6-hole container in a mixed pattern. This way the plants are always together, exposed to the same conditions. The container was then placed in full sun and rotated several times over the rest of the year. Watering and fertilizing was as with all my plants.
Substrate composition
The mixed substrate used in this experiment consisted of molar clay, mixed with broken expanded shale and pine bark. A few bits of coarse bims are present too (As I re-used some old substrate). I used regular Akadama from a bonsai dealer, sifted, unmixed with other components. (More on substrate for bonsai).
Above-ground differences
Difference in above-ground development of seedlings in akadama versus my regular substrate
After the leaves had dropped, I inspected the plants. Surprisingly, there was a very clear difference between the seedlings in Akadama and those in my regular substrate. The seedlings in my regular substrate were substantially larger than the ones in Akadama. So substantial that concerns I had at the beginning of the trial regarding equal size distribution across the two substrates had been lifted completely. Every single seedling in my substrate was larger than all Akadama-grown seedlings.
Below-ground differences
Bonsai substrate experiment
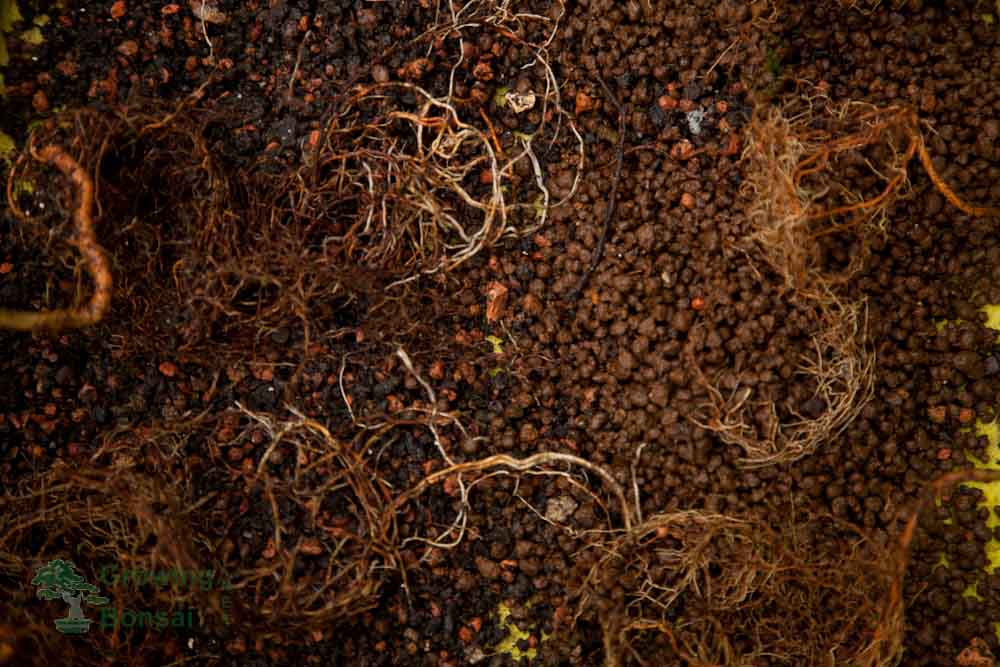
Taking care to not mix things up, I removed each seedling from the container, putting all Akadama-grown seedlings to one side, and the others on the other side. Here we see that the roots from those grown in Akadama (Bottom row) are short and fine with many growing tips. The roots of the seedlings grown in my regular substrate (top row) have fewer active growing tips, and the roots are longer and thicker. The closeup shows this even clearer, where Akadama grown seedlings are on the right.
Bonsai substrate experiment
Conclusion
This trial was done with a very small number of plants. From a scientific perspective the number of samples probably is insufficient for statistically sounds conclusions. That being said, with the differences being so clear, I personally feel confident that the pattern seen here is real, and not a coincidence.
In this experiment, seedlings grown in Akadama showed reduced biomass accumulation. The above-ground parts were shorter and thinner than those in other substrate. For growing bonsai from seed / young material this might mean that Akadama will slow down above ground development. On the other hand, for more mature material it might mean that internodes are closer and fewer extending branches will form when growing in Akadama.
The roots were finer, and with more active growing tips for Akadama. This may assist in developing a better nebari.
Considerations
Akadama is by most not used pure, but rather in a mix with e.g., bims and lava. As such this could be seen as an unfair comparison. Considering the differences seen in this experiment it is worthwhile to explore further experiments with individual substrate components as well as mixed substrates. If you have done such experiments, please let me know!
In my collection I have this little leaf lilac bonsai (Syringa microphylla). This tree was found on a local biowaste disposal unit, and when I got it, it was little more than a little stump. It has taken a few years to get some branches on it, but 3 years ago I for the first time had a decent show of flowers.
Lilac trunk for bonsai
Fast-forward and I have developed a bonsai with a pleasing canopy and loads of flower buds. With lilac however, the flowers grow in clusters. If you just let them grow freely, they will overwhelm the tree and all you see is flowers. Therefor I do a few things. I wire the tree in fall, and prune back branches without flower buds. In spring, I wait until the flower buds are well developed, and I prune these back, and remove most of the spring growth. This way, the flowers are more reduced in presence, yet stand out.
Lilac bonsai canopy structure
Lilac bonsai budding out
A few benefits for the tree are of course an increased amount of light in the canopy, which stimulates back budding. The pruning of the growing tips does the same thing. And finally, removing part of the flowers reduces the energy the plant spends on flowering, and you get better growth in the season following.
Lilac bonsai in full flower
I have captured the spring cleanup process in a short video. Enjoy!
Often people that grow bonsai and in particular, maples, will wonder whether it is possible to grow them from cuttings. And the first question of course is then: Rooting the cuttings.
I have made a little video on rooting Japanese Maple cuttings. Please take a look and let me know what you think!
In short, the steps are:
Trim the maple
Collect branches with 2 nodes of semi-hardened material, leaving only the top 2 branches
Dip the lower node in rooting hormones
Place the cutting in a suitable media (See video!)
Shield the container & cuttings from wind and keep moist (Special trick in the video)
Last year I air-layered this Japanese maple and it has developed like a charm. In the attached video you will see how I go from a layered branch to a first styled bonsai. Naturally, over the years to come it will take a lot of work to get this to become a fully refined bonsai but I am quite happy with the first outcome!