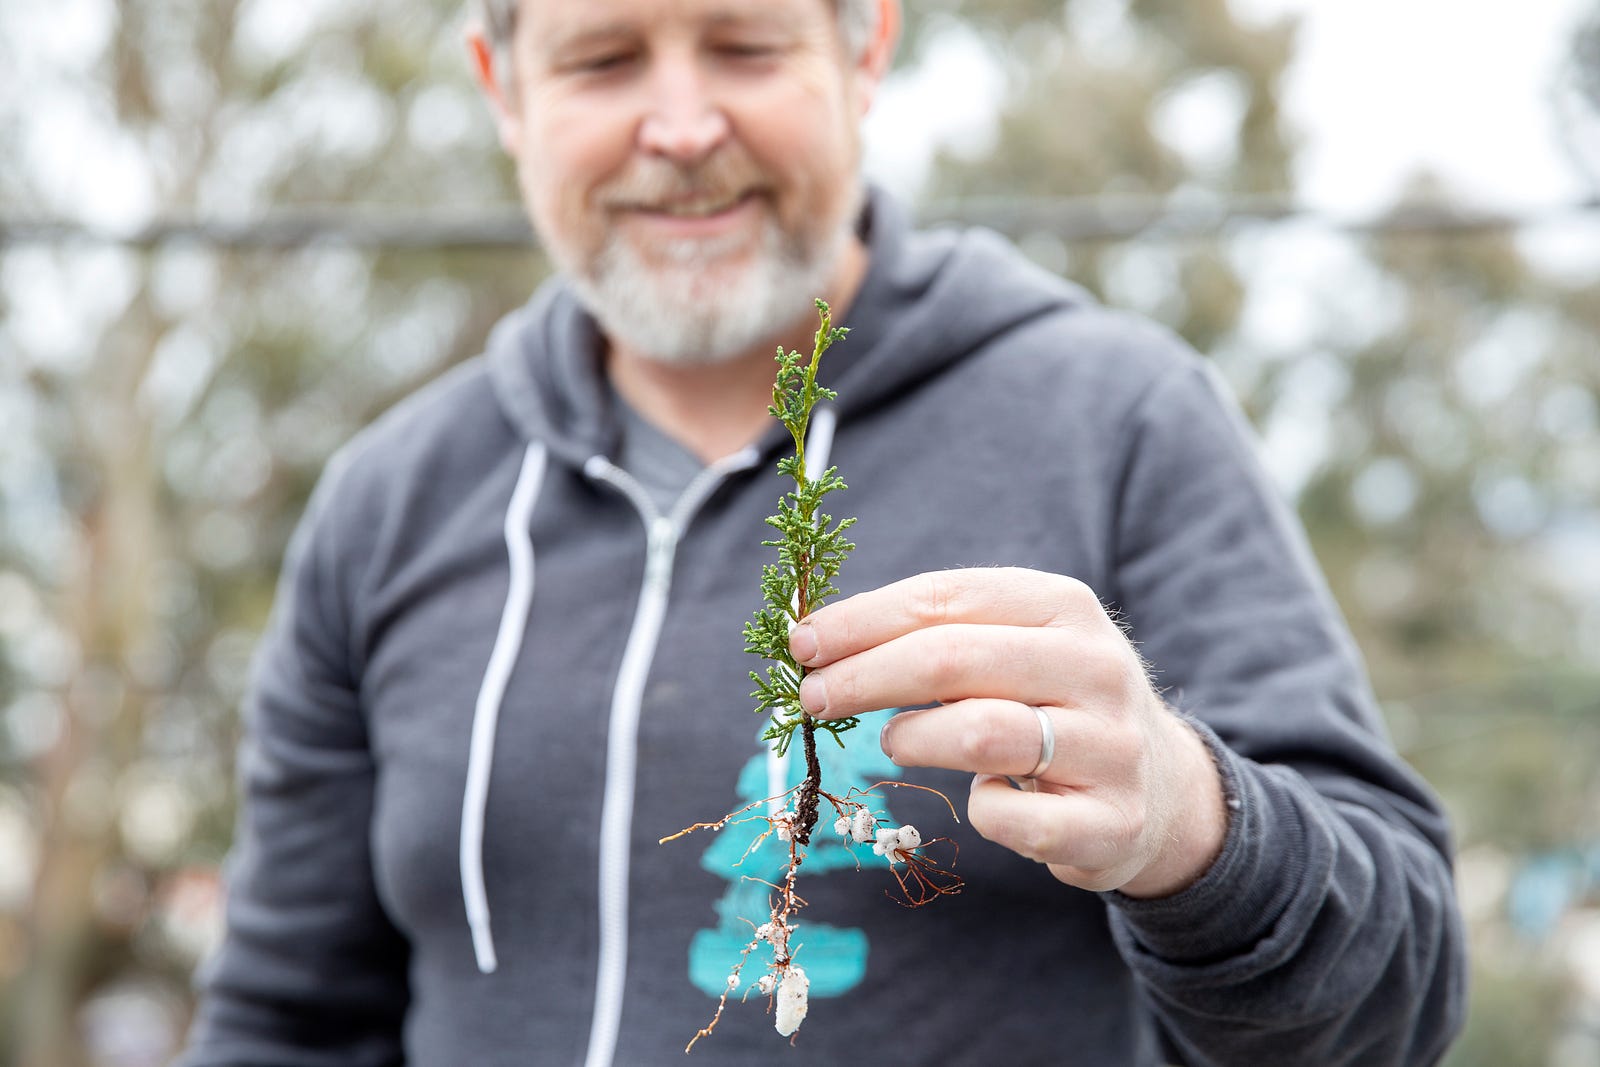
Unless it's early spring, and you're growing willow, it's almost always bad to see white fuzzy stuff on your tree. (willows make beautiful catkins that are fuzzy and white which is what is pictured above.)
Mealy bugs are soft-bodied insects that suck on plant sap like aphids. The females are what are normally seen - crawling around on plants covered in white fuzz. The egg masses that females lay can often look like mold growing on the bark of trees, or the undersides of leaves.
Ants farm mealy bugs, so if you see ants inspect hidden areas of your plants to see if there are insects that the ants are tending - for the purpose of collecting the waste they create.
Mealy bugs come in a few different varieties, including tiny ones that mainly inhabit the soil, rather than the tops of plants.
We propagate and sell a few varieties of plants that are well suited to indoor bonsai growing; among them is rough-bark dwarf jade (Portulacaria afra.) When kept indoors the natural predators of mealy bugs like birds, spiders, and many insects are absent, allowing the population of the pests to proliferate.
To kill mealy bugs, try drenching the plant in a soap spray (like Safer Soap) or by diluting 1/4 Tsp of dish soap (not detergent) in a quart of water. Soaking the entire rootball in soap, and drenching the entire top is the best way to knock back mealy bug populations. Repeat this exercise at 2 week intervals until you no longer notice any bugs.
Because mealy bugs are very good at hiding, dense foliage, dense twigs, and even the rims of plastic pots and similar spots make good protection. Do not assume that anything short of dunking the entire plant will reach all the crevices they are using for hiding spots.
Mold on the surface of Portulacaria afra bark is not a common occurrence - if some part of the plant has died due to frost or another issue, mold can get a foothold, but in normal conditions, any white on the trunk is more likely to be some sort of pest, either the insect itself or eggs.
Portulacaria are quite drought tolerant and like hot dry conditions alternating with enough water to replenish their internal stores. Because mealy bugs are not able to survive the hot dry conditions like portulacaria, another way to deter mealy bugs is simply to let the plant dry out for a week or two in a bright sunny spot. (Note that doing this with other bonsai species will result in plant death!)
Do you have a slam-dunk method for getting rid of mealy bugs? Leave a comment below!
The first time I ever saw a bonsai tree was when I watched "The Karate Kid" in 1984. I was still a child, and I still hold this as a beloved introduction to bonsai, as do many people who are now adult practitioners of the art. Unfortunately, this movie is also a source of misrepresentation of bonsai, unintentionally planting some poor images into the minds of millions of people and likely causing avoidable frustrations to generations of new bonsai hobbyists. And I am afraid that, as good as the series is (and we all love it!) the reboot "Cobra Kai" is likely continuing this cycle of misinformation. These errors are subtle to the uninitiated, but to those of us who practice bonsai regularly, they are significant. There are two bonsai-related things I think "The Karate Kid" could have done better, and one "Cobra Kai" should rethink.
Say It Ain't So, Karate Kid!
In the first and most memorable bonsai scene of the original movie, Daniel walks into a dark room where Mr. Miyagi is trimming some Juniperus procumbens plants. Mr. Miyagi invites Daniel to trim one of the trees and the scene unfolds as a lesson in mindfulness and thoughtful bonsai practice. Watch for yourself:
1. Wrong Species: although many Americans think of Juniperus procumbens (or the Nana variety) as a "Bonsai" it is actually called a Japanese Garden Juniper. While the species is commonly used as a spreading ground cover in Japanese gardens, it is almost universally rejected as a bonsai subject. Instead, bonsai practitioners use two other kinds of junipers abundantly - Juniperus rigida and Juniperus chinensis v. Itoigawa and v. Kishu.
And why does the exact species matter? Because J. procumbens and J. procmbens 'nana' are not your friend in the long term when it comes to bonsai. Yes, you can create a bonsai with a procumbens juniper, as you can train the trunk and branching, but you cannot maintain and improve it after creation, when the foliar characteristics become quite important. Even in the 1980's when this species was more popular, bonsai practitioners "in the know" were grafting other more cooperative varieties onto it to escape the problematic maintenance issues. Today, these are the plants that you might buy in a home center in a plastic pot, or from a roadside truck from a guy who doesn't know very much about bonsai.
2. Wrong climate: the bonsai portrayed in the movie are not grown indoors by most or perhaps all serious practitioners and artists. Bonsai being mainly made from tree species means that they nearly all want bright all-day-long sunlight. Where Mr. Miyagi is keeping his trees they would certainly not receive enough light, and lest you think perhaps he is in a greenhouse at night, refer to the third movie where they are also kept indoors at the store. This unfortunate movie styling decision seems to have started a trend in all other movie and serial entertainment where bonsai are kept indoors as decorative objects, resulting in the majority of people believing that bonsai should be kept indoors.
While it's fine to bring bonsai indoors, and during winter protection can be essential, generally they are easier to grow outdoors where they create tighter healthier growth than inside buildings. Bonsai can be grown indoors, but you will face many challenges in providing adequate light and your efforts will largely be confined to tropical or other species that tolerate the constant temperatures inside homes. To their credit, the creators do keep some scenes with trees outside, as in the third moving "Roots" scene.
Mercy, Cobra Kai!
3. That juniper is not a bonsai: In the first season, Daniel holds up the little juniper you can see in the screen shot above during his commercial for his dealership. This is an untrained juniper that doesn't look like a tree; certainly not like a juniper tree. It's still the wrong species, and really shouldn't be held up as an example of American bonsai.
What was your first exposure to bonsai? Was it from "The Karate Kid" or "Cobra Kai"? Let us know in the comments below and share your impressions!
For a generation of Americans and Europeans, the 1984 movie "The Karate Kid" was an unexpected introduction to bonsai as a hobby and a mindfulness activity. Mr. Miyagi introduce Daniel to bonsai, first showing him a medium-size juniper* and tells him to close his eyes and think only of the tree. He further instructs him to picture the tree, then to open his eyes and make the actual bonsai in front of him look like the picture in his mind.
Daniel: "How do I know the picture in my mind is the right one?"
Mr. Miyagi: "If come from inside you, always right one"
After some work on the tree Daniel's mom enters and asks what he's up to, Daniel responds by saying I'm working on my "Baby Tree"
M: "Bonsai Tree"
D: "Banzai Tree"
M: "Bone-sigh"
In this one short scene (click on the image above to watch the clip), the default concept of bonsai was formed in the minds of millions of people. For an American production company working in Los Angeles in the 1980's we think they got a lot of great things right, starting the ball rolling for so many people. Here are four things we think they did well:
1. The plants are healthy and full of good looking growth - even though this is difficult to tell in the dark scene, just this simple idea that a plant should be healthy and growing well as a bonsai is helpful to people who have little other experience with the concept of bonsai.
2. Mr. Miyagi manages to quickly convey that bonsai is a process that a person thinks through and then executes physically, shaping the tree to the picture that they create in their mind. He hands Daniel a pair of scissors and leaves him to work on a plant. While many Americans still think of bonsai as a decorative object like a painting, this scene conveys this key conceptualization - it is a partnership between a plant and a person that makes a bonsai.
3. Bonsai are trained to be small. One of the very basics of bonsai is that they are not a type of plant, they are a method of training both the foliage and the roots.
4. Mindfulness is a part of bonsai practice - incorporating time to consider your actions, maintaining concentration on what you are doing, and enjoying the process of working on a tree through scents, textures, and sounds allows you to quiet your busy mind and contemplate. Although bonsai has conceptually been linked in popular culture to "Zen" and mindfulness, it is well incorporated in this scene.
When was the last time you watched The Karate Kid? Have you binge-watched the new season of "Cobra Kai" on Netflix yet? Let us know if we missed anything else the movie got right about bonsai in the comments below!
After years of talking about it, my husband Eric and I finally started a business in late 2019. We crafted a mission and business plan, conducted audience and market research, connected with a designer and web developer, and began developing our product. We debated seeking investors vs. bootstrapping and decided that we would bootstrap, ensuring that we would retain full creative, operational, and fiduciary control. Our website launched in 2020, and we’ve spent the past two years slowly growing a beautiful business together. We’ve made plenty of mistakes, had quite a few happy accidents, and ultimately have learned so much about entrepreneurship and starting a business. I wanted to welcome 2022 by sharing our experiences with anyone considering starting their own small business this year. While our specific business may be very different from yours, the lessons we’ve learned will definitely apply to you at some point in your entrepreneurial journey.
1: START TODAY!
Have you ever heard this proverb, attributed to ancient China? “The best time to plant a tree was 20 years ago. The second best time is now.” It’s generally interpreted to mean that if you want to succeed at something in the future, the best time to act is now, in the present. Eric shared his business ideas with me years before we finally decided to start Bonsaify. While we may have gained experience and wisdom in the intervening years between ideation and actualization, I wish we had stopped waiting and taken the leap into entrepreneurship sooner. Looking back, the only thing that really held us back, was our own FUD — fear, uncertainty, and doubt. What’s holding you back, other than yourself?
2: WRITE IT DOWN
Ideas come when you least expect them — while on a run or walk, laying on the yoga mat, prepping a meal, sipping coffee, taking a shower. Don’t judge your ideas immediately and toss them aside; give them space to ruminate and develop by writing them down!
3: GET A WHITEBOARD
Quickly followed by, “Use a Whiteboard”! This is a great tool for quickly getting your ideas out, and making changes rapidly, without committing too much time to technology, template, or format. We have two whiteboards set up, one in our operations (office) space, and a second in our production space. This enables us to ideate and prioritize the most important to-dos and plans for separate parts of the business.
4: GO TECH-FREE
Does it ever feel like there are an overwhelming number of digital tools available to entrepreneurs? It’s because there are: project management tools; work organization tools; website tools; email communication tools; customer relationship management tools; and accounting tools (to name a few broad categories). Hubspot has shared that marketers alone use on average more than 12 different tools, and some are using more than 31 tools to manage campaigns and data!
Every start-up or small business will have a different set of digital tools and software that make up its tech stack. These tools make a difference, and we’re not suggesting that you drop any of them. The point of today’s resolution is to consciously take stock and look for opportunities to simplify for a few hours or a few days. Can going tech-free for a few hours or days really help an entrepreneur build a successful business? Yes, it can. Take your thoughts, plans, dreams, and goals offline — on a walk or to a journal (or whiteboard).
5: RESEARCH
Market Research…can you ever really do too much? When we began planning for Bonsaify’s launch, I spent a lot of time looking at our competitor’s websites and social media accounts. I divided the competition into different categories; reviewed their voice, design, and product descriptions; analyzed their search and promotion strategies. Eric and I agreed on which part of the market we were going to focus on, and we built out content, product, and marketing plans from there. If I hadn’t already known it before we launched Bonsaify, the past few years have taught me you can never do too much research to understand your customers, your competition, and your market.
6: IDENTIFY YOUR STRENGTHS
Is anyone great at everything? Is each of us great at one thing [at the least]? When we first began Bonsaify, Eric and I thought about what type of work brought us joy and motivation; areas where colleagues and friends had praised us in the past; and tasks that made us cringe. We divided up the “must do’s” between us based on the strengths we identified…and had space to add a few “want to do’s” on top. One example: I knew I was good with wordplay and could establish an authentic voice for our brand that would connect with our customers. I took charge of all communications. I wanted to learn more about SEO and building audiences organically, so I took that on as an additional area of focus. I’m still learning, and I’m loving it! Although my full-time job doesn’t require me to have these skills, I do feel that I can bring extra passion and experience to my “day job” that benefits my colleagues. A true win-win!
7: OUTSOURCE
“Outsource is the secret sauce.” — Dory Schrader
Eric and I realized early on that even though our business is small (Eric plus whatever few hours I can provide outside my full-time gig), bootstrapped (e.g. our budget is tiiight), and early stage, we wouldn’t be able to do everything ourselves. After organizing around our individual strengths and time availability, we highlighted a few key areas where we needed to outsource. Those included accounting, legal (LegalZoom thank you!), greenhouse management, parts of product development (e.g. 3D modeling for concrete pots), and brand design. Any financial investments in these areas have been returned exponentially, either through time back, piece of mind, or trackable ROI $$. OUTSOURCE when you need to!
8: BOOTSTRAP
Is this controversial? Remember, these are our reflections and learnings from the start of our small, family-owned and operated business. We started Bonsaify from our own personal finances in the Fall of 2019, which meant we started small and slow. Our first few investments were very basic — before even renting a greenhouse space, we ordered seeds and the flats/trays/containers we’d need for seedlings and cuttings; handled the legal and regulatory aspect of our business, and asked a designer we met through a friend to help us with our brand and logo design. We purchased a URL…and not much beyond that. We planned what we’d need to spend each month to nurture the business and grow, and brainstormed ways to earn some revenue to counter costs. There’s much more to our bootstrapping story, which I intend to share someday. For now, I’ll leave off by sharing that we ended 2021 with a full quarter of monthly sales covering monthly costs. The business is moving in the right direction, and bootstrapping continues to be our preference, to retain full control of our goals, our customers’ experience, and our destiny.
9: FOCUS
Even in our niche industry — bonsai in the U.S. — there was no limit to the potential paths we could take when we began Bonsaify. Grow big trees or small; sell starters and pre-bonsai or only trained bonsai; focus on species best for indoors, outdoors, or both; ceramic or concrete pots, mass-produced or locally made; offer virtual workshops and seminars; how much related and peripheral merchandise to offer; and more decisions that were focused just on product development and offerings!
We also had to think about which social channels to invest in; where to focus on building community, audience, and engagement; which infrastructure tools to subscribe (e.g. Shopify, Klaviyo, Trello, LegalZoom). It was easy to feel overwhelmed, and we learned that we needed to FOCUS on one decision at a time to keep making progress and to move the business forward. As a marketer, I read “Traction” by Gabriel Weinberg and Justin Mares, and overall, I recommend it. The Bullseye framework works, and it helped me determine the three traction channels I needed to focus on in 2021 to drive our intended growth.
10: CUSTOMER EXPERIENCE
Building our business has been all about customer experience. We’re not just focused on the quality of our products, but on how we communicate with our customers, building authentic relationships; on how we pack and ship our products, throwing in a sweet little extra to bring a smile to our customers face as they open their box; and on speed and detail in responding to customer questions, concerns, and ideas. We are hyper-focused on our customers. They know it; they love us for it and they’re loyal because of it.
Comment posted on YouTube: “Today just got my root over rock black pine and small juniper..let me tell you that was the healthiest most well packed set of trees I have ever got shipped exp in winter in Michigan…tysm I’ll def be a repeat customer…”
Email received: “Everything I’ve ordered from you has been outstanding. The way you pack the plants for shipping and the quality is way better than anything I’ve purchased online. I never question if the roots are damaged, trunks are split, etc. I can tell that you care about your plants just by the way they look. Never going to order from anyone else. Thank you.”
Message sent via Instagram: “Glad to see your business is thriving. Great products, excellent service, and quality educational videos. Wishing you great success going forward…”
11: THINK POSITIVE
I’m not typically associated with the “half glass full” mentality, and even I have to admit that working with Eric on Bonsaify has helped me see the value of positive thinking. We’ve had been plenty of frustrating, zero dollars, plans falling through, fallback to Plan D, days since we launched Bonsaify. It would have been easy to fall into catastrophizing, planning to fail, and all that bad juju. Perhaps being a wife & husband team (with a little help from our sons and good family friends) helped us to focus on the good things, the opportunities; to trust that we were the right people to be successful in this particular business and that if we continued to focus and push forward, we would be [more than] fine. We hold tight to humor and laughs especially in the face of setbacks. We find excitement and joy in each customer engagement — emails, phone calls, likes/comments/shares on social media, and of course, orders — and that translates easily into gratitude. Finding and holding on to this positive energy makes it easier to deal with the inevitable problems we face. Being a blindly optimistic Pollyanna still isn’t a good strategy IMO, but I have learned that focusing on each little win and joy in the day-to-day of starting a business definitely helps me push through the tough stuff without complaint. I definitely believe that if you can hold to positive thinking, you can persevere as you launch a new business.
12: MANIFEST
Eric had a vision for Bonsaify long before we had a name, a logo, or a website for the business. He manifested this business, sharing his vision with me, bringing me along, until I could clearly see it and could help him draft a mission, and ultimately, a business plan. We take time every week to review how our business is growing, and continue to manifest our vision, mapping out short- and long-term goals, and picturing where we want Bonsaify to be in 2022 and beyond. You CAN manifest your ideas, dreams, and goals into a whole new business. Eric did it, and I’m so happy to be along for the journey.
13: EXERCISE
There are nights when Eric crashes into bed before 8:00 pm because starting and running a new business is #sodamnhard. I’m sure he’s not the only entrepreneur pushing himself to exhaustion. For me, the antidote to exhaustion is exercise; actually, it’s mindful movement. Whether it’s yoga (Yoga with Adriene is my jam), a walk, run, or bike ride, or an Orangetheory Fitness class, I take at least 20 minutes each day for my body and mind to connect. It offers me a break, helps me rebalance between professional and personal stressors, and provides a daily refresh/reset. I cannot advocate enough for the power of exercise!
14: SLEEP
Forbes published an article in July 2021, “Entrepreneur Sleep Deprivation: A Work Trend That Needs To Be Put To Bed”. Sleep isn’t a sign of weakness, and keeping a 10:00 pm — 6:00 am (or 9–5, 11–7) schedule doesn’t mean you lack passion, drive, or motivation. Sleep is essential to life. Do you want to have the energy and stamina to continue producing innovative and market-changing products and services? Your brain and your body need sleep.
I have a very difficult time falling asleep, and an even worse time staying asleep. I am a light sleeper (until I’m not, something that only the insomniac → truly exhausted can understand) and I am easily awoken by any noise, light, or even my own thoughts. They break through and BAM I’m awake at 2:00 am. I can feel and see a difference in my productivity, creativity, and physical wellness on those days when I didn’t get enough sleep the night before.
I envy Eric, who has a metronomic internal clock that generally guarantees him 7–8 hours of sleep. But even he can fall prey to his Trello task list entering a REM sleep cycle and jolting him awake at 4:00 am. He’s taught me one way to overcome this is getting into a habit of laying down ahead of when you want to fall asleep, actually giving your mind and body enough time to relax and for sleep to come. That way, even on those stressful mornings when we wake up “too early” we’ve at least gotten some good hours of sleep the night before.
How many people do you know, who wear their exhaustion like a ribbon or medal? As the Forbes article author Jonathan Prichard wrote, “Sleep deprivation shouldn’t be something people brag about like it’s a badge of honor for others to admire, yet that is exactly the culture entrepreneurs live in today.” I agree, and I wish this mentality would change; so many entrepreneurs would be happier and healthier.
15: EAT
I LOVE COFFEE. It can be so easy to fill my mug in the morning with a steaming cuppa, and refill it a few times, telling myself that if I want to get some pre-workday Bonsaify work done, then I don’t have time to make breakfast. But I know that I’m not at my best when I feel jittery and yes a little nauseous, from a body full of caffeine and empty of carbs, proteins, and fats. A simple resolution with simple advice: take time to eat! Our business can only thrive so much as we are thriving.
16: RELAX
I know I’m starting to sound more like the owner of a Zen meditation retreat than an entrepreneur with a young D2C e-commerce business, but don’t give up on these resolutions yet! The only way to move forward is to sit back and RELAX. Take just five minutes to stand up and walk around, lift your shoulders up to your ears and release them a few times, or roll your head around to loosen the muscles in your neck. Or give yourself more time and actually meditate, full-body stretch, or read a chapter of a book — just for fun. I prefer yoga, a massage, or float therapy. There’s science behind this — practicing relaxation techniques such as yoga, deep breathing, massage, or meditation reduces the stress hormones adrenaline and cortisol. And that in turn, can help you focus — which is something we entrepreneurs need! You know what? I think I’m going to pause writing this, shut down my computer, and go do some yoga.
17: ANALYZE
Over the past few years, as we conceived and began our business, we’ve had to become Jill and Jack of all trades. Here are just two examples: Eric had to learn how to operate a greenhouse and manage propagation at scale, and I had to move from a broad conceptual understanding of SEO, SEM, and Google Analytics to actually creating content and doing the optimization for organic search, designing search ads, and using the GA dashboard to inform decisions. It’s this last learning that I believe is the most important — entrepreneurs must take the time to study and understand how their business is performing, to inform strategy, planning, and execution. I am still not an analytics expert, but I am looking at numbers daily (email CTR, GA for search terms, time on page, bounce rates, etc) and using the information available to inform how Eric and I prioritize key aspects of the business such as our content plant, product listings, search ads, email flows, and more.
18: TEST
We didn’t have any budget to test product offerings or marketing decisions when we first began Bonsaify. Even now, we have very little money available to do anything other than create products, support operations and infrastructure, and ship. Fortunately, I’ve learned that you don’t need a big budget to TEST and discover what makes your audience happy. Here is one easy example: initially, I sent one monthly newsletter to our entire email list which included links to new articles, videos, and products. I analyzed the open rate, click-throughs, site activity, and conversion value for each monthly email, and I noticed that certain segments engaged much more with the content, and others with the products. I tested splitting the newsletter into multiple sends — one for VIP customers (those who had made more than 5 purchases); one for winbacks (those who ordered at least once, but not in the last 180 days); and one for newsletter only sign-ups. I made minor changes to the subject and preview lines and tailored the body of the email to each audience. The results speak for themselves — as strong as a 73% open rate, 32% click rate, and 32% active on-site for our VIPs! You can test without a large budget; you just need patience, ideas, and access to data.
19: ITERATE
To maintain a successful business in our niche, we need bonsai pots. Lots and lots of bonsai pots. Mediocre ceramic pots are easy to find; great ones nearly impossible because demand outstrips supply exponentially. So Eric decided to try his hand at making our own bespoke line of pots, using specially treated concrete. He first needed to partner with CAD experts to create the models. This took multiple conversations and versions before he had working models that met his standards. He then needed to have the models 3D printed. The first round of models we had printed were too low resolution; so we had to go back to another printer. Then he had to actually create the molds. You better believe it took more than a few rounds until the molds were “just right”. Next, Eric needed a cement mix that work for the particulars of growing bonsai trees. He researched, formulated, mixed, and poured — it took a few rounds before the consistency, texture, etc. was acceptable for our needs. We also wanted to offer color options — the same process of formulating, mixing, etc. And even after the colors were “golden” he realized that some of the molds weren’t quite right, because the pots would get damaged as he released them from the molds. So back to the drawing board with mold production! More than 9 months after kicking off concrete bonsai container development, we finally had a useable and saleable product that we’re proud of.
For us to successfully develop a line of modern cement bonsai pots, iteration was necessary. Eric had to refine his concept, idea, and process many, many times before he created pots that we both felt represented our brand and our standards. If repetition — “doing the same thing over and over and expecting different results” is insanity, then iteration — “a change made to an existing product, idea, or field” is innovation. That’s why entrepreneurs need to iterate!
20: SMALL, FAST MOVES
A small boat is more nimble and easier to maneuver than a large boat, right? Our small business is similar — Eric and I can change course pretty quickly and easily, without much fuss or worry about the fallout. We learn something new in the morning, and by that night, our website is updated, I’ve changed ad copy, or Eric’s filmed a new YouTube video. One of the advantages to bootstrapping our new business with just one full-time and one part-time employee is that we can make a lot of small changes, quickly. We see this as an advantage — a customer asks if we have a specific product or can help them answer a specific question, and we can have a quick confab before replying with a yes or no. Here’s a specific example. We planned initially to source ceramic pots from a large wholesale producer. We were able to quickly change to partnering with a few local/regional smaller production potters and offer a wider array of pot styles with a more personal approach, plus move toward producing our own cement pots.
21: TAKE BREAKS
When I was in my first year of university, I took a Psych 101 course with Professor James Maas, who coined the term “power nap”. I’ve given the old 20-minute power nap a try many times over the years since taking that class, and it has never worked for me. I agree with the concept of quick revitalization, especially now as a mom, employee, and entrepreneur. So while laying down for a fast nap doesn’t work for me, I do lean on other types of breaks — I’ll sip a cup of steaming hot coffee outside on my back porch, sit on the family room floor and work on a jigsaw puzzle, or I’ll go to my bedroom and do a quick yoga session. None of these need to take longer than 15 minutes, and each provides me with just enough of a buzz to bring me back into high productivity mode. I also try to take a longer and more complete break once a week; on a recent Saturday I enjoyed a physically strenuous and emotionally uplifting 3+ hour hike.
22: CREATE VALUABLE CONTENT
By valuable, I mean content that is interesting and engaging to your customer base, to give them a reason to come back and spend time on your site. Our weekly content plan includes two YouTube videos, one article (either something more advanced for active bonsai enthusiasts or something more basic for our general interest audience), and one educational social post. I fill in the rest of our publishing calendar with product posts or bonsai tree pictures that I know bonsai enthusiasts love! Our focus has been on building engaged audiences through YouTube, a newsletter email list, Instagram, and Facebook. And we’re doing it all through great content. Do you consider this guide valuable? I know the content is relevant to the audience I am targeting (hello, entrepreneurs looking to bootstrap their own business!) but it’s up to you to tell me if the content is relevant and valuable.
23: ALWAYS BE LEARNING
“I WILL ALWAYS KEEP LEARNING.” It’s written in the “About” section of my Linkedin profile, and I mean it. in 2021 I completed the Google Analytics for beginners certification because I need to understand GA to help Bonsaify grow. I’m always researching, reading, and adopting new approaches to supporting our business, based on what I’ve learned. The lifelong learning mindset is essential for an entrepreneur, small business owner, or frankly, anyone who wants to make an impact. For example, I look at our content strategy and execution as an opportunity to learn what our audience finds valuable, what type of information they’re looking for, and how they prefer to consume that content. I believe that the moment I stop listening and learning our content will become stale, and our audience will disengage.
24: OPTIMIZE
We don’t have any special software or tools to help us optimize. Here’s how we’ve made the best use of our time, experience, and budget. Eric is the bonsai expert: he focuses on the trees, including planting seeds and propagation, development, care, and design; and the pots, whether it’s creating bespoke cement containers or partnering with local ceramicists. I am the marketer: I focus on content, audience development, and engagement.
Eric leads the operational business: he focuses on legal, regulatory, and financial requirements. I lead the creative business: I focus on partnerships, wordplay, and new product ideas. Eric uses real-time feedback on tree health and development to optimize our growing operations, while I use data to help us optimize our marketing and sales funnel.
25: CELEBRATE
Eric and I have a secret phrase we use whenever we get a new order. Each time we say it or text it, it makes us smile. We take the time to celebrate every small win. And not just orders; we celebrate our customers by sharing their feedback, comments, and photos of the beautiful bonsai they’ve created with our products.
26: BUDGET
Am I for or against budgeting? Yes. There are many scenarios that call for building a solid budget. I’ve learned that launching our business was NOT one of those. Throughout the fall of 2019 and most of 2020, I kept trying to set a monthly budget for our little bootstrapped operation. Eric kept pushing back, convinced that we needed to focus on building our business. He’s a big fan of Jen Sincero and kept asking me to read her work, as he believed my fixation on budgeting was coming from a restrictive mindset that could limit our future success. At the end of 2021, I finally took his advice and listened to Jen’s best-selling books, “You Are a Badass” and “You Are a Badass at Making Money” and I GOT IT. I understood the importance of focusing on our goals and what we wanted to achieve, and not limiting ourselves to a monthly spend amount. Instead, we discuss weekly what we need to accomplish that week, decide together that we’ll be paying for it, and look at our options for making each investment bring us closer to our long-term goals.
27: PLAN
A few years ago, I started a food blog just for fun and called it “Planful Cook”. I created and shared weekly meal plans and completed grocery lists, advice for prepping in advance, and suggestions for scheduling meals “out”. My goal was to take the daily thinking out of cooking and eating, and it worked amazingly well for me and my family, and I received positive reinforcement from folks engaging with my content. After a year, the pressure of that level of planning got to be too much for me, causing me anxiety if our schedule changed, or I couldn’t find an ingredient. I realized that I had lost track of my goal, in my focus on executing the plan. With Bonsaify, we took a different approach. Our goal is our North Star, and we create loose and flexible plans to help us achieve milestones toward our goals. That’s my advice — plan for purpose, to support goals and outcomes. You rule your plan; don’t let your plan rule you.
28: BE BRAVE
It takes courage to quit a steady job that provides a steady paycheck and start something new from the ground up with your own savings. Entrepreneurship, especially bootstrapping, is intrinsically risky and takes a strong belief in oneself. When we first agreed to start Bonsaify, Eric had a full-time corporate job. He held on to it for more than 18 months and fit Bonsaify in around it, waking before sunrise every day to focus on the operational aspect of the business, and working long into the evenings to plant seedlings and take cuttings (the fieldwork). I kept trying to convince him, push him, and barter with him, hoping he would quit the safe route and devote himself full-time to Bonsaify. He kept calculating how long he could hold on to a salary and succeed in both worlds. Yes, our personal finances played a role in his timeline; but doubt and fear held him back as well. When he finally made the decision to cut his corporate ties and dive fully into Bonsaify, he immediately experienced joy and felt inspired to move forward. Be Brave.
29: ADMIT MISTAKES
“The biggest mistake you can make is being afraid to make one.” — Elbert Hubbard. One of my ongoing projects is to grow our inventory of bonsai-related merchandise. So far I’ve had a few hits (bespoke tool bags) but more misses. I still think a branded yoga mat is a good idea because there is a distinct link between the art of bonsai and the zen of yoga, but I can readily admit that ordering a quantity of indoor grow light stands before testing that they would work, was a mistake. I’ve spent hundreds of dollars bringing in products that we may never sell, and while I berated myself for “wasting” money, Eric wisely reminded me to not focus on the losses, but instead on the learnings. With each miss, I’m learning more about our customers and our brand. So I’m choosing to not be afraid of mistakes, to readily admit them, and to see them as opportunities to grow.
30: PERSEVERE
“Tis a lesson you should heed, try, try again. If at first you don’t succeed, try, try again.” -Thomas H. Palmer. Having our kids work with us has definitely been a highlight of starting a small business. In 2020, our younger son negotiated with Eric and agreed to count out piles of 50 seeds and package them for a 50% share of profits from selling the seed packets online. He was super-excited and engaged and asked every day for weeks if we’d had a seed sale. Our older son accepted a part-time summer job with Bonsaify in 2021, “Cement bonsai pot maker”. He had to learn how to make the specific cement mix for our pots, pour wet cement into our molds, unmold the pots, and do the finish smoothing work. It took him many tries before he was able to create a useable pot. Each time he made a mistake or had a failed attempt, Eric worked with him to take the learning process in stride, and start again. He persevered and helped us create hundreds of quality cement pots to support our business!
31: BUILD HABITS
Since our launch, I’ve created a few new habits that help me balance supporting Eric and Bonsaify, and maintaining focus on my core job. I spend 10 minutes each morning thinking about Bonsaify and determining one area I will focus on for the day. In addition, I devote up to 30 minutes daily on our social media posts, and another 10 minutes reviewing performance analytics (this is the fun part to me, seeing how my efforts translate into audience engagement and action). I believe that building productive habits is necessary to building a successful business. Did you make it through all 31 resolutions? I’m hoping that this guide helps you build at least one new habit — focusing on your entrepreneurial spirit for a few minutes every day!
Thank you for joining me on this journey. I hope this guide (originally published January 2022 as a series of 31 short posts on LinkedIn) offers you a needed nudge or idea to support your entrepreneurial goals!
Dory Schrader is co-founder of Bonsaify, whose mission is to increase human connection to nature through making beautiful bonsai accessible to everyone; to educate and facilitate the enjoyment of bonsai as a hobby; and to do so sustainably, with a carbon-neutral impact to the planet. Learn more at bonsaify.com.
In 2007 I started a batch of Monterey Cypress from seeds I collected from a tree in the Presidio here in San Francisco. Cypress grow very fast, even as seedlings. It takes only 2-3 years to have a tree that is three feet tall, although the trunk remains small.
I grew them in pond baskets and boxes for a few years. They do okay in baskets, but tend to get roots so dense that using a Sawzall to remove the bottom of the root mass becomes necessary. In 2010 when I moved to Thousand Oaks, I put eight of the trees into the ground, almost like a hedge along one side of my bonsai growing area. In only two years the trunks went from less than one inch to about three inches across.
In December 2012, I dug all eight trees up again and put them into large boxes to transport back to San Francisco. Below is an example of what one of these looked like.
Before work. The tree was cut back hard after being dug out of the ground. The top half was removed and all the large branches were stubbed back to be short. Cypress can easily grow a couple feet worth of branch extension in a year so it didn’t take long to get some good small branches to work with.
My chosen front, 2014. It provides a good balance between the movement of the main trunk and the angle of the large branch on the left.
Detail of the base from the front, 2014.
The tree measured about 25″ high with a girth of 3″. One of the great things about Cypress is that they seem to put on significant wood even in a bonsai container. The wire will cut in very quickly, and after removing the wire the branches have a habit of springing back. The disadvantage of their wood production is that over time the branches can get too large, particularly on the top of the tree.
Looking down at the top of the tree, 2014. Lots of wire!Looking at it now, I suppose I should have done something about that cut mark before I wired the tree.
January 2015, after a second wiring.
February 2015, repotted into a nice old pot.
After the work in February of 2015 I seriously considered showing the tree. It’s impressive how quickly these trees develop. But this tree, while showing a nearly-full silhouette, wasn’t showing mature character. Cypress have strips of bark, which to this point the tree hadn't developed. Perhaps even more important, they have a fine needle foliage, very similar to a Kishu Shimpaku or even Itoigawa in color and size. This tree was still showing immature foliage, or somewhere in between the seedling fluffy needle and the mature foliage. I felt that waiting a year to show the tree was probably best, to allow the crown to develop more maturity and to get mature foliage.
A comparison of the foliage on the top left side of the crown from February 2015 and March 2016. Note the difference in texture.
The tree grew slowly in 2015, especially compared to its growth in 2014. I barely needed to touch it for the entire year, which is unusual for a Monterey Cypress.
March 2016, before work.
March 2016, ready to show.
It took me about 6 hours of solid work to complete the detail wiring of the tree. I used mostly 18 and 20 gauge copper to spread out and neaten up the small tips, but in a few places I had to use some medium size wire to move larger branches. All that's left to ready this tree for exhibit is some nice moss for the surface of the soil.
Interested in watching Eric prep a different Monterey Cypress for a bonsai show? Watch this video from our YouTube channel!
“The mountains are calling and I must go.” - John Muir
Visiting magnificent trees in nature such as the Bennett Juniper is an experience I wholeheartedly encourage everyone to seek out. Really examine these trees, as they can provide you with instruction as well as inspiration in how to make good bonsai.
The Bennett Juniper is the Grand Champion Sierra Juniper, the largest Juniper in the world. It’s a Juniperus grandis, the largest species in the world in the juniper genus (formerly Juniperus occidentalis v. Australis) It's registered with American Forests in the National Register of Big Trees. When last measured in 2015, this giant stood at 78 feet tall, with a trunk circumference of 40 feet and a crown spread of 56 feet!
The tree’s size and majesty are hard to comprehend from seeing photographs alone. It's quite interesting to get to see the tree up close. Although the trunk is basically straight, almost all the branches are a twisty gnarled mess of loops, knots, and odd angled protrusions. The winter snow and wind seem to combine to kill the cambium on the top of the branches as they age, leaving the bottom of the branch alive to grow around the top. While there are sections of the deadwood that are bleached white, the color variation ranges into yellow, orange and then gets even more interesting as certain kinds of lichen colonize and carpet the deadwood. The branching of the juniper stands in stark contrast to the big formal upright nature of the trunk, with red fibrous bark resembling that of a coastal redwood.
The Forest Service has a handout which provides many details, some of which are reproduced here:
Background
The Bennett Juniper (Juniperus Occidentalis) is named after Clarence Bennett, a naturalist who devoted himself to the study of this specific species. It is, indeed, the biggest western juniper in existence. Only seven known trees have a greater girth.
Although located in the Stanislaus National Forest, The Bennett Juniper is situated on private property, owned and maintained by the Save-The-Redwoods League by way of a donation from the land’s original owner, Joe Martin. Mr. Martin donated the tree site and three acres surrounding it to the Nature Conservancy in 1978. The job of protecting the Bennett has since been passed on to Save-The-Redwoods.
Age
After decades of arguments from experts over the age of the tree, recent dendrochronology tests performed by tree experts now date the tree at closer to 3,000 years of age, roughly the same age as another giant, but dead, western juniper found in the same vicinity of high granite country. That tree, known as the Schofield Juniper, was already as old as the Bennett when it died 800 years ago.
A significant number of folks who know trees maintain that the Bennett is the oldest living champion tree-period. They cite the example of a branch some three inches in diameter, examined after it dropped from the main part of the tree. It contained 550 annual rings. They postulate that it took 700 to 1,000 years for the tree to add just the outer foot of its thirteen-foot diameter.
Location
The Bennett Juniper is located in the Stanislaus National Forest in Tuolumne County, California. Just off Highway 108, the Bennett is accessible via eagle Meadow Road (Forest Service Road 5N01.)
The Bennett receives about 1,500 visitors each year. To get to the tree, visitors must ford two streams in the process of traversing twelve miles of Forest roads, the first five miles of which are paved, the last seven becoming increasingly bumpy and narrow until you see a tiny vertical green sign with an even smaller arrow reading “juniper” and arrive at the driveway that leads onto the Save-The-Redwoods property.
When you get there, you’ll likely be met by a gentleman named Ken Brunges, who acts as the Save-The-Redwoods representative and caretaker to the Bennett. In 2022 Ken marks his 34th year of attending to this giant.
Ken has made many improvements to the trail and the immediate area surrounding the tree, such as hauling in native rock for the pathway and installing wooden benches for the comfort of visitors. Best of all, he provides many of the answers to the many questions about the Bennett Juniper.
I had the pleasure of meeting Ken in 2007, who at the time was a 60-something-year-old man whose camp consisted of two tents, two dogs, and a large pile of firewood. He answered many of my questions which included: what is the most ridiculous car that you ever saw make it all the way here? To which he replied: “a Porsche; he made it fine, but I think it took them a couple hours.”
The roads to the Bennett Juniper are only open from mid-June through October, so time your visit carefully! When planning a visit, make sure you take time to stop and admire "Fred and Ginger", two trees that stand together nearby. Though they are two separate trees, the interplay between them reflects an ideal design of a two-tree or double trunk bonsai composition.
I recorded my most recent visit and have posted it to the Bonsaify YouTube Channel. Watch the video to join me and Pedro, our 2022 summer intern, on our adventure in the mountains. If you’re interested in seeing more examples of amazing trees in the Sierra Nevada Mountains, read this article I wrote last year.
Sports, musical instruments, art, cooking, dance, gardening - there are so many potential hobbies for kids! Our older son is firmly entrenched in tennis and video games, while our younger son loves rock climbing, taking care of his guinea pigs, cooking, and gardening. When I look back on their younger years, it seems that they came to some of these hobbies completely on their own, such as tennis, rock climbing, and guinea pig parenting, and some stemmed from watching us, such as gardening and cooking.
I’d love to see bonsai gain popularity as a youthful hobby in the United States. I understand first-hand how challenging it can be to try to actively direct kids into an activity versus letting them discover their passions independently. I did a little research to understand more about how children select hobbies and how parents can offer support.
Hobbies are Important for Children
I love this statement from Families magazine, “The best hobbies for kids are ones that help them to learn about the world…kids' hobbies and interests are born from a spark of passion.” There are proven benefits of hobbies for children, including eliminating boredom, making friends with similar interests, learning new skills, helping relieve stress, nurturing creativity and new ideas, and boosting self-esteem and confidence.
How Parents can Help Their Kids Find Hobbies
My own experience was validated through my research - sometimes children pick hobbies by replicating what they see their parents doing, and other times, hobbies are discovered through self-direction. Parents can help their children find hobbies by first observing their interests, skills, and strengths, and the activities that bring them joy. Next, create a list together of the things they like or might like, and discuss together what sounds the most interesting. Then, provide opportunities for exploration of those hobbies! It’s important as a parent to keep an open mind, and not try to push children down any particular path.
Why Bonsai May be a Good Hobby for Your Child
Published research demonstrates that interacting with nature helps children develop resilience and promotes social-emotional well being. It also provides a practice learning experience. Gardening - digging, potting, and watering - promotes physical and mental development, and can help children gain confidence, responsibility, and self-reliance. Everything Mom reinforces this with practical advice, “Gardening is a lifelong hobby [that] will be useful forever.” Bonsai is a very specific form of gardening, but offers the same benefits - children will get to see the fruits of their labor as the trees grow, just like when they pick vegetables!
Types of Bonsai Work Children Can Do
Children’s Health of Orange County provides an outstanding list of behaviors parents can expect of their children at various ages between 6 and 12 years old. Here is a breakdown, as applied to bonsai:
6 to 7 year olds:
Practice basic skills like watering
Draw pictures of their tree with new shapes and designs
Learn the names of popular bonsai tree species
8 to 9 year olds:
Use tools like tweezers and scissors to trim
Fertilize (with adult supervision)
Enjoy starting a collection
10 to 12 year olds:
Wire and bend branches to shape bonsai
Visit bonsai gardens and appreciate older more refined trees
Watch YouTube videos to improve their skills
How can you help your child start a bonsai hobby? Bring them to a local bonsai garden or shop, or go online and order them a small starter tree. Make sure that instructions are offered specifically for children. If their interest grows, children will find ways to upskill themselves - YouTube videos, local clubs, and maybe even introduce bonsai to friends and family. We actually created a video, "Making Bonsai Fun and Accessible for Kids!" that is free to watch on Youtube. Offer support, guidance, and motivation, and then allow your child’s imagination and interest to take over!
The art of bonsai allows for personal expression in the development and styling of trees, and the selection of bonsai pots. Like many art forms, it takes time and deliberate practice to do bonsai well. Bonsai enthusiasts often spend years studying to become professionals. The rest of us, regardless of Malcolm Gladwell’s research, don’t need to spend 10,000 hours studying bonsai for it to become a rewarding hobby. What we can all benefit from is guidance from enthusiasts and professionals on how to get started. So here it is: a list of seven rookie mistakes anyone new to bonsai should avoid.
1: Bonsai on a Shoestring
This is the first of two money-related mistakes. Bonsai can be an expensive hobby, but you can begin a bonsai hobby on a small budget. All you really need are a few key tools (e.g., basic bonsai scissors and tweezers), bonsai soil and fertilizer, a plant and container, and wire. Purchasing inexpensive material for $5-$10 is a fine place to start, but don’t expect that you will have a show-quality tree in a couple years with that kind of expenditure.
If you plan to spend as little as possible - bonsai on a shoestring budget - then start by learning how to propagate plants and how to grow them out inexpensively. You will be learning many broad skills if you can take a plant from start to finish into being a quality bonsai. There is a wealth of free bonsai basics information available online, between YouTube and blogs. You can also purchase a basics book for less than $20 USD. Regardless, definitely take time to read and watch a bit before selecting your first plant.
The value of a bonsai plant is determined by the market and takes into account the age, shape and style of a plant. When selecting your first plant, you may find something on sale at your local garden center or for free from your neighbor’s yard (please, ask for permission before cutting or removing anything!) You can also purchase an inexpensive bonsai starter or young bonsai tree from a bonsai retailer. Look for a plant that matches your climate and your lifestyle.
If you want to develop skills in maintaining older and more established bonsai trees, you will eventually need to procure a higher-quality (and thus more expensive) tree. Think about it this way: you can’t learn how to fix an electric car by working on an alarm clock!
2: Budget Blow-up
The opposite of the low-budget do-it-yourself approach is to just start spending a lot of money on plants. As a beginner this will enable you to learn more quickly than if you just start seedlings, but beware of budget blow-up! If you attend a sale, there may be plants that are priced above $1,000. Does a high price mean that you are buying a great bonsai? Not necessarily! First, fine-tune your understanding of what makes a good bonsai. If you plan to start purchasing expensive material, first educate yourself by watching auctions (online or in person) and seeing what is driving the value of a plant. Read old magazines (which may be the cheapest thing at the auction!) and show books to familiarize yourself with photos of high-quality trees.
Don’t spend money without understanding what you’re buying. Here is a list of features that generally drive the value of a bonsai:
Trunk size and shape: the trunk size and taper is a difficult part of a bonsai to change or improve, it is generally considered a “given” in bonsai sales that the trunk quality represents a good portion of the value.
Nebari: The junction of the trunk with the major roots is a key feature in a bonsai. The criteria for quality vary among different species; but the value of a plant is greatly affected by this feature.
Branch placement and quality: if the basic primary branches are all in place, then it is much easier to create the fine twigs from that point onward. If grafts or other work are needed this takes time and work to execute.
Twigs, branches, and the silhouette: The refined structure of a mature bonsai is made up of many tiny branches. The work that goes into these is the difference between a mediocre plant and a show-quality plant. Look at the mass of foliage to determine if it’s made up of usable and well-tended twigs.
3: Skipping Horticulture 101
Get the horticulture right first. If you can't grow your plants, you can't make a bonsai.
Whether you start on the cheap, or by buying quality trees, you will need to create a foundation of good horticulture to create and maintain good bonsai. If you’ve never grown a plant before, don’t assume that it will all just go perfectly. From the quality of your water, to the amount of sun and the temperature, each environmental factor is important to a plant. There are not an infinite number of variables, but there are a lot. A good way to get the horticulture going is to purchase 10 or more of a couple different species - seedlings are a good way to do this inexpensively. Nurture your young plants and watch what makes them grow. You should expect to spend 10 years creating a good bonsai from any starting point. Even if a tree is already a bonsai it may take that long to really make it shine.
4: Waiting for a Miracle
A miracle is defined as “a surprising and welcome event that is not explicable by natural or scientific laws.” Simply believing that given enough time your tree will improve isn’t enough. Bonsai will certainly get older with time, but they are not guaranteed to get more beautiful. To make a bonsai more interesting you almost always need to do something and do it at the right time using the right technique. Self-improvement books extol the idea of having a “radical bias towards action”. If you just watch your bonsai grow, it will stop being a bonsai and end up being a tree or bush. If you use the wrong techniques it will be Charlie Brown’s Christmas tree instead of the National Arboretum’s White pine gifted from the emperor of Japan to the US during the 1990’s.
5: Innovation without Grounding
In art, there are conventions and there are experts. To be accepted as an artist by the experts in the field, you must understand how to follow the conventions. The most famous example of this is Picasso’s early work. Cubism may look like the drawing of an inexperienced middle-schooler, but this is dispelled when you see how well Picasso could execute a more photorealistic portrait. Bonsai is also an art form. To be a great bonsai practitioner you need to understand, and even imitate, great compositions. Once you understand how an old informal upright black pine is made, and maintained, then you can begin to think about how to break the conventions and be innovative. Don’t ignore the tradition and conventions in bonsai until you’ve achieved success in using them. Then innovate and find ways to create original trees.
6: Choosing the Most Photogenic Style
Many beginners gravitate toward the idea of creating a “windswept” tree and use it as their initial style of choice. This style is certainly picturesque and most beginners have at least a rudimentary understanding of the interaction of a tree and wind. This style is also one of the hardest to create. Take time to visit trees in nature to see how wind has really impacted those trees over time. Study how the trees have reacted. From the cliffs over the California coast, to the tops of the Rocky mountains, there are many places where wind influences the shape of tree growth. Studying how the tree grows in these conditions is your first step to making a windswept bonsai.
7: “Long and Straight = Couldn’t Wait”
Proportions are probably the single most important thing in bonsai. The tighter, the better. To make a good bonsai, you should aim to eliminate any branch section, trunk section, or other feature that does not actively add beauty to the composition. If you can create a good set of branches in 4 inches, that’s better than doing it in 8 inches. If you want to make a compact and interesting tree, examine each piece and think about how to make it smaller or more interesting.
Do you have any additional rookie mistakes to share? Post them in the comments below!
Recently, Eric showed me a dozen or so Yaupon Holly mini-bonsai, some of which he'd planted into teacup-style containers. I thought they were pretty and would make nice additions to any bonsai collection, but I didn't really think about them in any deeper way. Then Eric mentioned that there was a special connection between the plants and the containers, and he sent me on a research expedition. It didn't take me long to see how Eric had connected the history of two cultures across hundreds of years to create these mini-bonsai.
Chadō and Chawan: The Way of Tea and the Tea Bowl, Japan
Like bonsai, Japan’s introduction to tea originated from China. As early as the 8th century, traders, diplomats, and visiting monks from China brought tea to Japan. Once in Japan, drinking tea evolved over the next five centuries from a simple habit into a broad cultural experience, and became known as chadō "The Way of Tea". There are different types of tea ceremonies, with generally consistent elements (e.g. dedicated room, hanging scroll, flower arrangement originating from ikebana, customary clothing, and meal) and equipment (tea scoop, whisk, caddy, bowl, and cleaning linen).
For many chadō practitioners, the tea bowl, or chawan, is a treasured item. Any bowl can be a chawan - the only thing that makes a bowl a chawan is the act of preparing and drinking tea from it! The history of chawan includes the formal Chinese tenmoku style, the more rustic Korean Ido, and the handbuilt Japanese Raku and playful Oribe styles (more information).
Cassina: Energy, Strength, and Focus, North America
Yaupon Holly (Ilex Vomitoria) is a species native to southeastern North America. It’s found only from Texas to Florida, and north through Virginia. It’s the only naturally caffeinated plant species that grows in the United States. Yaupon has been used as an important food, medicine, and ceremonial item by Indigenous communities for thousands of years. The Timucua people (who lived in what is today Florida and Georgia) called Yaupon cassina, and believed that it purified the mind and body of those who drank it. For sure, the leaf's natural caffeine and powerful antioxidants also gave Timucua warriors strength and energy. The leaves were roasted, infused in boiling water, and drank hot from elaborately carved whelk shells. (Yaupon Brothers Tea)
Yaupon Holly are typically used as ornamental shrubs in landscaping. Bonsai enthusiasts appreciate the small shiny evergreen leaves, numerous red berries (on female plants) and small white spring flowers, and pale gray bark marked with white patches. This established tree is part of Jonas Dupuich’s collection; you can learn more about it here.
A Decidedly Eclectic Bonsai
Now whenever I look at these beautiful Yaupon Holly in little teacup-style bonsai containers, I can't help but imagine picking a few leaves off [during regular bonsai maintenance], roasting them and infusing them in boiling water, to drink from my favorite chawan! Drawing from traditional Japanese influences and indigenous North American cultural practices has created a a truly eclectic and unique bonsai.
The art of bonsai began in China over 1,000 years ago and gained popularity as a craft in Japan over the centuries. Bonsai are not a special variety of plant and there is no "bonsai species"; instead, they are normal trees. A bonsai is simply an ornamental tree in a pot, grown and styled to create a miniaturized and sometimes stylized representation of a tree in nature. Although in some cases dwarf trees are used for bonsai, if a bonsai is planted in the ground it will eventually grow into a full-size tree or plant. There are landscape style bonsai; they are generally called Penjing (which is also the Chinese term for bonsai).
Some of the most popular deciduous trees include Japanese Maples, Chinese Elm, Japanese Elm, Oak, and Wisteria. These shed their leaves in the fall. Ficus, Dwarf Jade, and Cotoneaster are popular broadleaf evergreen trees. Of all the conifer trees Juniper, Japanese Black Pine and Japanese White Pine, Cedar, Fir, Hinoki Cypress, and Redwood are favorites. Whether a bonsai lives indoors or outside depends on the species. Indoor bonsai trees should generally be tropical and have access to direct sunlight for a large part of the day. One reason Ficus trees are so popular with bonsai beginners is because they can live indoors.
Just as there are many different bonsai tree species, bonsai can grow to different sizes. The size class implies the height and weight of the tree in its container, and it's based on the number of people required to move the tree and pot. The very largest size, named Imperial bonsai, is named after the enormous potted trees of Japan's Imperial Palace.
Bonsai Tree Size Classification
The Large Bonsai sizes require the most sets of hands:
Imperial which is an Eight-handed bonsai, 60-80″ (152-203 cm)
Hachi-uye which is a Six-handed bonsai, 40-60″ (102-152 cm)
Dai or Omono, which are each Four-handed bonsai, 30-48″ (76-122 cm)
The Medium-size Bonsai are two-handed:
Chiu or Chumono or Ōgata, 16-36″ (41-91 cm)
Katade-mochi or Chuhin, 10-18″ (25-46 cm)
A miniature Bonsai is a small tree that won't take up more than one hand:
Kumono or Kifu is a One-handed bonsai, 6-10″ (15-25 cm)
Shohin or Chohin is also a One-handed bonsai, 5-8″ (13-20 cm)
Mame fit in the palm of your hand, 2-6″ (5-15 cm)
Shito are Fingertip size, 2-4″ (5-10 cm)
Keshitsubo are tiny trees, poppy seed size, 1-3″ (3-8 cm)
The shape of a bonsai is created through regular pruning and careful maintenance of the growth of the roots and the leaves or needles. Any species of tree with a permanent wood-like structure, a vine, or a shrub, is a candidate for bonsai. Some cacti, succulents, and pachycaul (like desert rose) can also be used to make bonsai plants. Bonsai is a natural, organic art form that provides joy to bonsai enthusiasts and hobbyists.
Bonsai trees can be planted in ceramic or concrete pots, on stones, or in unique containers. Bonsai containers come in many styles and sizes and must have drainage holes. There are conventions to selecting the proper bonsai pot, depending on the type of tree. One general rule is that the pot’s height should match the trunk’s width above the nebari (roots visible above the soil). The depth of the pot is mostly determined by the girth of the trunk. The size of the pot is determined by the visual weight of the combination of the foliage and trunk. The style of the pot is chosen to match the style of the tree, which is open to interpretation.
The pot is an important component for the overall health and root growth. Using a shallow pot helps to constrict the tree’s roots and prevents the tree from growing too quickly. With a shallow container, the root system is restricted from spreading and expanding. A tree is often repotted from a larger pot into a small pot for similar reasons. As a young tree ages, it might move from a small container into an even smaller bonsai pot! Regardless of the rules, if the combination of a pot and tree brings its owner joy, then the pot selected works with the tree!
Important aspects of proper care that impact a tree's health and growth rate include how much water the tree receives, whether it needs and receives access to full sun, weather during the prime growing season, fertilization, and proper bonsai soil. With good care and the right conditions, a bonsai tree can be expected to experience multiple rounds of new growth each year.
A Few Fun Bonsai Records
The smallest bonsai in the world (pending, Guinness World Record listing) is a Japanese Maple. It is truly a miniature tree!
The largest bonsai in the world is believed to be a red pine located at the Akao Herb & Rose Garden in Atami, Japan. It is also one of the oldest bonsai trees. The tree is at least 16 feet tall and 30 feet wide. It qualifies as a bonsai because it’s contained in a pot. (photo from Akao Herb & Rose Garden)
One of the oldest bonsai trees in the world is the Ficus retusa Linn (in the fig family). It’s estimated to be at least 1,000 years old and it grows in the oldest bonsai pot. This tree was taken care of by Chinese bonsai masters for a long time before moving to Italy, where it now resides at the Crespi Bonsai Museum.
To learn more about bonsai, visit a public bonsai collection and get an up-close look at high quality trees; join a local bonsai club to connect with other bonsai hobbyists, or sign up for workshops with a bonsai professional. Popular collections include The Bonsai and Penjing Museum at the National Arboretum (Washington, D.C.); The Chicago Botanical Garden (Chicago, IL); Clark Center Bonsai Collection at the Shinzan Friendship Gardens (Fresno, CA); The Bonsai Garden at Lake Merritt (Oakland, CA); The Pacific Bonsai Museum (Federal Way, Washington); the Huntington Botanical Gardens (San Marino, CA); and the James J. Smith Gallery (tropical species) at Heathcote Botanical Gardens (Fort Pierce, FL). The American Bonsai Society has compiled a complete list.
So how big do bonsai trees get? It really is up to the patience, temperament, and preference of the bonsai artist to decide!
What do you get for the friend, colleague, or family member who has everything? You can find many lists of unique gifts online in response to Googling that question. A bonsai tree is very likely on one (or many) of those lists. Bonsai can be a most wonderful gift if given to the right person, but how can you know if your person is the right person? Here are a few clues to help you decide if a bonsai tree is that perfect gift you've been looking to give that very hard-to-gift person!
Who Would Love a Bonsai Tree as a Gift
Someone with a proclivity for gardening and houseplants, and a track record of learning how to properly care for them (aka a "green thumb"), is a great candidate to receive a bonsai tree as a gift. Your cousin who loves houseplants; has a beautiful garden; is always looking for some new bit of greenery or flowers to add to her home would make a great bonsai gift recipient.
If your BFF has a flare for art and design, with a beautiful mix of eclectic art pieces, furniture, and fabrics in his home, he has the eye to appreciate a bonsai tree. Especially if he has a few carefully placed specialty plants such as an orchid, croton, or pothos that are always healthy, he is more likely to take the time to learn how to care for a bonsai. He will understand that an indoor bonsai requires access to natural sunlight; water and fertilizer; a humid environment; and regular check for pests.
Someone with a strong interest in, connection to, or respect for Asian culture, history, and art forms, may value a bonsai tree for many reasons. The practice of bonsai began in China almost a thousand years ago, and after centuries it also gained popularity as a craft in Japan. Bonsai is the Japanese term for a tree in a tray; the Chinese term for bonsai is Penjing. Your colleague at the office who spent a few years living in the Asia Pacific region or who chose to study Chinese or Japanese as their second language in school, may really enjoy the art of bonsai!
Anyone who appreciates eastern philosophies and practices is likely open to experiencing bonsai, because bonsai symbolizes harmony, peace, order of thoughts, balance, and a connection to nature. Practitioners of Feng Shui (the practice of arranging pieces in living spaces to create balance with the nature world), meditation (the practice of focusing your mind for a period of time, noticing but not engaging with thoughts), yoga (a group of physical, mental, and spiritual practices that aim to control and still your mind), shinrin-yoku or forest bathing (spending time in nature, hiking or walking amongst trees), or origami (the art of folding paper into decorative shapes and figures).
A few other likely recipients of a bonsai tree include: the outdoorsy friend who loves to hike and spend time amongst trees; a ceramicist who appreciates beautiful pottery; a woodworker who digs bark and other cool features of wood; your most patient colleague who understands that good things take time.
What Type of Bonsai to Give as a Gift
You've decided that a bonsai tree would be the ideal gift for your special someone; now what? There are a few ways to give the gift of bonsai (hint: they don't all involve actually selecting a tree!)
Buy a tree from a business that specializes in bonsai. These tend to be small or mid-size companies owned and staffed by people who know about bonsai and can give you sound advice. If you don't live near a local bonsai shop or garden, look online for bonsai businesses that are run by real people - like ours! When you email [email protected], you are emailing me and Eric, so you know you'll get a personal response from folks who know what they're talking about.
Buy a bonsai tree PLUS a way for the recipient to learn how to take care of it. You can add a basics or introductory class; 1-1 time with a qualified instructor (online or in-person); or purchase a great beginners book along with the tree. When we sell a tree as a gift, we often recommend a basic indoor and outdoor bonsai gift package that includes a small bonsai tree with a species ideal for indoors or outdoors, along with our favorite book, "The Little Book of Bonsai" by Jonas Dupuich, and two essential basic tools (bonsai scissors and tweezers). Eric offers regular bonsai workshops as well as 1-1 sessions either in-person or online.
Select a tree species that's appropriate for where the recipient is most likely to keep the bonsai. If they have no outdoor space you should look for an indoor species (e.g. tropicals): Dwarf Jade, Standard and Willow-leaf Ficus, and Jasmine Star Flower are great options. If they have outdoor space like a deck or garden, go with a Japanese Black Pine, Zelkova, Junipers (both Kishu and Itoigawa are popular varieties), Yaupon Holly, Maples, Elms, Cypress, Washington Hawthorn, or Cotoneaster.
How Not to Give a Bonsai Tree as a Gift
I highly recommend this Reddit thread for tips on how NOT to give a bonsai tree as a gift, with one caveat: there's no reason to avoid buying a bonsai tree as a gift during winter IF you're following my advice above. If you're purchasing the tree from a bonsai specialist, that person will know how to pack it properly to stay healthy during transit.
Don't purchase a bonsai tree from a big-box store or online retailer like Amazon or 1-800-Flowers. They generally sell poor approximations of bonsai in cheap pots and use species that are meant to be kept outdoors but show them in indoor settings. It's a recipe for tree death and recipient disappointment.
I also recommend staying away from "bonsai in a box" or bonsai seed kits. For a beginner, start them off with an actual bonsai tree in a nice pot. Give them a chance to enjoy the art of bonsai, and work with a tree that is healthy. Propagation is no easy feat, and it takes years (and sometimes decades!) to design and style a seedling into a beautiful bonsai tree.
Are you thinking of gifting a bonsai to someone this holiday season? Let us know if you need any advice or support; our mission is to make the art and craft of bonsai accessible to everyone. Of course, you can always give a gift card for the current or soon-to-be bonsai lover in your life!
Every holiday season, we’re reminded how much our shopping choices matter — not just to our gift recipients, but to the people and businesses behind every product. At Bonsaify, we feel this deeply. Shopping small isn’t a trend; it’s a meaningful way to support art, craft, community, and the people who pour their hearts into what they do.
What Is Small Business Saturday?
Small Business Saturday began in 2010 as a marketing effort by American Express, but over time it’s become something much bigger. Today, the Saturday after Thanksgiving is an officially recognized holiday dedicated to supporting small, local, and independent businesses.
According to the U.S. Small Business Administration (SBA), small businesses are defined by industry type, average annual revenue, and number of employees. Using all three criteria, Bonsaify fits squarely — proudly — into the very small business category.
Why Shopping Small Matters
For business owners like Eric and me, Bonsaify isn’t “just” a business. It’s an extension of who we are — Eric as an artist and grower, and both of us as dreamers, builders, and family-first entrepreneurs raising two kids who now understand what it means to run a real business.
When you shop small, you’re supporting:
Local economies. For every dollar spent at a small business, 67¢ stays local.
Families, not corporations. You’re supporting real people with real dreams.
Connection. We’ve built friendships with our USPS carrier who stops by daily, our workshop students, and the Bay Area community.
Sustainability. At Bonsaify, we donate 1% of all revenue to One Tree Planted to support reforestation.
Your support allows us to keep creating, keep teaching, and keep offering bonsai that bring joy, calm, and presence into people’s lives.
How Small Business Benefits Communities
Every small business has a ripple effect. For Bonsaify, your purchases help us:
Hire locally
Host workshops and classes, and meet new neighbors each month
Contribute to local and ecological sustainability
Keep the art and tradition of bonsai accessible and joyful
It's never “just a purchase.” It’s fuel for everything we do.
Four Simple Ways to Support Small Businesses
Supporting a small business doesn’t require grand gestures. Here are four easy ways to make a big difference:
1. Look Around When You’re Out and About
Next time you’re picking up your morning coffee, take a second to notice what’s around you. There may be a local bookstore, boutique, or specialty shop you’ve never stepped into — now’s the time.
2. Ask for Recommendations
Your friends, neighbors, and online communities are full of great suggestions. And when you do find a small business you love, sharing it is one of the most powerful ways to support them. Post it on Nextdoor or to a local Facebook group.
3. Gift Cards Are Small-Business Superpowers
They introduce someone new to the business, provide immediate support to the owner, and make wonderful gifts. (And yes — we offer Bonsaify gift cards!)
4. Make Every Day Small Business Day
Small Business Saturday is one day out of the year, but small businesses depend on everyday support. Whenever you can, choose a small business first — whether online or in your own neighborhood.
From Our Family to Yours
Thank you for supporting Bonsaify — whether you’ve bought a tree, attended a class, subscribed on YouTube, or simply sent us a photo of your bonsai thriving in your garden. Your support helps keep a very meaningful dream alive for our family and brings more beauty into the world through the patient and joyful art of bonsai.
Zelkova serrata (Japanese Grey Bark Elm) are a deciduous tree with smooth bark and delicate branching that are prized in bonsai for their winter silhouettes. They are typically grown as broom-style trees from small to medium size; and rarely into large bonsai. Zelkova are also particularly well-suited to creating small bonsai forests, bonsai copse, and bonsai clumps.
We we've received so many questions about how to grow Zelkova that we decided to pull the answers altogether into this article because the techniques used to grow Zelkova from seedlings to small mature bonsai are dissimilar to many other deciduous trees. Zelkova are best grown in a slow and methodical manner, avoiding large chops and cuts so as to create smooth branch transitions and no scarring.
How to Start a Bonsai Broom
To establish broom-style trees, the single trunk trees are cut back in their first growing season after the trunk reaches about 1/16-1/8" thickness. This first cut is to establish a V low in the trunk and also what will become the final height of the tree. Essentially, the bottom of the V - the point where you make the first cut - should be about 1/3 the height of the finished tree. If you want a tree that is 12" tall, you should have about 4" below the V, keeping in mind that the middle 4" will contain most of the structure and the outer and upper 4 inches will be all fine branching.
Once the basic structure is established, allow the tree to repeatedly grow out and cut back to two leaves. Thin any areas where multiple branches occur to avoid swelling. Select branching that angles upward properly and eliminate branches that have odd angles. In Japan, many growers clump young zelkova twigs together using raffia in winter to train them without the use of wire; this make the twigs more uniform in direction. But the wrapping material must be removed before the trees begin to leaf out.
How to Start a Bonsai Forest
A good bonsai forest has many subtle qualities and your eye knows when they are all in place. We have created copse and forests from three to over fifty trees in one container. Start with a variety of young trees and separate them into 4-5 size categories. The 2-5 largest trees will be the focus of the forest; think of the smaller ones as complementary and mostly to create branching and widen the scope of the forest. You can pair a couple of the larger trees near each other. Focus on "dis-ordered order" - using wire you can create small clumps of trees in mixes of the three smaller sizes, or just medium or small trees.
Place the largest trees first, and then use the clumps of smaller trees to complement them. Strategically leave some empty spaces while grouping trees together in other areas.
FAQ: Frequently Asked Questions About Bare Root Zelkova
Q:How should I protect Zelkova trees until repotting time?
A: The bare root should be "heeled-in" to a soil mix loosely - we use 80% perlite and 20% coco coir, but bonsai soils or even potting soils work perfectly well. Keep them protected from freezing temperatures, ideally maintaining them in the range of 34-40F until repotting time. This can be done in a cold frame, a garage, a refrigerator, or a greenhouse if you have one. Monitor the humidity and soil moisture as you would during the growing season, keeping them damp but not soaking wet.
Q:Should I put bare root Zelkova in an organic potting mix to promote more root division?
A: There are many soils that will work fine, but we prefer 70-80% perlite with 20-30% coco coir. Akadama mixes work well, and young trees can grow in standard nursery soil mixes before being transitioned later into bonsai soil.
Q: Can I plant bare root Zelkova as soon as I receive them?
A: You can do root work and create forests or broom starters in winter as long as you protect the roots from cold temperatures until spring. A bottom heat mat warming the roots can help after repotting, but keep the tree around 40F to ensure it remains dormant. If the trees begin to leaf before your weather is warm enough, ensure they receive adequate light and do not freeze.
Q: Are Zelkova a good candidate for clump style bonsai?
A: If you mean a small forest then yes - they do quite nicely as forests. If you mean a Kabudachi clump style with fused bases and multiple trunks - we have never seenZelkovain that configuration but give it a try! If you mean more like a raft-clump (sinuous style is another term for this), it could be done without much difficulty, but it's not common.
Q: I saw your YouTube Video "Making a Bonsai Forest from Bare Root Zelkova (ASMR)". How many trees do I need to make a similar forest?
A: We used about 25 trees in the ASMR Zelkova Video.
Q: Do you sell the rocks in the video?
A:No, we would encourage you to explore collecting rocks from your local environment (with permission where needed!)
Q: I want to make a bigger forest, do you have larger trees available?
A:No, we would recommend that you use the bare-root we are selling, and then grow them into a larger composition. It can take 5-10 years to create, but the composition will be much better if the trees are grown together as a forest.
Q: What bonsai soil did you use in your video?
A:We used 1:1:1 Akadama pumice and lava sifted to a fine size. We also used a small amount of "Muck" when setting the rocks. Muck is a mixture of shredded sphagnum moss and the fine siftings of Akadama and can also contain clay.
A:We applied locally collected wild moss. Look for moss that grows in the sun, not shade, and avoid moss that climbs trees as this can take over a small planting quickly. The smaller and tighter the texture of the moss, the better. You can grow your own moss by shredding some wild moss, mixing it with sand and shredded sphagnum, and adding a fine later to the surface of your pot. You can also apply the mixture to a flat containing just sand or fine soil. Be sure to keep it well watered (and use rain water, or low-mineral content water as moss doesn't like high pH water or high mineral content.)
Post photos of your Zelkova bonsai forest, copse, broom, or clump and tag us! On Instagram and Facebook: @bonsaifyonline. On TikTok: @bonsaify. Let us know how the process worked for you - post a comment to this article.
Carefully placing a beautiful bonsai tree on your home office desk will make you the envy of your coworkers who see it during Zoom video calls. Or as part of your home décor, placing a small or mini bonsai tree on your living room coffee table is a wonderful way to introduce your guests to the art of bonsai. To keep indoor plants healthy and on display long-term, you need to choose the tree species carefully.
Here's a list of species that can thrive as an indoor tree. These are some of the best indoor bonsai trees because they're adapted to constant moderate temperature, low humidity and low-light conditions, and often native to mid-elevation dry tropical forests, just like more typical house plants.
Portulacaria afra "Dwarf Jade"
Since this plant is more like a succulent than a Japanese Maple of pine tree, it's a lot tougher and adaptable to a variety of conditions. You can water it only once per week or even less; the leaves will shrivel and start to look wrinkled when the plant has been short on water. Dwarf Jade trees will tolerate low-light conditions for a long time, but if you see it starting to slow down or branches look unhealthy, put it outside for a month or two during spring or summer to get direct sunlight. Native to South Africa, where it's called Spekboom, it has small leaves that are shaped like a jade plant. This is why it’s sometimes called dwarf jade, even though they're not closely related. See below:
This particular species is sold as a standard houseplant shape, but can also be shaped into a ficus bonsai tree. The large glossy green leaves give it a slightly untidy appearance as a bonsai, but allow it to grow in low light conditions unlike many other species.
Ficus nerifolia "Willow Leaf Ficus"
This small-leaf Ficus is a bit more finicky about conditions. It will happily live inside for six months at a time, but if you want it to grow faster, take it outside during hot and humid weather for a while like the Dwarf Jade. Leaf drop in Ficus is common when conditions change, so don’t be alarmed that a few turn color and drop off after you move it. Look for new growth reddish buds emerging from between leaves or on the branches or trunk.
Grewia occidentalis "Jasmine Star Flower"
This is another South Africa native that has a lovely pale pink flower that lasts only a day or two but the plant makes them profusely under the right conditions. You'll get more flowers and growth if you set it in a sunny spot near a window.
Ideal Conditions and Best Practices to Maintain Indoor Bonsai Health
Anytime you’re growing bonsai plants in indoor environments and you start to see signs of stress, it’s a good idea to think about the growing conditions and change them up to ensure your tree receives proper care. Bonsai care is equally important for all plants, whether or not they are a tropical tree species. If you’re growing Ficus indoors and having problems, try placing the plant in a warmer location. If you’re growing Jasmine Star Flower and not getting flowers, try giving it more sun.
Natural Light: Ensure your tree has access to natural sunlight. Aim for 6-8 hours per day. Depending on your location the angle of the sun may change significantly through the year (and through each day, too.) Move your bonsai around weekly or monthly to make sure it’s getting enough light. If light is strongly from one direction, be sure to rotate the tree every couple weeks also.
Water: Watch the soil and only water when it starts to dry out. Actually push a finger down into the soil to ensure it's not just drying on top, but below the surface as well. Watering from above flushes salts from the soil that can build up over time, and watering by soaking makes sure all the soil gets completely wet. Alternate the two methods for best results.
Humidity: Indoor species tend to be tropical, and thus do well in humid environments. Don't keep your tree near a heating or air conditioning vent.
Fertilizer: use nutrients like BioGold, DynaGro, Miracle Grow or a time release like Osamcote. These are all salt-based fertilizer that will not cause odors, and will give your plant lots of nutrients to keep growth going.
Pests: Keep your eye out for anything that looks like a tiny insect - black bumps, green bumps, white flies, aphids and the like. Spray them or wipe them off and use a contact-spray insecticide (there are different kinds for different species.)
Dormancy: if you choose to keep a non-tropical plant inside for a while, it’ll usually do fine. But, make sure that you give it some cold dormancy. Junipers can be placed outdoors for winter where temperatures will not drop below 28 degrees Fahrenheit. Or you can keep them in your unheated garage or another space where it is cold (30-45 degrees Fahrenheit) but not freezing for a couple months in winter. Some plants go dormant based on temperature and others go dormant based on day-length; to be safe, provide both cold temps and short days for these plants at the same time - during winter.
Advice on Keeping Juniper Bonsai Indoors
Many people struggle to grow Juniper bonsai (Juniperus procumbens ‘nana’) indoors because they missed the memo that this tree needs to be outside! It’s a temperate-climate plant, and grows best in full sun with lots of air movement. If you have a Juniper, either put it outside for a while (e.g., the entire summer) or get creative and see what conditions you can create to make them grow and thrive!
If you've recently been inspired to try bonsai, perhaps by an image on Pinterest or Instagram, a trip to the mountains, or visiting a bonsai exhibition, it's easy to get started as long as you take a few key points into account.
Bonsai is the same word in Japanese and in English because there was no English word for the idea prior to its introduction from Japan to the rest of the world. Bonsai is a combination of two characters in Japanese, the first means tree, and the second means container, or tray.
The term "tree" might also be expanded to include any species of tree or shrub that creates a woody structure (or even semi-woody like cactus or Othonna arbuscula.) Given this, and that bonsai are not a special species of plant, but instead a set of techniques used to control the shape of a plant, it may be daunting to figure out what species to use as a beginner.
It's a common misconception that all bonsai are grown indoors; the reality is that only a few tropical species are suitable for typical indoor environments, while most tree species will prefer to live outdoors, sometimes requiring protection from very cold and hot conditions due in part to the confining nature of a bonsai container.
Local outdoor conditions can play a large role in the suitability of species for beginners. You can look around your local environment and identify the types of trees that grow there. If you see a lot of deciduous trees (growing naturally) then you will likely have more success with deciduous, while if you see few trees, or have dry conditions you may have more success with conifers.
Best Outdoor Bonsai Trees for Beginners:
Juniperus chinensis / "Kishu"Juniper has all the characteristics that make it perfect for bonsai. There are a million varieties of Chinese juniper, with an incredibly variable range of foliage and growth characteristics. The "Kishu" tree grows slowly in cooler climates, and more quickly in hotter climates. Kishu is very similar to what growers in the U.S. call "Shimpaku" but it is slightly smaller, and has a blue cast to the needles under some conditions. Both varieties are suitable for bonsai, but "Kishu" is more adaptable to smaller size bonsai trees.
Pinus thunbergii (aka Pinus thunbergiana) / Japanese Black Pine is one of the most common varieties used in Japan for high quality bonsai. These pines have all the qualities that make them suitable for bonsai, with beautiful dark green foliage, bark that ages, and the ability to create fine structure and branching. The tree is suitable for beginners, but requires more attention to timing that other species. It is sensitive to over-watering.
Juniperus procumbens "nana" / Japanese Garden Juniper is the most common juniper bonsai, thanks to Mr. Miyagi's work in the original Karate Kid movie. It's suitable for beginners wanting to learn the basics. It's biggest drawback is that the foliage in many climates remains "juvenile" for its entire life, leading to a more coarse growth habit that is harder to work with if you advance past beginner-level interest, or want a tree that is smaller than 8" or so in height.
Zelkova serrata (aka Zelkova) /Japanese gray bark Elm is a vigorous member of the Elm family (Ulmaceae) that can form very fine branching and reacts well to bonsai techniques. The beautiful spring foliage, green summer canopy, and fall color contrast with the winter bare twigs for unmatched seasonal interest.
Ulmus parvifolia / Chinese Elm has a number of cultivars that are "corkbark" with different size leaves, such as "Hokkaido" (tiny leaves, like 1/8th of an inch) but the more common "corticosa" or corkbark variety is typically the most vigorous and suitable for beginners. The leaves can be reduced to less than 1/2" but can also reach 2" in size if the tree is left to grow wild. The tree creates fine branch structure, rugged bark, and typically yellow fall foliage; the winter silhouette can be stunning in contrast to the lush nature of the summer growth.
Best Indoor Bonsai Trees for Beginners:
Ficus nerifolia / Willow-leaf Ficus is a somewhat uncommon Ficus variety that is well suited to bonsai training due to it's vigorous growth and fine leaf and twig structure. The plant buds rapidly, and sometimes even produces tiny figs, even while confined to containers less than 1" in size.
Portulacaria afra / Dwarf Jade is a succulent type plant that is very forgiving in terms of watering. It tolerates pruning, trimming and other bonsai work; just keep it away from freezing temperatures! The variegated variety of miniature jade are also perfect for beginners! The pretty little leaves and purple-red twigs are delightful in contrast with a green-white leaf.
We offer a self-paced eCourse that guides you, step-by-step, to use a young Dwarf Jade to make your own bonsai tree. You'll learn how to trim, repot, and wire your Dwarf jade tree to make it into a bonsai. Check it out here!
Grewia occidentalis / Lavender Star Flower is a beautiful indoor species for bonsai. If you like flowers, this tree is going to make your day! The plant will flower almost continuously under the right conditions. It can be placed outdoors during warmer conditions for even more vigorous growth. The small bright green leaves contrast with the lovely flowers, and the tree will bud profusely when trimmed, allowing you to make almost any shape you desire! Under low light conditions the leaves increase in size slightly and flowering is less reliable, but southern or western windows may provide a suitable growing spot.
Best Bonsai Trees for Beginner 2022 Update:
A large part of what makes Bonsaify so much fun is having the opportunity to work with an ever-expanding array of species! We've found that the following species are well suited for bonsai beginners.
Ulmus crassifolia / Cedar Elm are native to the southeast United States and are a wonderful outdoor tree for bonsai. They're vigorous growers and respond well to the same training that is used for Chinese elm. A heat-driven plant, these trees will do well in hot and humid summers, growing more slowly in cooler climates.
Cotoneaster microphyllus is a member of the rose family. We love this species for outdoor bonsai. They are typically covered in flowers in April - June (depending on local conditions), sporadically flowers later in the year, and is covered in red fruits through summer and fall. They are really fun to work with, especially for making mini-bonsai, or mame bonsai. The main image in this post is a cotoneaster mame bonsai in full bloom from May 2022.
Ilex vomitoria / Yaupon Holly is an American Native plant, common in the southeast, along the gulf coast and a bit north. The evergreen trees have small shiny leaves, and tiny white flowers. They can produce tiny berries under the right conditions. An easy tree for bonsai beginners to care for, they like to be outdoors with lots of sun and will need regular trimming.
Decandling is essential to the development of Japanese Black pine (Pinus thunbergii) bonsai. The goal of decandling is to contain the growth of the tree, force more compact growth, and create back-budding. Decandling removes all of the new growth from the pine, which like any tree, is built to react to foliage removal by replacing the foliage, normally with more compact foliage.
After any type of pruning, a tree typically reacts prudently to conserve energy and allow itself to re-establish the photosynthetic surfaces (e.g. needles). In deciduous trees, partial or total defoliation allows lots of light into the interior branching. Pine decandling does the same thing, simultaneously removing the new growth and exposing the interior branching to more light.
There arethree main factors to consider before you decandle a Japanese Black Pine bonsai tree: 1. is the tree healthy; 2. is it the right time of year to decandle; and 3. how compact do you want your tree to be?
Is my Japanese Black Pine healthy?
The first step in decandling and summer cutback doesn't involve even touching the tree; it's to assess the health of the tree and determine exactly what work needs to be done. In decandling you are trying to contain growth and force your tree to make more compact growth and to back bud as close back to the trunk and inner branches as possible. However, only healthy, vigorously growing trees can be decandled if you expect good results.
There are alternative techniques to decandling that you should use if your tree is not vigorous and growing strong: 1. reduce some older needles to reduce density; 2. cut off only half of each new candle, leaving the smaller ones while reducing the size of the larger ones; or 3. do nothing but water and fertilize, and wait until the tree is healthy and vigorous.
Is it the right time to decandle my Japanese Black Pine?
Decandling is generally done around the summer solstice - near June 20-21st in the Northern Hemisphere, or December 21-22nd in the Southern Hemisphere. Using this as the baseline date, plan to decandle earlier if you want longer needles (which are typically for larger trees), or decandle later if you want shorter needles (which are typically for smaller to medium trees).
The primary factors that drive growth after decandling are temperature and fertilization. If you live in an area with cooler summers, you should decandle 1-3 weeks earlier than the solstice, and if you live in an area with hot summers then you may decandle 1-3 weeks after the solstice. Adding more fertilizer can help push things along; conversely, to reduce the size of vigorous summer growth, remove fertilizer for 4-6 weeks after decandling.
If you remove candles too early your tree will produce growth that resembles spring growth - it will be too large to make a good bonsai composition. If you remove candles too late, the tree will create buds but no new needles, making it uneven.
How compact do I want my tree to be?
Large trees will have larger branches and longer needles typically than small bonsai compositions. For trees under 14-16" you will want to maintain a very compact needle structure. For trees above this range, you can allow a larger growth pattern and longer nodes in some cases. How large you want your composition to be can help determine the exact decandling technique to use.
Decandling healthy pines with budding in mind
There are two types of buds: adventitious and needle. How your pine will grow after its been pruned and thinned will differ depending where you focus your decandling efforts.
Adventitious buds are at the base of a new candle, called the node point. The node is where the bud forms during the late summer-to-fall growing season and where the new growth elongates during the spring and sends out new needles. To stimulate the buds at the node point, cut just above the base of the new growth; leave 1/8"-1/4" of new growth. This will look like a bright green stub but should have no new needles remaining. The buds at the node will emerge relatively quickly; you should see buds starting 10 days later; and give shorter needles than the spring growth as they grow out the rest of the season.
Needle buds can be stimulated by decandling behind the node. Each pair of needles on a JBP has a dormant bud in the center. Find the base of the spring candle, then cut back below the ring of needles that are around the base. This removes all the buds at the node and forces the tree to bud back further. The tree will send out buds from the center of some of the pairs of needles below the cut. This technique provides less reliable placement of new growth and the emergence of the buds takes longer by about two weeks. The advantage is that you can create a tighter growth pattern than by decandling above the node points. Note that once needle pairs have been removed, that it is much less likely that a dormant bud will emerge at that location.
Key tool for decandling: scissor recommendations
It's important to have a good pair of bonsai scissors when decandling. The scissors need a relatively narrow tip that can be inserted between needles, and that can cut right at the tip of the scissors. The scissor needs two cutting blades, not one; most bypass pruners (like Felco) are too large to use for decandling. 1. ARS Trimming Scissors are made for grape cutting. They're readily available and inexpensive, but with a somewhat dull tip. These are a great beginner's tool; Eric's has lasted 10 years and he shares that one of the best ways to get a sharper tip is just to grind down the outer edges. 2. A regular bonsai shear is great for bigger hands or if you prefer a scissor with a longer reach. 3. Many bonsai growers choose a full metal handle Japanese scissor from makers such as Kaneshin.
Removing, reducing, rewiring
Once you have completed removing the new candles, it's time to thin the older needles also. For Needle buds, leave the pairs of needles that you want to create buds. The closer they are to the base of the prior summer's growth, the more compact growth pattern you can create for a small tree. For adventitious buds, remove some of the old needles from around the base of the bud, but leave some of the needles lower on the year-old growth to allow for more budding. Once decandling and needle pulling are done the tree should look relatively thin. You are forcing the tree to generate more buds and needles. Use this opportunity to assess the structure of the tree, pruning longer branches or anything that is not needed.
You can wire branches right after decandling. It's a nice time to wire because there are fewer needles which means more space! Wiring at this time allows you to set the branches in your desired position and get the tree to look really natural for the next winter. Don't do this more than 7-10 days after decandling because once the buds start coming out from the decandling sites, it's really easy to accidentally damage them.
Decandling Japanese Black pines in middle development is different
The decandling techniques above can be applied to refined (e.g. mature) healthy trees to maintain balanced branch strength. Young trees are generally not decandled, or only some branching is decandled. If you are still developing the trunk and nebari of your tree, or selecting primary branching, your tree is in middle development. With trees in development we often want to allow one or two large branches to escape to help with thickening the trunk or nebari.
Accomplishing a nice mature tree is your ultimate goal, but that might mean that your tree looks like a lanky teenager for a few years. During development it is not important to have uniform, short or even needles in the tree (like you would for a tree you're preparing for a show) - your purpose is different, so the technique is different.
You can decandle branching selectively to maintain growth close to the trunk so that you don't have to later graft or do heavy cutback. Decandling behind the node will create a lot of nice buds at the top of the tree. This technique gives you a lot of smaller branching to work with which is useful in forming the crown of the tree. Try to contain the length and size of the branching on the lower portion of the trunk.
Establishing a sacrifice branch requires you to NOT decandle at least one bud/branch for a few years. You can reduce the hormone and shading that a sacrifice branch creates by removing the side branching on the sacrifice. Allow just the central strong bud to grow each year.
Decandling to adapt existing coarse growth
With field-grown Japanese Black Pine or trees you purchase from nurseries or bonsai growers, you may have to reduce and/or remove a lot of larger growth in favor of creating smaller branching and compact dense structure. In many cases the existing branching on this type of material is too chaotic and large to use.
In the first year you own this type of coarse material, focus on understanding the tree's health. Remember, only healthy and strong trees should be decandled; no decandling should be performed on weak trees. At decandling time, use large pruners or branch cutters to cut back large unusable branching. If the branches are too large to bend effectively they are usually not considered usable. These larger cuts are pruning cuts and can be performed either in summer or early fall. Performing cuts in summer leads to a more immediate reaction from the tree, but normally fall cuts will also stimulate new budding the following spring.
Watch Eric decandle a large field-grown Japanese Black Pine!
Keep the interior growth and small buds on the trunk and near the base of the branches. Thin them to 1-2 in any single location. Allow these to run if they are small or decandle them if their vigor is sufficient. Normally the first 2-4 years of working with nursery material will be devoted to transitioning the tree from course to refined through this process of removing large branching and beginning the refinement process.
In Japanese, "Tanuki" is the word for the Japanese raccoon dog, a canid species that are neither racoons or dogs, but are actually most closely related to foxes. In Japanese folklore, Tanuki were believed to be mischievous shape-shifters or tricksters. A tanuki bonsai is created by joining a living tree to an interesting piece of deadwood, creating a beautiful bonsai that looks natural. Tanuki bonsai trees are tricksters, just like their namesakes!
Creating a tanuki bonsai can make a young, affordable tree look much older and fabulous without waiting decades for it to develop. It's a great technique for bonsai hobbyists who are impatient, or who are interested in incorporating interesting deadwood into a bonsai composition.
While tanuki can be created from many different trees, this article uses Shimpaku (aka Kishu) or Itoigawa junipers as the example. The ideal Juniper to use for Tanuki will be about 10 years old, two to three feet tall and still able to bend and be manipulated into a channel carved into the deadwood. However you can start with different size live material or base it on the size of a piece of deadwood that you already have. If the material is too small it will not have enough wood in the trunk. If it is too large you will not be able to bend it to conform to the deadwood.
Looking for Kishu Juniper bonsai starters? We have plenty available here.
Steps to Bring Deadwood to Life through Tanuki Bonsai
First,find a fabulous piece of deadwood. Creating Tanuki is truly an art form, so the more fabulous the deadwood, the better. Look for a solid piece of wood (not rotted) that has interesting twists and turns.
Second,prep and clean the deadwood. You may want to strip bark to make the wood more interesting and you will need to remove any algae that may have developed and to clean-up any tool marks. The bottom of the piece can be saw-cut to allow it to sit in the container more easily.
Third,apply lime sulfur. Use a mister or spray bottle with water to get the wood lightly moist before applying lime sulfur. Use a detail brush to "paint" on the lime sulfur; using water before adding the lime sulfur quickens the time it takes the wood to turn white.
Fourth,securely attach live Juniper to the deadwood. You may want to add a nail gun to your inventory of bonsai tools! Be sure to select finish nails that will extend through both the tree trunk and the deadwood, to ensure that when it's time to repot, the entire composition can be removed in one piece. It's important for the tree to be securely attached to the deadwood to enable the roots to get established. If you don't have a nail gun available you can use finish screws (a type of screw used for trim work that has a very small head.)
Fifth,give the tree time to recover from this stressful operation. This may take 5-6 months. During this time, water and fertilize just as you would any other Juniper bonsai. The root ball will fill out and the composition can be maintained like any other bonsai.
Sixth,make your creative vision for the tree reality through wiring and styling.
Tanuki is a fun technique that can produce interesting and dramatic trees to add to your bonsai collection. Just remember to tell people your tree is a tanuki - you can trickster all you want in the creation of a tanuki, but you need to be honest and claim it as tanuki!
Want to learn more about Tanuki bonsai? Watch this video from our YouTube channel, "How to Make Amazing Tanuki Bonsai with an OG Trickster"
Mosses have been an intentional part of landscape design in the form of moss carpets and gardens for nearly one thousand years, since Japan's feudal era began in the 1100's. Japan is famous for "moss gardens", and arguably the most famous moss garden of all is at the Saiho-ji Temple in Kyoto, Japan. It was created in the early 14th century by a Zen Buddhist monk and esteemed garden designer Muso Soseki. Today tourists from around the world plan months in advance to visit Saiho-ji (by reservation only). The experience of witnessing vibrant green moss carpets is certainly soothing; in fact, the guided tour of Saiho-ji includes a meditation service!
Bonsai enthusiasts share the monks' appreciation for mosses, and moss is incorporated into many bonsai compositions. A layer of thick green moss surrounding a tree in a bonsai container ignites the imagination, adding depth and texture. A bonsai tree nestled upon a moss bed can complete the look of a miniature landscape, called a Saikei in Japanese. Live moss is a wonderful addition to a bonsai tree as its prepared for showing, but it's use is far more than just aesthetic. Moss greatly benefits bonsai trees. It holds in heat during the winter, and helps keep the soil cool during summer, which helps protect the trees' roots throughout the year. It also prevents erosion or soil loss from watering when it grows on the surface of the soil, as it will adhere to the top layer of bonsai soil and keep it where it belongs during watering.
What is Moss and How do Mosses Grow?
Moss (division Bryophyta) is a rootless plant that grows in a mat of fine threads. Mosses are categorized as bryophytes, or non-vascular plants. They don't have roots, they have rhizoids; wispy root-like extensions of the stem. Since mosses don't have roots or a vascular system, they transport water and soil nutrients osmotically, from cell to cell. Some mosses prefer hanging out in damp, shady areas; others do well in partial shade or even full sun.
Moss spreads in different ways, including dispersal of moss spores through wind and insects; fragmentation; and shoot growth. Moss doesn't have flowers. Mosses reproduce by spores that travel on air or water currents. With fragmentation, a tiny part of moss develops into a larger plant and spreads over time to cover a large area. Moss can also spread by sending out shoots; moss stems can multiply and become a colony.
Types of Moss
There are both different species of moss and different types of moss; wherever you live, the mosses and plants you see growing naturally (e.g. natives) are the best use to use with your bonsai and in your garden. Here are a few common mosses:
Sphagnum moss: There are more than 350 species of sphagnum mosses. It's long-stranded, and a thick layer of sphagnum moss is often used between the bonsai soil and the top dressing moss. Peat moss is actually from the same plant except it's dead and decayed, and usually dried and sterilized after harvest.
Silver moss*: Bryum argenteum is a type of carpet moss so expect more horizontal growth than vertical.
Sheet moss*:Hypnum cupressiforme is typically seen on the ground in forests; if you're an avid hiker, you've definitely crossed paths with sheet moss!
Common Fern moss: Thuidium delicatulum produces tall leaves up to 3.5 inches in height. Don't use if for bonsai unless you have a large bonsai (30 inches or taller) because it could cover over a third of a smaller tree trunk and make the composition look overgrown.
Atrichum Moss*: Two popular options are Big Star moss (Atrichum Undulatum) is taller, growing up to 3 inches; and the miniature Starburst moss (Atrichum Angustatum), that grows only to an inch in height. Both of these options are best for trees that prefer partial shade.
*these are the best options for creating a moss layer on the soil surface of a tree in a bonsai pot.
Where to Find Suitable Moss for Bonsai
Fortunately, it's not hard to find fresh moss at the appropriate times of the year, whether in urban areas or outside city limits. Fresh moss grows all around after a rain; in sidewalk cracks or along freeway or highway underpasses (be careful when collecting moss near moving vehicles!) Jonas Dupuich of Bonsai Tonight takes note of all the patches of attractive moss he finds growing on public property. In January (ideal collecting time in Northern California), Jonas knows exactly where to go moss collecting! Moss can also readily be found in a nearby forest or park. Note that Irish and Scotch moss, sold as groundcover commonly, are not true mosses, they are vascular plants that will compete with your tree for nutrients. They are difficult to eradicate once they become established. (pictured below is Irish Moss)
How to Collect Moss and Transplant Moss for Bonsai
The best time to collect moss is when there is the most rainfall. That could be spring or fall, depending on locale; in Northern California, January is often a great time to collect moss. Collect the moss by using a putty-knife, spatula, paring knife, or a similar flat, wide-bladed knife and try to collect relatively large patches. Keep the moss moist and transplant it quickly, laying a patch of moss in the location you would like for it to grow; ideally on top of a thin layer of nutrient-rich, water-retaining bonsai soil. To cover a large area you, use a plug method such as is used with grass. Place small pieces of moss at regular intervals over the area, and the moss will eventually grow together. After planting new moss, water it thoroughly. Keep the area damp with regular watering for the next year or so to help the moss establish well. Once established, transplanted moss should be watered at the same interval as the tree it's growing alongside. Watch this video "How to Put Moss on Your Bonsai for Show Preparation," to see this process in action!
In his book "Moss Gardening," (Timber Press, 1997) author George Schenk introduced an example of moss container gardening tied to bonsai that he called mame mosses. A mame moss is "one small enough to fit comfortably into a mame pot" and can serve as a playful and imaginative accent plant in a bonsai display.
Caring for Moss: Sunlight, Water, Soil
Moss needs water; how much water moss needs when growing in a bonsai container depends on a number of factors, including the climate and quantity and frequency of rain. During a wet or rainy season, moss will receive plenty of water from Mother Nature. In a warm climate or during a draught, moss requires regular watering, from a light mist to a more thorough showering. Also similar to bonsai plants, moss is not a "set a weekly watering reminder and forget it" type of plant. Moss does not need direct sunlight; some mosses can survive in full sun, but most prefer shade. There is an ideal soil pH for moss; about 5.5 which is acidic. Moss can grow in standard potting soil, but generally prefers compacted soil (especially clay soil).
“The forest is blanketed by the greenest ferns and moss and bonsai-like trees, a wild majesty that beckons hobbits and pixies and elves and dreamers.” - author Shannon M. Mullen
References:
"Moss Gardening, Including Lichens, Liverworts and Other Miniatures" by George Schenk, Timber Press, 1997. ISBN: 9780881923704
The Monterey cypress (Cupressusmacrocarpa orHesperocyparis macrocarpa) is an iconic coniferous tree. It's one of severalspeciesofcypresstrees endemic toCalifornia. Not only is it magnificent to witness, it also smells magnificent - crush a handful of leaves in your hand and breathe in their fresh lemony smell. If you plan to visit the central coast of California, take time to appreciate the beauty of the native stands of Monterey Pine (a coniferous evergreen), Coast Live Oaks, and above all, the native stands of Monterey Cypress. They grow along the coast in town and atPoint Lobos State Natural Reserve.
If you want to see numerous examples of the natural beauty of the pattern of Monterey Cypress growth, add the drive south of Monterey along the ocean to your must-do list. “The Lone Cypress” has been the subject of countless photos as it stands alone on a rock between17-Mile Driveand the Pacific Ocean. It recently lost a large limb but remains as picturesque as ever. The “Old Veteran” tree atPoint Lobos State Natural Reservealso recently succumbed to a storm and gravity and was reduced in grandeur when the northern half of the tree fell into the ocean. Nevertheless, it's still well worth a trip to Point Lobos to traverse the Cypress Grove trail.
Here is a gallery of images of full-size Monterey Cypress.
It can be challenging to create a bonsai that faithfully replicates the windswept features found naturally in the Monterey Cypress along the central coast. It's worth it though, just look at these examples!
Monterey Cypress bonsai by Katsumi Kinoshita, started around 1950; gallery of cypress bonsai from Eric.
Outside it’s natural habitat, the Monterey cypress has been planted widely in California with an abundance of trees along the San Francisco, Santa Cruz, Marin, Sonoma, and Mendocino coastlines. Many of the coastal trails in San Francisco are abundant with beautiful Cypress examples. The deep lemony aroma is abundant as you walk along these trails!
Below is a list of the products that are used or recommended by Eric. Please consider using the links below to make your purchase. Thank you!
Fertilizer
Fertilizer For Bonsai in Refinement and Maintenance
Slow release fertilizer is the name of the game when your bonsai is mature. If you want faster growth you can use more. Japanese Black Pines, for example like a lot of fertilizer in spring prior to decandling. Some species are salt-sensitive and better fertilized with organics. For these scenarios we recommend Bio-Gold Original.
Fertilizer is important in a container! If you find you don't stay on top of fertilization, use a time-release dose to keep your plant growing strong. Supplement with other fertilizers in rotation to speed up growth further.
Bonsai All-Purpose Fertilizer by The Bonsai Supply (Time release!)
For young plants in growing containers: 60:20:20 Perlite:Coco Coir or Bark:Lava
Perlite
We recommend coarse perlite. Perlite sizing is inconsistent across brands - we use #4 from NorCal Perlite. #3 from Mother earth are too large and porous. Size should be about 1/4"+/-
Akadama and Japanese Mixes - For older and more refined trees.
We use soil imported by Bonsai Tonight for our refined and older trees. Because Akadama is mined in Japan, it is more costly, but it is the gold standard for bonsai growth! Keep in mind it's not necessarily a better soil for rapid growth, in refinement we want steady moderate growth.
Sphagnum moss can be applied to the top of the soil to retain moisture near the surface, particularly right after repotting. Shredding it with a sifter and mixing in shredded live moss is a common practice for re-populating the surface with moss.
Rubbermaid Tough Tubs for storing soil and/or mixing. Note: these are best for indoor storage as the lids collect rainwater which is annoying. For outdoor storage, use the 'Action Packer' series.
Soil Sifting
Bonsai Soil sieves are not particularly expensive and have mesh sized correctly: Bonsai Tonight sieves
Gold sifting pans are more expensive, but they're stackable and the mesh is built in.
Eley Brass Hose valve with or without a swivel. Feels like butter in your hand. Definitely our new favorite.
Dramm Solid Brass valve - slightly stiffer than the Eley valve, but durable and tough. Over-tightening it will cause the valve lever to be hard to use. Adding an extra hose washer can mitigate this, but the nylon valve assembly is slightly too close to the threads.
Watering Wands:
We recommend you use a short watering wand to make it easier to rotate the stream and reach the plants while watering. We DO NOT recommend wands that have integrated valves as the valves normally wear out quickly and begin leaking from the assembly and can't be repaired.
16" Dramm Wand (comes with a plastic valve which is fine but annoying to use, I normally discard it.) We use these in the nursery and greenhouse.
The Joshua Roth wand is what we use in our small city yard, substituting the Eley valve (see above) for the provided one. The included breaker is very soft and good for refined bonsai.
Japanese wands
These typically do not have a threaded connection, so you must cut the fitting off your hose to use them and/or add an extra small section from an old hose. Jam the tapered end into the rubber and you get a surprisingly good connection.
This is just the nozzle/breaker. If you purchase a Dramm wand it will have a smaller hole-count (and larger holes) in the breaker head. This is the softest one we use but it's still a high-volume water supply. It fits standard American hose thread so you can also just screw it straight onto the end of a hose or add a valve without a wand, but the watering pattern is a bit more even with a wand in the middle.
An Inline system powered by water to add precise levels of fertilizer, or other liquids and soluble products to your water. The unit will draw from a reservoir (e.g. a 5-gallon bucket.) You can plumb it from your hose bib with adaptors (threads on it are 3/4" IPT) or use standard PVC inlets and outlets. In the nursery we use this for soluble fertilizer, adjusting pH with acid injection and pesticide drench applications. More useful for those with larger collections.
Low-Tech Venturi injection systems can work, but are less accurate and require some practice to use effectively. Keep in mind that the amount of concentrate injected may vary with the speed of water flow. We haven't used them successfully so we don't have a particular one to recommend.
Water Treatment and Analysis (See our Article Here for more info.)
TDS (Total Dissolved Solids) Meters.
If you live in an area where water is typically "hard" you should monitor your water quality. You can also use TDS meters to effectively avoid fertilizer dilutions that would otherwise burn plants.
Cheap and good enough for occasional use, get the water as close to 75F as possible when doing the reading for consistency
If you have high pH water (7.0 or above) and high TDS (300 or above), acid treatment can help with nutrient uptake.
Mixing 1/4 tsp of Citric acid to 5 gallons of water is a good way to purge Chloramine and chlorine from water while lowering the pH
If you use a Dosatron or other injection method and want a larger and more stable solution you can use pH Down, but it is VERY concentrated, so use caution wear PPE and measure carefully.
Reverse Osmosis Systems
For a complete solution to poor water quality use an RO system, which strips out all the salts from the water - then supplement with a nutrient solution to avoid micronutrient deficiencies.
You'll need a couple barrels, a float valve on the end of the RO outlet (in case you forget to turn it off!) and a small pump if you want to be able to water with a hose.
To add micronutrients, use DynaGro "Grow" or a similar fertilizer that contains the right ratio and all the micronutrients. Bring the TDS reading back up to ~100 to avoid nutrient deficiency.
There is a whole school of thought in bonsai that less is more; that if you eliminate something from a tree you will end up with a result that is a better, more interesting bonsai. Basically, bonsai by subtraction. I generally advocate for a different approach. As you may be able to tell from the number and variety of trees I grow from seed and cutting, I tend to grow trees into bonsai, rather than chop them down. Both approaches are valid; to me, the chop-down approach seems to be an excuse to always be making large cuts followed by carving efforts to make a tree more compact and more powerful.
So when I make the decision to eliminate large branches from trees, it's only after I've carefully considered all of my options. This is particularly true for trees that are old or well established. There is what I like to call “the first-brancher”; a tree that has been cut back all the way to nothing but the first branch of the original composition. This frequently ends up producing a tree that is much simpler, but depending on the trunk movement, not necessarily more interesting.
This little pine had been sitting around my yard for a few months, one of a large batch of trees that I got all at the same time. In 2014 I offered it for sale to a few people, but nobody seemed interested. The tree’s problem was that while it had some good trunk movement and an interesting nebari, the branching was too long to be a nice little compact informal upright. Grafting back foliage onto the larger old branches may have solved the problem; that would have taken a couple years to accomplish. Growing out a sacrifice branch to increase the trunk size also could have changed the proportions enough to make the tree significantly higher quality, given at least 2 years and as many as 5 years, depending on the finished size.
Left: before. Right: Mid-wiring; a different tree appeared. I had bent the lower two branches down and inward to make the tree more compact and more interesting. That awkward low branch on the right didn’t quite agree with me even after I bent it.
As I sat wiring the tree and bending the branches, I realized that less might actually be more in the case of this bonsai. I had bent the low branch on the right from the side and twisted it to accentuate some movement that was already there and to get the foliage where I wanted it to be in the composition. But it just didn’t quite work.
The trunk section above the second branch was also not very interesting. And, the branching that made up the top portion of the tree was almost as large as the trunk itself. I sat looking at this for a while, then had the idea to make the space between the two lower and upper branches shorter by bending the upper section of the trunk. Unfortunately, a few tweaks with my fingers told me that not only would this not greatly improve the tree, but that it was going to be difficult to get the section of trunk to set into its new position. It seems that the tree had been weak for a while and black pines tend to make very stiff wood when they are unhealthy.
After analyzing the low right branch and the top and finding them lacking I found myself staring at the second branch and the trunk line that lead to it. The tree seemed all of a sudden much better than it had before. I knew it would take at least 2-3 years to get the crown to look full, but there was no doubt in my mind that cutting off the branch and the top was the right decision.
Top Left: Off comes the top! Bottom Left: Off comes the first branch! Right: The tree after reducing to just the second branch. The composition is much clearer, more compact and more interesting.
Left: Using the camera to visualize what the tree will look like when it is just the one branch. Right: After!
As in this case, if you can make a bonsai tree drastically better by eliminating something, then less IS more!
Each fall, I can hardly wait to get started working on my Japanese Black Pines. The long summer season of working on Juniper and Cypress finally winds down, and I can get to serious fall work on all types of conifers. While I probably have more Cypress work that I could be doing (they never stop growing!) I’ll gladly take some time to go through my black pine collection and focus on needle pulling, bud thinning, and wiring.
Each tree needs slightly different work, on the stage it's in. Many of the trees that I’m growing are need wiring touch-ups each year.
This first tree was dramatically reduced the year prior - and improved in the process - but it will take a few more years to really see where we’re going with this one (the sketch below is my long-term vision.)
Before work. The tree grew shoots after candle cutting that are bit longer than desired.
After work. The central apical bud from the previous fall grew strongly and two small buds appeared at it’s base. I bent the upward growing shoot toward the back to allow the smaller buds to grow also.
Second, is a tree that is now 10 growing seasons old. The main work here is reduction of buds around the decandling sites, reduction of old needles and in this case I had to decide on a top once and for all. The prior year I left two candidates but I finally cut off the one that was larger and further to the right because it just didn’t seem like it would ever work as a compact top for the tree.
The previous year, after cleanup and wiring to create the basic style.
Six months later, a closeup of the problematic top on the right and what I ultimately decided to use on the left.
Before work.
After thinning, needle pulling, and some wiring. You can see the eliminated apex as a jin on the right near the apex.
Finally, the little tree below is one of my better successes from my second batch of Japanese black pine. I have others coming along, but none quite as well as this one. While it may be good enough to show now in most club shows, I think another year or two of refinement and repotting into a smaller container will really polish this tree.
Before work.
After needle pulling, thinning, and a little wiring.
Among American native pine species, Ponderosa is perhaps the most popular species to collect and train as bonsai. I can think of numerous other species that seem more suitable to bonsai based on needle characteristics, but the relative ease of availability of good, collectible Ponderosa specimens make them more popular than other pines (e.g. Lodgepole, Western White, or Shore).
Ponderosa can have a wonderful ruggedness to them, exhibiting bark as flaky or crusty as any tree. The sometimes twisting trunks and branching can be a wonderful starting point for a powerful bonsai composition.
A large Ponderosa – the foliage is in scale with the large size of the overall composition. The needles on this tree are two or three inches long typically.
The same tree after restyling. The needle length on this tree has come down over time and the restyling accentuates the movement of the trunk while keeping the native foliage. This tree will be repotted at a different angle and ultimately the branch on the right that is wrapped in a towel will be eliminated.
The natural variability in needle characteristics in Ponderosa is such that you might assume that there are different species. In fact, there are numerous varieties and even variation within the recognized varieties. In hiking in the central Sierra Nevada I find trees with large, straight, and slightly yellow-green needles, while trees collected in Oregon and in the Rockies seem to have shorter and greener needles. In some cases the needles are much less straight and the trees look very unkempt in their natural state. Is it important for needles to be straight for bonsai purposes? The answer to that may be an opinion rather than a fact, but having straight needles certainly contributes more to a look of cleanliness and order.
The rate at which Ponderosa grow in containers is also something of a puzzle. These are trees that can reach 200 hundred feet high in the wild; you would expect them to be able to grow quickly. Yet, across all the specimens that I have had, even the strongest typically will only make branch extensions up to about 1″ per year while in a bonsai container. The mixed curse and blessing of this is that if you have all the branching you need at the time of collection you can, in a few years, create a tree that will be very low maintenance. The opposite is true of a tree where a large amount of foliage is needed to complete the composition – it will take many years for the tree to create this in a bonsai container.
Whether or not enough foliage is present on a collected tree and the specifics of the needle characteristics are not typically among the most important factors in selecting a good specimen in bonsai. Typically you should be more concerned with the shape and movement of the trunk. But, collected Ponderosa can have an enormously-long timeline before they become show-ready if you don’t think of a way to overcome these issues.
Grafting Japanese Black Pine (JBP) or Red Pine (JRP) onto Ponderosa is one solution to both the slow-growing foliage and the sometimes undesirable needle characteristics.
A lanky Ponderosa grafted about three years ago. The old foliage was too far from the trunk to easily make a tree. While the scale of the foliage would have been fine, the twisting nature of the needles and the long branching meant that grafting was the best option. After removing the last of the Ponderosa foliage and wiring the new JBP foliage down, the tree is on its way to being a nice pine bonsai. The JBP foliage will grow quickly and the tree will likely have a good style in only 5 years, with more mature branching possible in 10 years.
Since Ponderosa cannot be decandled like JBP or JRP to manage needle size, the foliage is more difficult to use as the scale of the composition gets smaller. Trees that are under 15-18″ as a finished bonsai will often be challenging to style with good detail. While grafting has its own challenges, it is certainly a good option for smaller Ponderosa trunks.
This Ponderosa is about 15″ tall right now. It may appear that the foliage is misplaced, but in fact it’s not. A few key bends will bring it down to a good position. The problem is that the scale of the foliage will never match the scale of the composition.
After adding 5 grafts to the tree. It should take about 2 or 3 years to transition the tree to JBP foliage. After that 5-10 years of ramification and branch creation will make a wonderful small tree with wild character in the trunk and beautiful foliage to complement.
While not a traditional bonsai species, Blue Atlas Cedar seem to be good subjects for bonsai. They have short needles naturally; grow quickly under good conditions; and seem to respond well to bonsai work. I've never seen this species in Japan, and I’ve never had many of them, and those I've had generally come and go quickly from my yard. With one exception - the subject for this article has been with me since 2005.
August 2023 update: check out this video!
Years ago, Jim Gremel of Deer Meadow Bonsai told me that when he began his growing operation, he screened many different species of trees in tests to see which would be better to work with. Atlas Cedars was one of the species that he concluded were very useful. When I visited his nursery, he was making good progress; he had hundreds of Atlas Cedars growing in his fields and many more in containers.
Rows of Blue Atlas Cedar, Green Atlas Cedar, and Black Pine at Deer Meadow Bonsai.
There are more good than bad aspects of cedars, but among the species' most problematic traits is that it lacks an ability to reliably back bud on old growth. When I acquired this tree there was no growth within 18″ of the trunk. There was a good base with some nice flare to it, and a trunk with some movement, but there was nothing to use to build a canopy.
The tree had been grown in the ground by a former member of the Bonsai Society of San Francisco. He had used the double colander technique that is most often applied to pine trees; when I got the tree I had to dismantle a mess of tangled roots and colanders before potting it into a large container to grow for a year.
After the tree was healthy, I had to figure out how to use the trunk. It was clear that my only option was to graft the tree. At the time, not knowing much about grafting I was a bit flummoxed about how to proceed. I formulated a plan to do approach grafts since they were a higher success rate and I had been told that cedar are difficult to graft due to the thick bark.
My plan was to grow out shoots from the existing top branch and to bend them around gradually to be in position for approach grafting. I think I may have been inspired by a thread grafting demonstration that was using trident maples as a subject. Unlike tridents, cedars in containers send out only about 6-12″ of growth per year in my experience. Thus it took more than two years of growing and waiting before I had enough growth to get the grafts in position.
As I look back at this plan I can’t help but wonder why my past self didn’t think to obtain a couple young blue Atlas cedars from a nursery and use them for grafting…thus saving myself two years of waiting. But, as with all things, I can’t go back and do it more efficiently, instead I can only take this as a lesson - the next time I want to try something I don't full understanding, I should make a plan with someone more experienced!
I completed the grafts in the summer of 2008 and unfortunately I don't have photos of the process. I recall being nervous about the success chances and being nervous about damaging the trunk in the process. By early 2009 it appeared that the grafts were taking so I started the process of transitioning them to growing from the trunk.
March 2009, in the garden. While transitioning the grafts, bark is scraped off of one side and the wood slowly whittled away beneath the graft point.
April 2009, before work.
April 2009, after wiring. I wired the growth that would be the branching while the grafts were still transitioning. Cedars like to spring back up after wiring so I didn’t want to wait until the branch grafts took out of concern that they would already be difficult to bend.
In early 2010 I moved to SoCal. I found that cedars, like many of my other trees, didn’t grow as well in Thousand Oaks as they did in San Francisco. Thus, three years later, while the grafts had been completed and the tree was growing, it was not growing so well that I made much progress. In late 2012 I moved back to San Francisco. It didn’t take long for this tree to take off again.
October 2013, after wiring additional branching.
With the climate on my side and the tree growing well, this tree made a lot of useful growth in a short period. Between 2012 and 2015 I had three good opportunities to refine the tree, each time with a full canopy of shoots to select from. All that I had to do was choose the right ones and wire them into place. I find that wiring the branching without smashing needles is quite challenging, even more so than wiring Japanese Black Pine branching.
May 2014, before work. The new shoots that the tree made were all looking healthy and ready to be either positioned or cut back.
May 2014 after wiring some branching and reducing the tree a little.
As you can see in the after photo from May 2014, I had the notion that I was going to create another layer of foliage above the existing one. The idea in my head was that the tree needed to be slightly taller so that the taper in the trunk would match proportionally with the height of the foliage mass. I had planned to allow the top branch to grow out and then create just about another inch or so in height.
May 2015, the tree was growing quite well for the third year in a row so I was able to harness the growth and refine the silhouette once again.
December 2015 – the canopy is as refined as it will be for this year.
Ultimately, it seemed that the top didn’t need to be any taller than it already was and that filling out the sides was enough to create the silhouette that I needed. Boon Manakitivipart and I had repotted the tree back in 2011 but left it in an over-size ceramic grow pot since at the time we had some health concerns. In December 2015 the branching was looking good and it was time to prep the tree for its first show the 2016 Bay Island Bonsai show.
I had selected an older Japanese pot for the tree, one with a wide rim and flared sides because it suited the large nebari and relatively compact form. Once I settled on the container the challenge was to make the tree fit. The nebari of the tree was considerably larger than the trunk and it was very deep front to back. The tree barely fit into the container!
Repotting was challenging – the tree barely fit into the new container because of the large nebari.
The photo at the top of this article shows the tree potted up into the show container and the branching cleaned up. The 2016 BIB show featured trees under 18″ only. This tree at about 16″ stacked up nicely. Read "The Finer Points of Making a Bonsai Stand" to see the tree in the BIB show on the stand I built for it.
2021 Update:Here's what this tree looks like today! You can see how the crown and branch pads have filled out.
Over the last few years I've been using my background in woodworking (a hobby starting from childhood) to make bonsai stands. At first, this was just a way to have good-looking bonsai stands at a reasonable cost; I figured that a bonsai stand couldn't be that difficult to recreate. More recently, this work has turned into a desire to create unique pieces in the tradition of both western and eastern woodworking.
Anyone who's ever thumbed through an issue of Fine Woodworking is familiar with the concept of a mortise and tenon joint, one of the foundations of woodworking in western traditions. The intricate and complex joints that have historically been used in Japanese and Chinese furniture are far less familiar to the casual woodworker.
I used this Kokufu-ten show book as reference material.
A concept drawing for a stand at left and a traditional stand at right. For this article I’m focused on replicating the stand in the photo.
I normally start with creating the top of the stand. The size of the panel is largely determined by the size of the bonsai pot that you want to put on it. Traditionally, the feet of your pot should sit comfortable inside the rectangle created by the outside of the panel and inside of the frame.
Gluing up the two halves of the panel for the top.
The frame for the panel is four pieces of wood - just like a picture frame - mitered at the corners. For this stand I’m also using an integral through-tenon, which is a piece of wood that will neatly hold the joint together even absent any glue.
With the panel ready, and the frame pieces already cut to include a groove to fit the panel sides, I set up a table saw sled with a miter jig to cut the sides off the tenon and create the miter.
The mitered frame pieces, with integral tenons, ready for some fine-tuning and dry assembly.
The integral tenons slide into mortises in the front and back.
Looking at part of the assembled top, the end of the tenon is visible on the front of the stand. Pencil marks show how the side piece goes through the front piece.
With the top done I moved onto the leg assembly. The simple elegant look of a three-way miter belies the complexity of creating a system beneath the facade that will hold three pieces of wood together. Glue alone is not enough.
The top of the legs – they contain a miter on the outside, and two different mortise and tenon systems on the inside.
A view from the back as the joint comes together.
The traditional stand in front with a second stand, destined for a slightly different finish behind. The two are similar, but the leg joinery is different. They will be similar in size, but have different looks when finished. Both stands are simply fit together here, no glue except on the center joint of the panel. The joinery is such that the stands hold themselves together. Ultimately they’ll be glued together also.
After creating the joinery and fine-tuning the fit of the pieces it’s time to cut the legs to shape. I use a template to make sure each leg is the same. And another template for the aprons.
A view of the legs and side pieces after cutting them on the bandsaw.
With the pieces roughly shaped on the bandsaw, the look starts to become more obvious.
The next steps will be to do the final shaping in the legs and aprons, then glue them and add the finish. There’s more sawdust on the way.